Apple packs the iPhone’s camera app with loads of features, making it useful for beginners as well as professional users. iPhone’s cameras are designed in a way that you can use them to capture precious moments of your life without any basic camera knowledge, at the same time it allows you to shoot amazing videos using pro features that will turn heads on YouTube or even in the filmmaking community. You’ll often find content creators shooting their whole YouTube video using features like Cinematic mode, HDR, high frame rates etc. The iPhone’s camera has come a long way than you think. If you own the 2021 iPhone 13 or even the iPhone 12 series, you can do a lot by utilizing its excellent camera hardware, and smart camera app which makes snapping professional looking pictures easy enough for even your school-going kids. Even though Apple offers a lot of features in the iPhone’s default camera app, many of us don’t bother using it or simply are not aware of their existence. Believe it or not, these top iPhone camera tricks will instantly improve your photography/videography experience and we’re going to share those with you.
After hours of research and findings, our team has come up with this guide where we’ll talk about various tips and tricks to make the most out of your iPhone’s camera. After reading these camera tips for iPhones, you’ll be able to take professional-looking photos and videos. Let’s not waste further time and keep on reading to learn how to use these iPhone camera settings to shoot incredible photos & videos every time you press the shutter button.
List of Must-try iPhone Camera Tips & Tricks
We’ll start off with the basic tips. The article has been divided into different categories of some of the top iPhone camera tips and tricks based on their functionality and ease of use. These camera tricks and hacks will work on the flagship as well as older iPhones like the iPhone 11 and iPhone 12. If you’ve got an older iPhone, you can take advantage of new features by using a 3rd party app that offers similar features.
Basic Camera Tips & Tricks for iPhone
1. Clean your camera lens
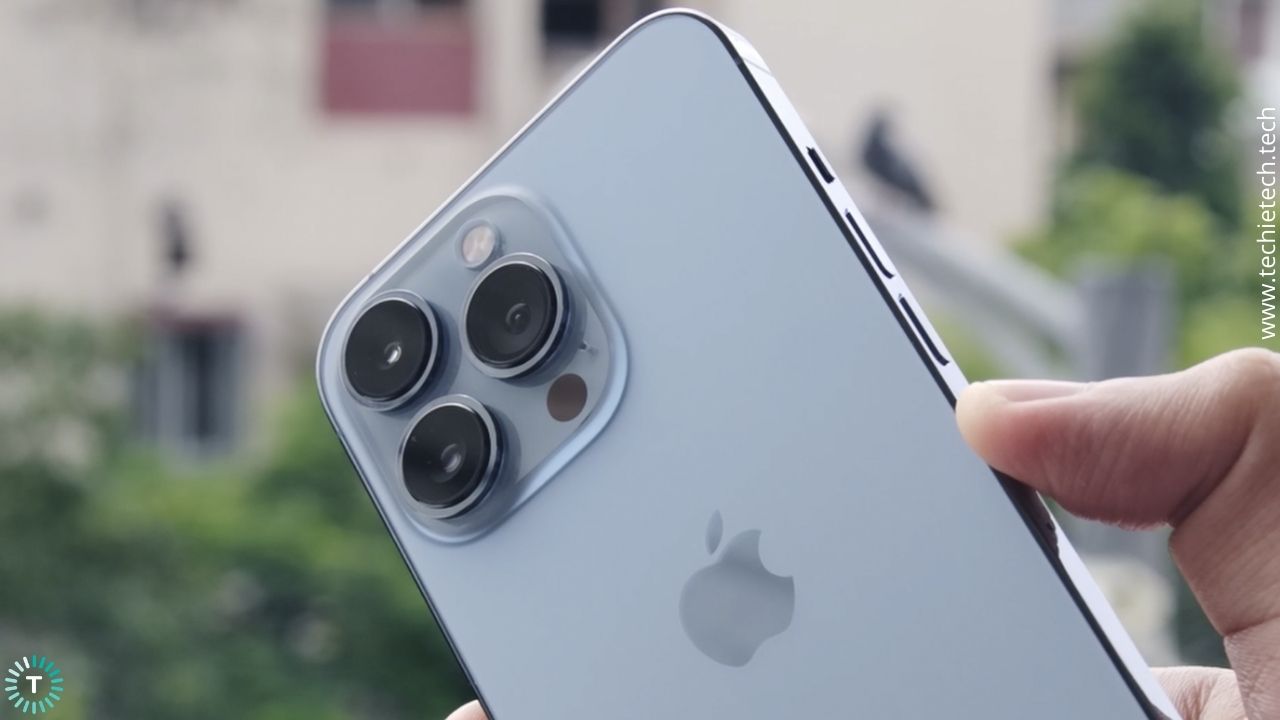
A good photo or video can only be captured if the camera lenses are perfectly clean. You don’t notice it but your iPhone camera does come in contact with dust and dirt particles, lots of times it has your fingerprint imprinted as well. Why am I saying that? It’s because a dirty or blurry iPhone camera lens will degrade the photo or video quality. You won’t be able to notice it by looking at the picture because the iPhone will automatically try to fix the grime and smudges in the pictures by editing them. This is especially noticeable when you’re shooting videos on your iPhone and you will notice some blurry artefacts when watching the video on a larger display.
Therefore, to prevent this and capture clearer and sharper pictures & videos, we recommend cleaning the iPhone camera lens every time you shoot anything. You can simply perform the following steps to clean your iPhone’s camera lenses:
- Take a wet wipe/cloth and initially clean the camera
- Next, use dry wipes/cloth
- Lastly, use dust removing stickers (if available) to catch dust particles, and you are good to go.
- If you’re on the go and do not have access to your cleaning kit, we recommend using a dry microfiber cloth to remove the grimes and fingerprints.
This basic camera tip will work with any iPhone whether it’s the iPhone 13 Pro Max or the iPhone 8 Plus from 2017.
Also read: How to fix common iPhone 13 Pro and 13 Pro Max problems
2. Get close to the object rather than zooming on it
While there’s digital zoom in the iPhone camera, it’s not optical zoom. The difference between optical and digital zoom is that the quality of the image does not degrade when you zoom in optically. On the other hand, if you zoom in digitally, the quality of the image will deteriorate as the rest of the image gets cropped out. So, you’re losing pixels & data while zooming in digitally. To be honest, digital zoom isn’t “zoom” at all. This feature only crops the images and makes them look grainy and pixelated on an iPhone’s sensor. The grainy digital zoom is less noticeable on modern iPhones but when viewed on a larger display, the difference is still recognizable.
If you want to zoom in on an image, you can do either of these two things.
You can either use the telephoto camera on your iPhone to zoom in optically or you can physically get closer to the object.
We recommend locking the specific area in the frame by either using the telephoto lens or moving physically and then fixing exposure by tapping on the subject and then hitting the shutter button.
Having said that, the digital zoom option has certain applications but shouldn’t be used in every shooting scenario. Instead of relying on digital zoom, simply move closer to the object.
If you’ve got an iPhone with a telephoto lens, instead of manually rotating the dial to zoom in, tap on the 2x, 2.5x or 3x (depending upon the telephoto lens on your iPhone) button to zoom in optically. This will ensure that you zoom in optically only without any digital crop. This iPhone camera tip will allow you to capture sharper and more detail-oriented pictures and videos no matter the situation.
Also read: How to fix Bluetooth not working on iPhone 13
3. Adjust exposure to achieve perfect brightness levels
There is no doubt that the iPhone’s automatic camera settings make your life pretty easy, but sometimes you need to take things into your own hands. Yes, we are talking about manually adjusting the exposure.
First of all, don’t sweat as we will keep this article free from any photography technical jargon. In simple terms,
exposure is basically the amount of light that reaches the iPhone’s camera sensors. It devices whether the picture is going to be a bright one or vice versa. It is adjusted by toggling with three settings namely, the shutter speed (the time for how long the sensor will capture the light), and the aperture (the size of the hole in your camera lens through which the light passes and hits the sensor) and the light sensitivity of the sensor i.e. ISO. The iPhone’s camera takes care of all these settings automatically when it focuses on the subject. You might see the image getting a lot brighter or darker as you tap on different areas of a picture. For example, the overall exposure of the image will get brighter if you tap on a dark area in the frame. On the flip side, the overall image will get darker if you tap a light area in the frame on your iPhone’s display.
You can adjust the image exposure in the following three ways:
- Automatic: You can let the iPhone adjust the exposure automatically.
- Manual (Slider): You can adjust the overall exposure of the image by using the exposure slider to get your desired look.
- Manual (Tap to expose): You can achieve a particular look by manually exposing part of an image by simply tapping on it.
Here’s how to manually adjust the exposure using the slider on the iPhone camera:
- Once you’re in the camera app, tap to focus on the subject of the photo
- Then, slide up or down on the viewfinder.
- Tap the exposure icon (highlighted in the screenshot below).
- Next, you’ll see the exposure slider. You can move along with your swipes, while you’ll notice the image become overexposed, or underexposed, depending on which way you move the slider.
- If you move the slider to the right (subject to the iPhone model), you will see the image getting over-exposed. Whereas, the image will get underexposed/darker when the slider is swiped to the left (subject to the iPhone model).
You need to know that the exposure adjustment is required for the desired result like silhouettes, portraits in harsh sunlight, extremely dark or challenging environments, etc. So, you can use this feature where there are both shadows and sunlight at the shooting scene.
Also read: How to fix iPhone 13 overheating problems
4. Switch on the grid for better framing
Most people who love photography know the Rule of Thirds. It is one of the essential rules for composing a photograph. In simple terms, this rule suggests placing the subject of the photo in one of the intersection points of lines on a 3×3 grid makes the photo or video visually more striking. For anyone unaware, the camera grid is a feature that divides the frame of your photos using two lines that run horizontally and two lines that run vertically along with the screen. Placing the subject photos at the points where those lines intersect can make them much more visually striking. When enabled you’ll see 9 squares overlayed along with the screen. Putting it simply, you will see an empty tic tac toe grid for better framing.
Here’s how to enable the camera grid in the iPhone camera:
- Go to Settings
- Tap on Camera
- Scroll down and toggle the Grid option.
You’ll see these 9 squares in the camera app now. Use these for framing your photos and videos.
Also read: How to fix iPhone 13 not charging issue
5. Switching from a photo to video mode using the shutter button
Have you ever rushed to take a video on an iPhone to capture an amazing moment? By the time you navigate to the video mode or even forget to hit the record button, the moment is already gone. You are not alone, many iPhone users have suffered this. So, to prevent this and help you instantly switch from taking photos to videos, you can take the advantage of Apple’s QuickTake feature. This useful iPhone camera trick allows recording a video without leaving the Photo mode or any extra gestures. You can use this iPhone camera trick on an iPhone XS, iPhone XR, or later.
Here’s how to switch from photo mode to video mode using the shutter button:
- Open the Camera app.
- Press and hold the Shutter button. Now, your iPhone will start recording.
- After the recording is done, release the shutter to end the video.
Alternative way:
If your iPhone is running on iOS 14 or later, you can also use the Volume Up button to take a video. Simply hold the Volume Up button while in Photo mode to start recording.
Note: Remember that you should hold the button until you’re done taking the video.
If you want to record video without holding the shutter button, please follow the steps given below:
- First, slide the Shutter button to the right, then release it.
- When the video recording is locked, a shutter button appears to the right; tap it to take a still photo during the video recording.
- When you’re ready to stop recording, tap the record button.
Also, you can use the shutter button for Burst Mode. Here’s how to do it:
- Slide the shutter button to the left and hold it to take a burst of photos, then release it to stop.
- On an iPhone XS, iPhone XR, and later with iOS 14, you can capture photos in burst mode by pressing the Volume up button. For that, you can just go to Settings > Camera and turn on Use Volume Up for Burst.
Also read: How to fix iPhone 13 not charging wirelessly
6. Use camera lens protectors to keep the camera lenses safe and secure
If you are looking to protect the camera of an iPhone, a camera lens protector can be very handy. A camera lens protector offers good protection against fall damages and keeps the camera lenses of the iPhone in one piece. Other than fatal damage protection, camera lens protectors also offer protection from annoying scratches that may appear on the rear lens due to daily wear and tear. If you’re an adventurous photographer or someone who likes to vlog in the wild, then we recommend pairing your iPhone 13 with a protective case and camera lens protector. Here are some of our recommendations:
- Best Camera lens protectors for iPhone 12 Pro and 12 Pro Max
- Best Camera lens protectors for iPhone 13 Pro and 13 Pro Max.
Also read: How to fix Wi-Fi not working on iPhone 13
7. Use Siri to start the iPhone camera
Siri is one of the most versatile and amazing virtual assistants by Apple. Other than opening apps, calling your friends, and telling jokes, there are many more things you can use Siri for. Did you know Siri can even help you take pictures and videos hands-free? You can trigger Siri to enable the iPhone camera right from the lock screen as well as the home screen.
You can simply do that by saying commands such as “Hey Siri, take a photo.” Having said that, you need to hit the shutter button yourself to take photos or videos. This iPhone camera trick is particularly useful if you’ve mounted your iPhone on a tripod or dashboard and want a quick look at yourself or the subject without messing with the position of the iPhone.
Please note that you need to have Voice Control enabled to perform this iPhone camera trick. You can do this by going to Settings > Accessibility. Once you land on the accessibility page, please make sure to toggle the switch ON beside the Voice Control option.
Also read: How to improve iPhone battery health
Intermediate Camera Tips & Tricks for iPhone:
8. Use a Tripod or a Gimbal for stability
Shaky hands while shooting can easily ruin your photos and videos even if you’ve got the most optically stable iPhone. So, if you are among those who find it difficult to keep their hands stable while shooting a video while running behind a toddler or snapping family portraits,
iPhone camera accessories like tripods and Gorillapods can be useful for you. You can also use smartphone stabilizers or gimbals to get the perfect shot without even touching your iPhone. You can simply attach your iPhone to such a device and take advantage of 3-axis stabilizer motors, hands-free gestures or remote control to take photos or record jitter-free videos. Tripods, monopods, and smartphone stabilizers are usually used by vloggers or content creators across the globe. What’s stopping you from trying it? In fact, we recommend you try these accessories to make the most out of your iPhone’s camera. Make sure to check out these tripods and Gorillapods by Joby. They’re one of the best camera accessories brands in the market. For mobile gimbals, you can check out DJI and Zhiyun, they offer value for money and reliable smartphone stabilizers.
Also read: How to fix 5G not working on iPhone 13
9. Enable Geolocation & Add Captions to Photos
Do you travel a lot? Are you a travel vlogger? Do you take a lot of pictures & videos? If so, you will find the geo-location tagging feature very helpful. This iPhone camera trick helps you tag your photos with the exact location coordinates at which they were shot. Geo-location tagging features will help you stay on top of all your memories in years to come. You can also filter out the photo using the location name in the Photos app of your iPhone.
Here’s how to enable geo-location for the camera app on iPhone:
- Go to Settings
- Tap on Privacy
- Then, tap on Location Services
- Now, tap on the Camera and select the “While using the app” option.
- You can further change the settings to allow the camera app to either use your precise location or exact location.
Another must-know iPhone camera tip is to add captions or alt tags to your photos and videos. This helps you search and filter important media in the Photos app. Here’s how to add a caption to your photos on iOS:
- Open the picture or video in the Photos app.
- Tap the i icon or swipe up the picture to reveal the info panel.
- Hit the caption box and write the keywords that you want to associate with the picture or video.
Now, you can search those keywords in the Photos app and the tagged picture will pop up in the search results. This is a very useful feature if you take a lot of photos of documents or you can even caption your driver’s license for faster accessibility.
Also read: Top 5 Free Fitness Apps for iPhone
10. Shoot epic Ultrawide Portraits with Panorama mode
If you own an iPhone, you probably know how to take a panoramic photo. It is a great way to capture the scenery with an ultrawide field view without losing details. But did you know your panoramic photos don’t only have to be horizontal? Suppose you are in front of a tall building and want it in the background of your portrait, how would you capture the full view? Not possible with the horizontal panning or the ultrawide lens, right? So, you need a way around to deal with this. Simply pan your device vertically to take epic photos. By doing this you can fit tall trees, monuments, and even the Burj Khalifa, in your photos. Here’s an outcome of the vertical panorama that we want you to check. It’s one of those little-known iPhone tricks that many users are unaware of.
Here’s how to take a vertical panorama:
- Open the camera app
- Swipe right to “PANO” mode
- Hold your phone horizontally
- Press the camera button
- Follow the arrow to shoot the image panning the device vertically
- Tap “Done” when complete.
For the best use of the image please rotate it and you are good to go.
View this post on Instagram
Also read: Best Productivity Apps for iPhone & iPad
11. Use Apple Watch or EarPods as a Viewfinder & Remote
Did you know that your EarPods or Apple Watch can help you take a family portrait when there is no one to press the shutter button? Yes, you can also use these Apple accessories to hit that record button while you’re trying to start a TikTok trend or complete an Instagram Reel challenge. This iPhone camera trick lets you frame your shots using your Apple Watch if you’ve mounted your iPhone on a tripod or simply do not want to adjust its position. The watch shows you a preview of the camera display so you can easily hit the record button along with features like mode switching and easy zoom.
Here’s how to control the shutter button using Apple Watch:
- Open the Camera Remote app on your Apple Watch. Make sure the Watch is connected to your iPhone.
- Position your iPhone to frame the shot using your Apple Watch as a viewfinder.
- To zoom, turn the Digital Crown.
- To adjust exposure, tap the key area of the shot in the preview on your Apple Watch.
- To take the shot, tap the Shutter button.
Here’s how to control the shutter button using wired EarPods:
- Keep the camera app open and mount or place your iPhone on a tripod.
- Now, using the volume buttons on your Apple EarPods will snap a picture.
Also read: Best Language Learning apps for iOS
12. Set the focus for tack-sharp photos
In photography terminology, tack-sharp means taking a sharp image of the subject with crisp details, clean lines, crisp details, and no blurring. Remember, achieving this level of sharpness is one of the vital factors to capture eye-catching photos with your iPhone’s camera. If you are wondering how to master this iPhone camera trick, then you’re in luck because the method is quite easier than it sounds. After opening the camera app, set the focus by tapping on the subject that you want to stand out/focus on in the picture. You’ll see a square on the subject’s focus area, along with a “Sun” icon on the side of it. The “Sun” logo is the exposure slider which can lower the image’s overall brightness or increase it depending on the upward and downward swipe. For most users, the iPhone’s AF (Auto Focus) /AE (Auto Exposure) feature does a pretty good job. But, for some people who are aiming for a particular look or style, manual focus and exposure are the best bet on an iPhone camera. In short, if you are not satisfied with the exposure and focus on the image, simply lock the AF (Auto Focus)/AE (Auto Exposure) so that your iPhone doesn’t change it. If you’re a professional, we recommend using a third-party camera app with focus peaking support.
Here’s how to use the AF/AE lock on the iPhone camera:
After you have set the focus and desired exposure level, simply tap and hold that part of the screen for a few seconds that you want to focus and expose for. When you see the AE/AF lock popup on the screen, release your finger and you’re done. Remember, the AF/AE even remains locked after you’ve pressed the shutter button. This is a great feature as it allows you to take multiple shots with the locked focus and exposure level. This is especially useful for product photography or macro shots.
Note: When the AE/AF Lock is activated, the focus is locked on that part of the scene and will remain locked until you tap another part of the screen.
Also read: How to Hide Apps on iPhone and iPad
Pro Camera Tips & Tricks for iPhone:
13. Double-tap the iPhone back to start video recording
One of the coolest iPhone camera hacks has to be double-tapping on the back to record videos. Please note that it is not a standalone feature, but it is possible through a combination of custom shortcuts assigned to an accessibility feature. Shortcuts are basically a combination of actions that can be created to do several things on iPhones without much hassle.
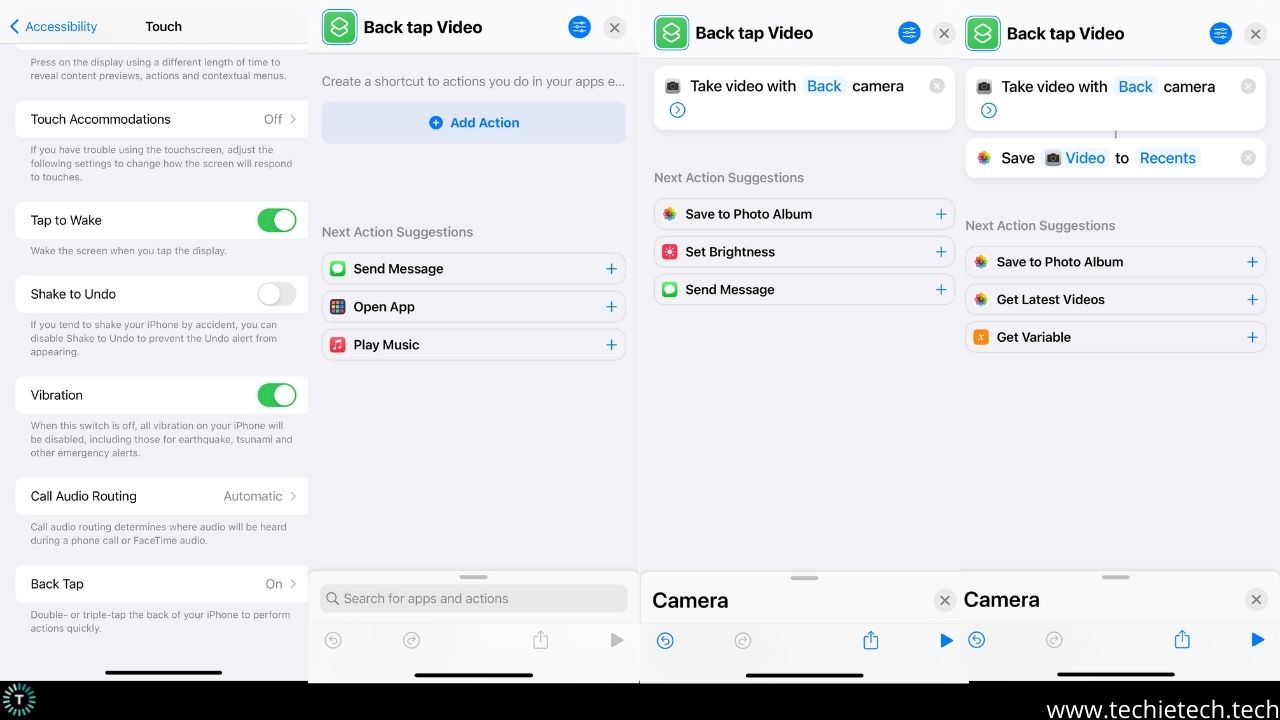
Before we can assign the shortcut to the accessibility button, we need to create our custom shortcut. Here’s how to create a custom camera shortcut on iPhone to record or shoot a video:
- Head to Settings
- Tap on Accessibility
- Then, tap on Touch
- Scroll down, then select Back Tap
- Tap on the Add Action button
- Create a shortcut to Take Video with Back Camera
- Then return to the Back Tap page
- From the option, tap on Double Tap or Triple Tap
- On the next page, Scroll down to the Shortcuts area, then tap on Back Tap Video, and you’re done.
Now, whenever you need to record a video of a baby walling or a pet jumping, you just need to double-tap or triple tap on the back of the iPhone and it will start recording a video. No need to open the camera app, swipe to video mode and hit the record button.
Also read: Best apps for iPhone 13
14. Shoot in ProRes for Unmatched Video Quality & Seamless Post-Production Workflow
With the launch of the iPhone 13, Apple also added support for ProRes video format in the iPhone 13 Pro models. ProRes video is important for professionals and content creators for several reasons. With ProRes codec support, the iPhone retains more video data and colour information as compared to more aggressive compression technologies like HEVC. Apart from this ProRes offers unmatched video quality, better colour grading possibilities & more advantages over regular/default codecs. If you’re a serious content creator or a filmmaker then this is the ultimate iPhone camera tip for you. If you’re new to this and just want to try this feature out then make sure your iPhone has plenty of free storage as ProRes files are 30 times the size of a regular video file.
Also, shooting in ProRes means the video is shot and saved in a format that video editing softwares already likes to work with. In simple terms, ProRes files are easier for the hardware to process and edit.
Also read: Best apps for iPhone 12
15. Shoot in ProRaw
Previously iPhone users were able to take raw photos using a third-party app like Halide or Moment, which has now changed after Apple introduced the ProRaw feature with the launch of the iPhone 12 back in 2020. Please note that ProRaw is supported only on the iPhone 12 Pro and iPhone 13 Pro series devices only. If you’re unaware, ProRaw captures and processes a fully uncompressed RAW image file along with iPhone’s computational photography & image processing pipelines.
In short, ProRaw gives a lot of flexibility and control over image data for professionals or enthusiasts who love editing photos after they’ve shot them. Please note that the file size of ProRaw files is significantly larger than the standard JPEG shot on an iPhone. If you want to capture the most amount of details in a challenging shooting environment, then we recommend shooting in ProRaw and developing for editing your pictures later.
Here’s how to enable ProRaw on a compatible iPhone:
- Go into Settings
- Tap on Camera
- Now, tap on Formats
- Toggle to turn Apple ProRaw ON from under the new Photo Capture section.
After enabling it, you’ll see a new RAW button on the top-right for quickly switching between ProRaw photos and JPEG (or HEIC) photos.
Note: RAW pictures do not look as good as a processed JPEG or a regular picture. It needs to be developed and processed in a photo editing app like iOS’s Photos app.
Also read: Best Apps for M1 powered MacBook Air and MacBook Pro
16. Enable Dolby Vision HDR to shoot better videos
Apple surprised its users with a plethora of features with the launch of the iPhone 12 and iPhone 12 Pro. Apart from MagSafe and other software features, the tech giant introduced Dolby Vision HDR recording, playback & editing on iPhone. The introduction of this iPhone camera feature was hugely appreciated. This is a game-changer feature for users who have invested or own Dolby Vision TVs and displays. In fact, most modern TVs for Apple TV, entertainment or gaming support Dolby Vision HDR. Dolby Vision support adds dynamic metadata to the core HDR image data. This metadata carries scene-by-scene instructions that a Dolby Vision-capable display can use to make sure it portrays the content as accurately as possible. In simple terms, the videos shot in Dolby Vision HDR will look brighter, and have more details, especially in darker and bright areas like shadows and bright skies. Having said that, you need to have Dolby Vision supported displays like OLED TVs, monitors, etc. to enjoy videos captured using Dolby Vision HDR.
Here’s how to enable Dolby Vision HDR:
- Head to Settings
- Scroll down and tap on the Camera option.
- Now, tap on Record Video
- Toggle on HDR Video ON to enable Dolby Vision
That’s it. The process is very easy and requires no external hardware. Now, you can record videos up to 4K at 60fps in 10-bit Dolby Vision HDR.
Also read: Best Stress Relief Apps for iPhone
17. Shoot videos in the cinematic mode for a professional look
Apple keeps offering more and more to the iPhone photography geeks and filmmaking enthusiasts. In 2021, with the launch of the iPhone 13 series, they introduced Cinematic Mode. You can use the cinematic mode to shoot videos with blurred backgrounds keeping the foreground subject focused to deliver professional-looking videos. Here’s the best part, after you’ve shot videos in cinematic mode on a supported iPhone, you can blur the background by adjusting the focus manually or let the AI handle the focus tracking.
In simple terms, it is just like the Portrait photo mode on a smartphone but Cinematic mode makes this feature available for videos and you can adjust the focus and the amount of blur during and after shooting as well.
What cinematic mode does?
The cinematic mode uses computational photography abilities to detect when a face or object enters the frame and automatically shifts focus to that. To further guide the viewer’s attention, if the subject in focus looks away, the Cinematic mode will shift focus to another person. It works with moving subjects, too. To keep the focus intact, you can manually select a subject by tapping on the screen or tapping twice to lock the iPhone’s attention.
You can change the focus on the subject after the video is recorded, through the default Photos editing app. You can narrow the depth or deepen it based on the subject you want to keep the focus on and which one to blur. The Bokeh feature available on modern-day Android smartphones also does the same using AI but the overall quality and user experience is nowhere near iPhone’s.
Also read: Safest Video Calling Apps in 2022
That’s all for now in this article where we have discussed some amazing tips and tricks to make the most out of the iPhone camera. We will be updating this article soon, stay tuned and bookmark this blog.