iPhones are ultra-popular for their amazing imaging capabilities. From capturing beautiful selfies to eye-catching videos, a regular user can do it all on his iPhone, without the need for any additional apps or software. Having said that, it doesn’t mean you can never face any issues with your iPhone’s camera. There can be instances when you want to capture an important moment of your life and your camera throws an error. Sometimes, the camera app on your iPhone malfunctions or becomes unresponsive. Just imagine getting a black screen or out-of-focus photos when you open the Camera app on your iPhone. It’s annoying, isn’t it?
To help you, we’ve come up with our troubleshooting guide on how to fix the iPhone camera problems. So, whether you get a black screen or blurred photos, every time you open the camera app, or if you just can’t find the Camera app on your iPhone, this guide will help you fix them. Also, if you’re not able to use your iPhone camera with a specific app, let’s say Instagram, this guide will help you fix that issue as well.
So, just be ready to kick out those irritating camera issues on your iPhone and start taking great photos and videos again.
You can follow this guide to fix camera issues on all the iPhone models, starting from iPhone 8 and 8 Plus, the older flagships iPhone XR, XS, XS Max, to the iPhone 11 series and iPhone SE 2020.
Got an older iPhone model, like iPhone 6, 6S, 7, or 7 Plus? Don’t worry, most of the steps mentioned below will work for them as well.
Disclaimer: Proceed at your own risk, TechieTechTech will not be responsible if anything goes wrong with your device.
How to fix iPhone Camera not working issues?
We’ve listed some commonly faced camera issues by iPhone users. We’ve also included some methods on how to fix software issues on your iPhone camera. So, whether you’re struggling with the iPhone camera’s black screen issues, or if you’re getting blurry photos on your iPhone, we’ve mentioned some effective workarounds for them. So, let’s get started.
How to Fix iPhone Camera not working or Black Camera Screen issue?
The steps mentioned below can be used to fix black screen camera issues on your iPhone as well as iPad.
1. Close and reopen the camera app
Sometimes, the Camera app on your iPhone is not loaded properly, and that’s the reason why you face the black screen problem on your iPhone camera. It usually happens when you’ve got a lot of apps running on your iPhone, and you head to the Camera app at that time, and in such a case, the app might not load up properly.
One of the easiest ways to fix the iPhone camera black screen or not working issues is to close out and re-open the Camera app. Some minor app glitches can be easily fixed by closing out the app and then reopening it.
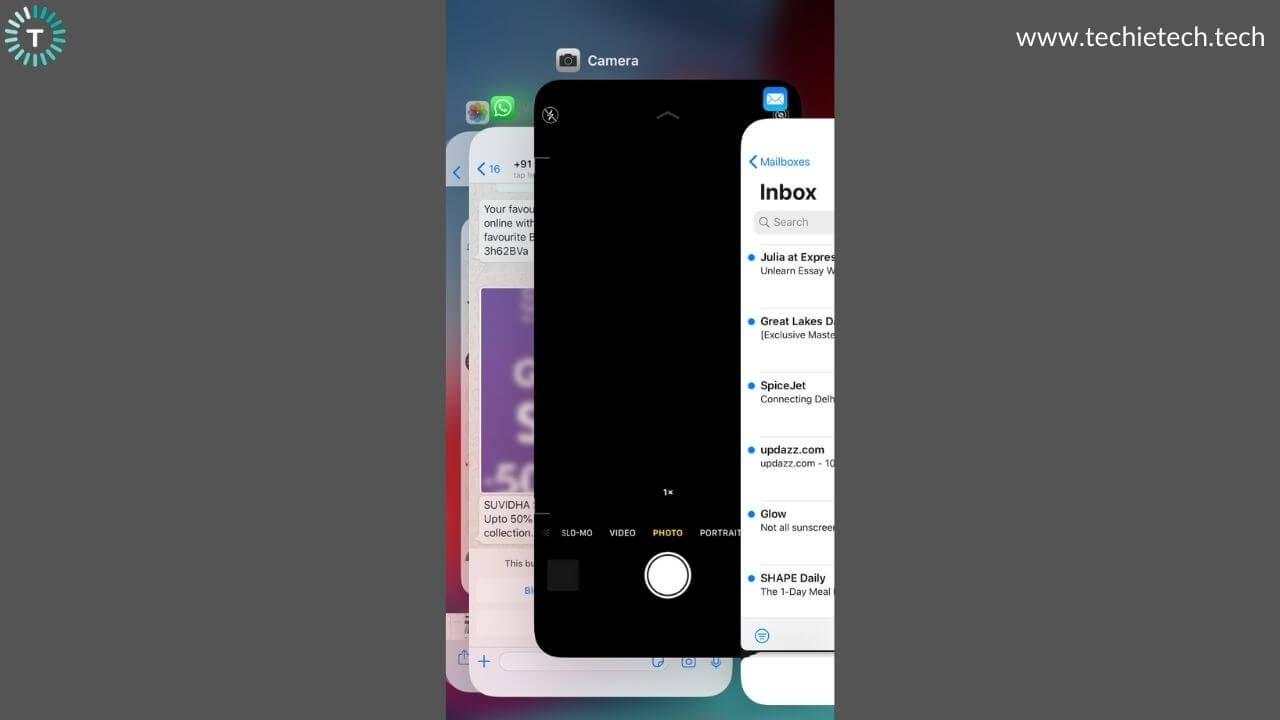
To close the Camera app on iPhone X or later models, go to the Home Screen, Swipe Up, and pause in the middle to open up recent apps. Now, swipe up on the Camera app icon to close it.
To close the Camera app on iPhone 8 or earlier models, press the Home button twice, and you’ll see the recently opened apps. Swipe up on the Camera app preview to close it.
After closing the app, wait for a few seconds, and then open the Camera app to check if the issue has been fixed.
2. Switch your camera to front/rear
If reopening the Camera app did not help you, switch between the front and rear cameras to check if they are working or not. This may sound very basic, but this trick has helped a lot of users to fix the black screen or camera not working problems on their iPhones. If you’re unable to use the front camera, try switching to the rear camera by tapping the camera flip icon available at the bottom-right of the screen. This is because switching from the front to the rear camera usually resets the camera app and brings back the view through the selected lens back into focus.
3. Use the Stock Camera app
If your iPhone camera is not working when you’re using a third-party camera app, the camera issue could be due to that app, and not your iPhone’s camera. Third-party camera apps are more prone to crashes, bugs, and other problems. Undoubtedly, the stock camera app on your iPhone is more reliable than any third-party camera apps.
Therefore if your iPhone’s camera is not loading or working on a 3rd party camera app, try switching to the native camera app. If you still want to use the third-party app, first try to close and reopen that app. If this does not help you, check if there’s an update available for that particular app in the App Store.
Also, go through the most recent app reviews to check whether other users have also faced this issue.
If the app is already running on its latest version, try to delete and install that app again.
4. Remove the case and metal attachments
Make sure that the iPhone lens is not physically blocked. If you’re using a case with your iPhone, make sure it’s put on correctly. Sometimes, metallic and magnetic cases interfere with your iPhone’s camera. Also, double-check that nothing, including a part of your tripod, mount, holder or your hand is blocking the camera lens. Moreover, if you’re using an external mobile lens attachment like the Sirui lens or any other camera accessories for your iPhone, make sure you’ve mounted them properly.
It’s a good idea to remove your case and other add-ons and then check if your iPhone’s camera is working properly without them or not.
Also read: Best clear cases for iPhone 11
5. Disable Voiceover feature
You may experience some camera glitches when the Voiceover feature is enabled on your iPhone.Therefore, firstly, disable this feature on your iPhone, and then try reopening the Camera again.
Here’s how to turn-off voice-over feature on iPhone:
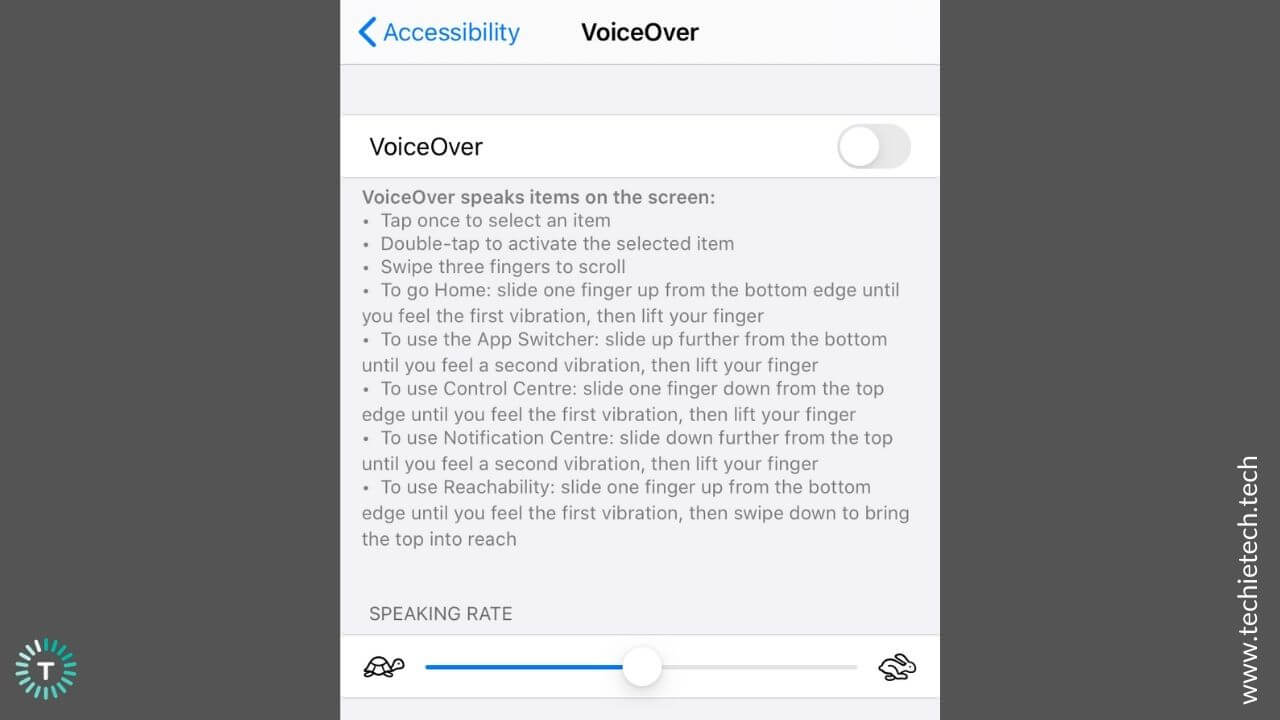
1. Head to Settings > Accessibility
2. Tap Voiceover
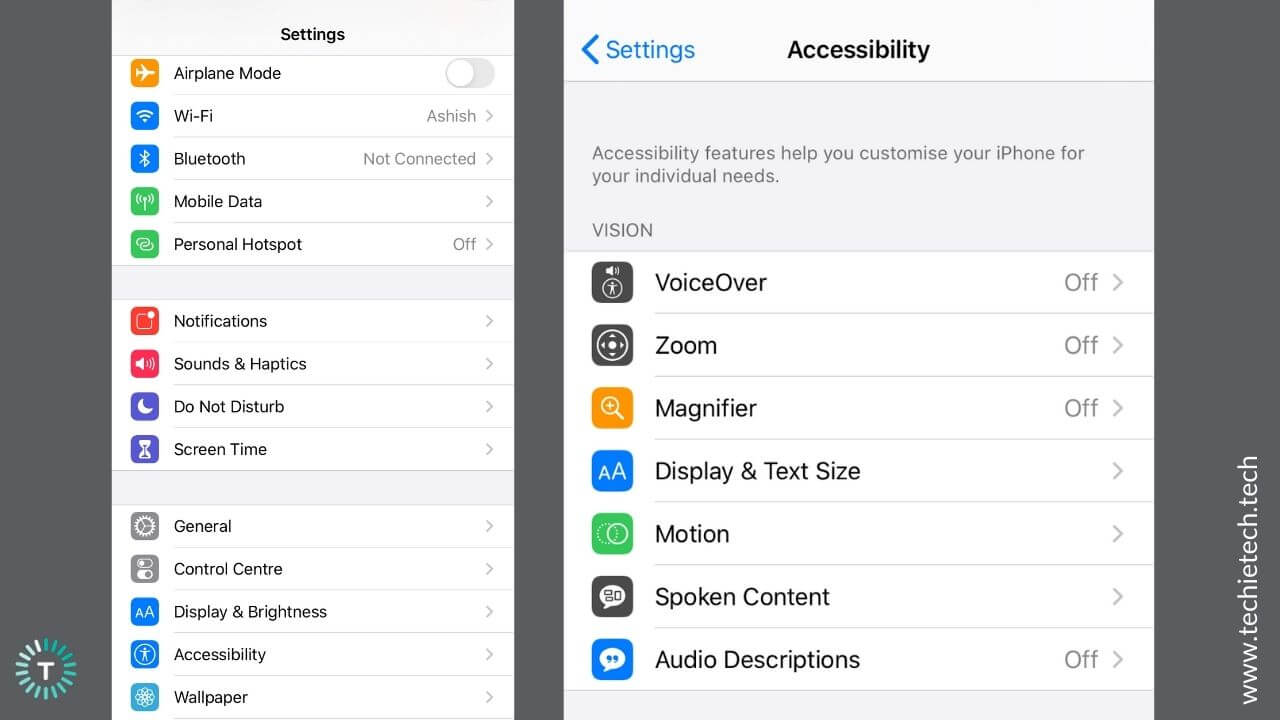
3. Turn the slider OFF for Voiceover
6. Try using FaceTime or any other video-calling app
If you’re still getting black screen issues, try to use your iPhone’s camera via a different app. Try FaceTime or any other video calling apps to check if you’re able to make a video call. Open the app, make a call to your friend or a family member, and check both the cameras. If both the front as well as rear cameras are working properly during a video call, there’s some software issue with the camera on your iPhone. Read on, to fix such software issues on the iPhone camera.
Many users have got positive results by performing this step. Therefore, make sure to give it a try.
7. Restart your iPhone
If you’ve restarted the camera app several times, and it did not work for you, then try restarting your iPhone. Generally, rebooting the device helps to fix minor software glitches that are causing iPhone camera black screen issues. This trick is supremely-useful in fixing several issues like No Service or charging issues on the iPhone. So, make sure that you don’t skip this step.
For iPhone X or later, press and hold the Power and Volume Down keys simultaneously until you see the “Slide to Power off” option.
To restart iPhone 8 or earlier, press and hold the Power button until you see the “Slide to Power off” option.
If you’re unable to charge your iPhone, make sure to check our troubleshooting guide on how to fix iPhone 11 charging issues. Apart from the iPhone 11 series, you can follow this guide to fix charging problems on any iPhone model.
8. Check your iPhone’s storage
In some rare cases, your iPhone storage is almost full, and there’s no space for any new photos. In such cases, you may feel that you’re unable to click pictures or record videos, and you may feel that something’s wrong with your iPhone’s camera, but actually, it’s the storage that’s giving you the trouble.
To do away with such issues, head to Settings > General > iPhone Storage and check the available storage.

You’ll see the used and total storage space available on your device. Make sure you have some amount of free storage for optimum performance of both stock and 3rd party apps on your iPhone.
9. Issues with the Physical Camera
If nothing has worked for you, there could be some problems with the physical camera on your iPhone. If you notice that you’ve started facing camera issues on your iPhone after it dropped from a height, or if your device suffered some liquid damage, then the problem could be bigger. Such issues can’t and shouldn’t be fixed at your end. Also, if you find any dents or cracks on the back of your iPhone, especially around the camera bump, it could be an hardware issue. In such cases, it is best to head to the Apple Store and get your iPhone diagnosed.
What to do if you get blurry photos with an iPhone camera?
1. Clean the camera lens
If you’re getting blurry or out of focus photos on your iPhone camera, clean the camera lenses using a dry and clean microfiber cloth. You’ll find a microfiber cloth with a spectacle or goggles case lying in your drawer. Carefully wipe off all the fingerprints or smudges from the lenses. Don’t use a rough or synthetic cloth to clean your camera lens as it can leave scratches.
Also, if you notice dirt or debris inside the lenses, or if the camera lenses are misaligned or blocked, head straight to the Apple Store.
2. Remove case/ metallic attachments
If something blocks your iPhone camera, you’ll end up with a black screen or blurred photos. Therefore, it’s a good idea to double-check if anything is blocking your iPhone’s physical camera. Check everything including the iPhone case, camera attachments, and even your fingers. Also, magnetic or metal phone cases and camera accessories can interfere with the Optical Image Stabilization system on your iPhone. Therefore, you must clear off anything that’s blocking the physical camera of your iPhone.
3. Close and reopen the camera app
If you’re getting blurry or out of focus photos on your iPhone, then you must close the Camera app and then open it again. Some minor app glitches could be responsible for such problems, and they can be easily fixed by closing out the app and reopening it after a few seconds.
4. Keep your phone steady
If your pictures are ruined by blurry or out of focus images, make sure to keep your iPhone steady while tapping the shutter button or pressing the Volume Up/ Volume Down key. In low light environments, even a slight shake is bad enough to ruin your photos. Therefore, make sure to keep your phone steady to capture clean and crisp photos and videos.
If your photos are out of focus, you might have mistakenly locked the focus by tapping and holding in the Camera app. To turn ON auto-focus, tap a blank area while clicking pictures.
5. Issues with the physical camera
If you’ve tried everything and still end up with blurred photos, it indicates something is wrong with the physical camera module on your iPhone. If your iPhone has recently faced water damage or if you find any cracks or dents around the camera bump of your iPhone, it’s most likely a hardware issue and can’t be fixed at your end. In such situations, head straight to the Apple store, without looking for any cheaper alternatives as they can further damage your iPhone beyond repair.
How to Fix iPhone Camera flash not if it’s not working
The Night mode on several iPhone models like the iPhone 11 allows you to capture warm, brighter photos in low light conditions. Now, that doesn’t mean you’ll never need the LED flash. Also, if we talk about older models, like iPhone 8, 7, or earlier variants, LED flash is a must-have to capture photos in dark environments.
If your iPhone flash is not working, try the steps mentioned below.
1. Make sure you’ve turned ON the Flash
Firstly, it’s worth knowing that you cannot use flash while shooting Time-lapses or Panorama on your iPhone. For photos, videos, portraits, and slow-mo videos make sure that you’ve turned ON the flash in the Camera app. For this, tap the Lightning bolt icon available at the top-left corner.
2. Remove Case
It is possible that a case or skin might be blocking the LED flash on your iPhone. Therefore, make sure that you’ve installed the case/skin properly and nothing is obstructing the flash module. While you buy a case for your iPhone, make sure the case has proper cutouts for ports and the camera modules along with the LED flash. Also, when you buy a camera accessory for your iPhone, make sure to check for compatibility.
3. Test the LED Flashlight
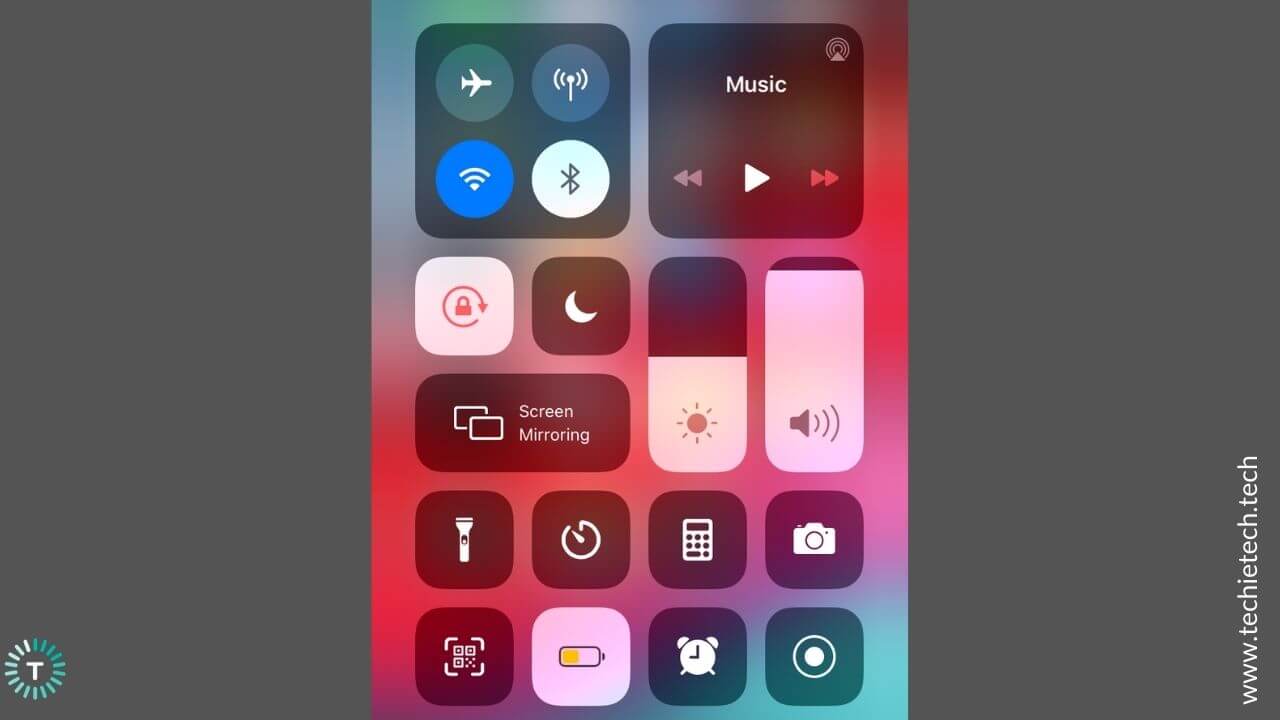
When you’re sure that you’ve turned on the iPhone flash and nothing is blocking its way, now it’s the time to test the LED flashlight. Head to the Control Center and try to turn ON the flashlight (torch icon).
For iPhone X or later, swipe down from the upper-right corner, and tap the flashlight icon.
For iPhone 8 or earlier, swipe up from the bottom edge of any screen, and turn on the flashlight.
4. Is your iPhone too hot? Cool it down
If your iPhone exceeds a certain temperature threshold, iOS may disable a few features on your device, like charging beyond a certain percentage.
The same rule applies to the flash. If you’ve been using flash or shooting for a very long time or if your iPhone is overheating, the flashlight might be disabled until your device cools down.
In such situations, turn OFF your iPhone, remove the case or any other accessory, unplug the charger, move your phone to an area with cool ambient temperature, and allow it to dissipate heat. Now, this is one of the ways to cool down an iPhone, if you want to know more, make sure to check out other methods in our detailed guide to fix an overheating iPhone.
It’s recommended not to use your iPhone until it has cooled down. If you continue using your iPhone, even when it’s hot, it may put the battery at risk.
Looking for ways to improve the battery health of your iPhone? Check out our tips on how to improve iPhone battery health.
How to fix the iPhone’s Flash is Disabled due to Low Battery warning?
There can be instances when the flash is disabled on your iPhone’s camera and it shows up the warning- “The iPhone battery is low and needs to be charged before you can use the flash.” This is one of the commonly faced problems with the iPhone 11. Many users have reported that their iPhone’s camera throws this error, even if the device is sufficiently or fully charged. I also faced the same problem a few days back. So, I thought of sharing how I fixed the flash disabled due to a low battery problem on my iPhone 11.
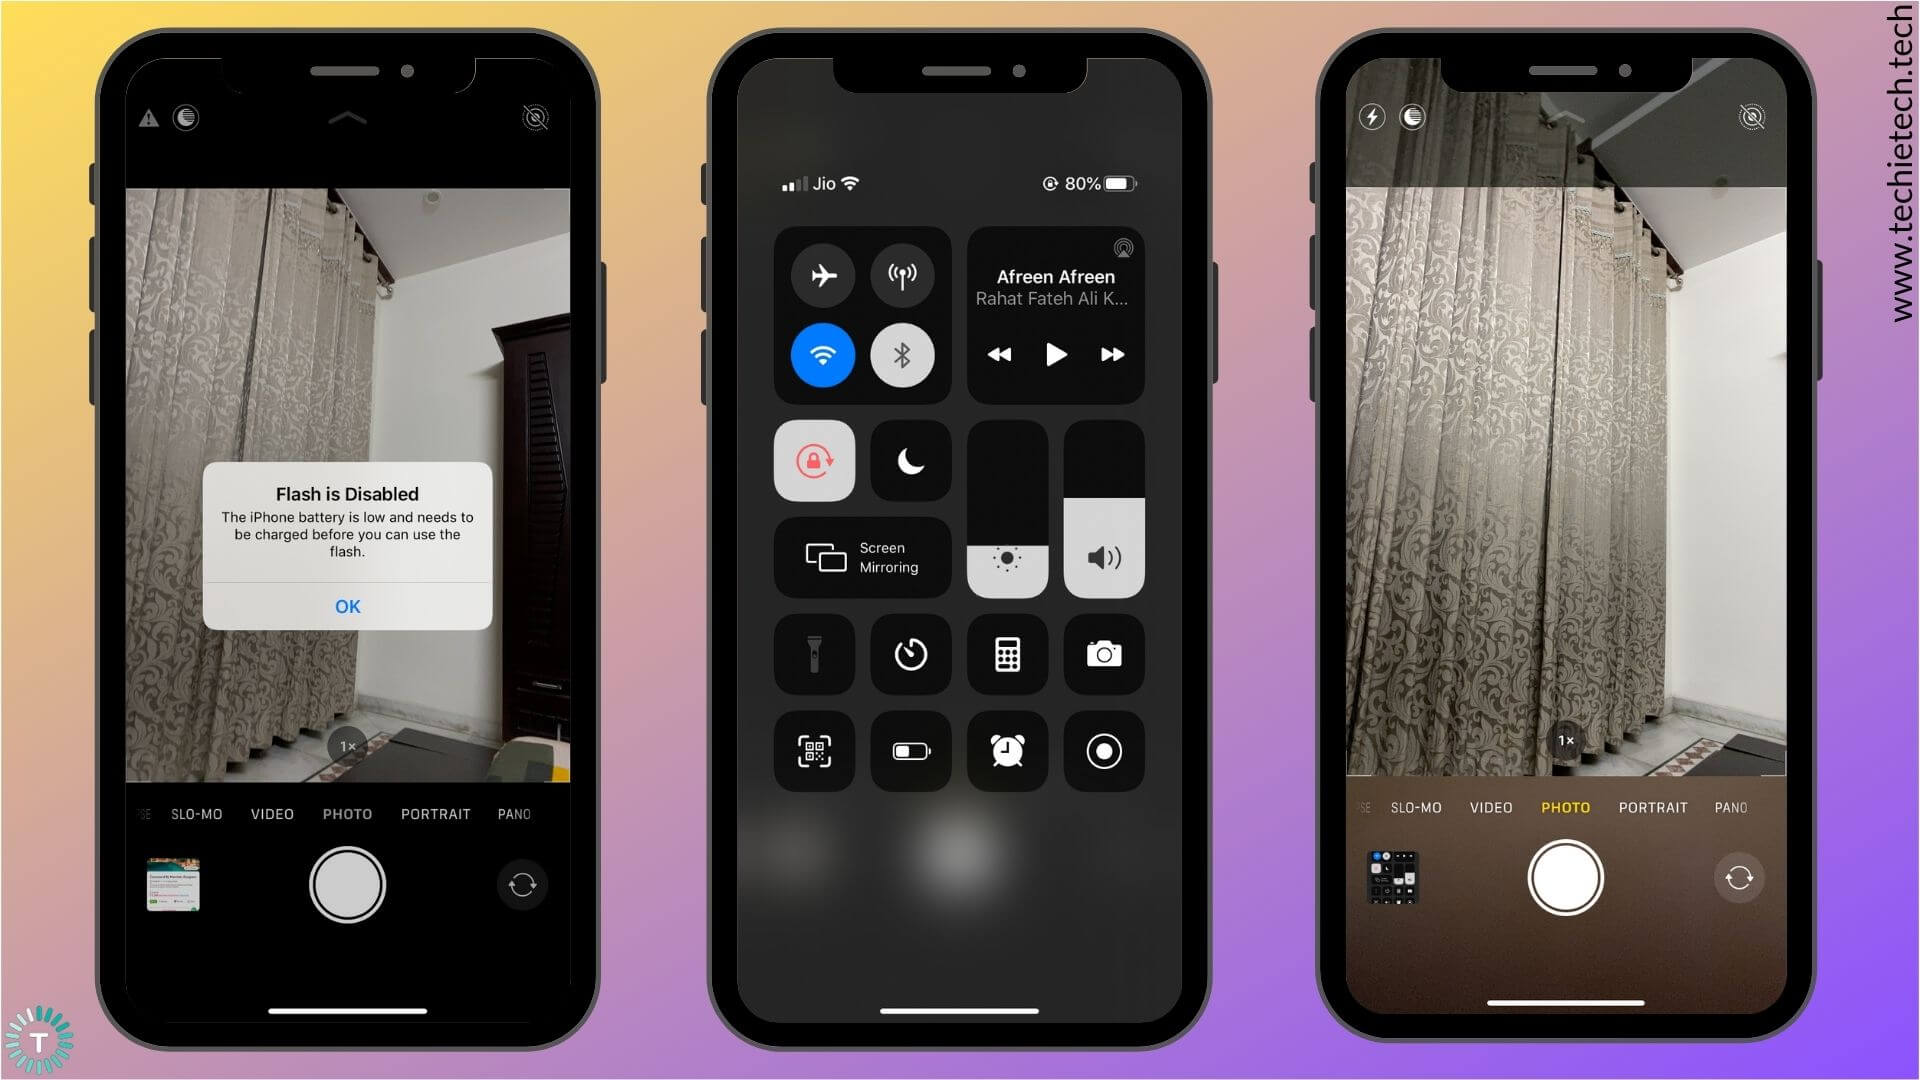
My phone was around 80 percent charged when I got the “Flash is Disabled” warning. Firstly, I tried to close and open the camera app again. I had done this around 4-5 times, but it didn’t help me. Then, I put my iPhone to charge. Even after topping my iPhone’s battery to 100 percent, I was stuck with the same issue. Then, I restarted my iPhone, and guess what? It worked like magic. I was able to use the flash on my iPhone. So, if your iPhone is sufficiently charged and you’re facing the same issue on your iPhone 11 or any other model, make sure to restart your phone to fix the “Flash is Disabled” problem on your iPhone.
To restart iPhone 8 or earlier, press and hold the Power button until you see the “Slide to Power off” option.
For iPhone X or later, press and hold the Power and Volume Down keys simultaneously until you see the “Slide to Power off” option.
If it doesn’t help you, update iOS, and then check if the issue is fixed.
What to do if your iPhone Camera is not working with a specific app?
There can be instances when you’re able to click pictures or shoot videos on your iPhone, but unable to use your iPhone’s camera with a specific app, let’s say Instagram or Facebook. If this happens to be your case, make sure to check if you’ve given the necessary app permissions for the hardware(camera, microphone, Gallery access, etc.) that you want to use with that particular app. For example, if you wish to upload a photo from your iPhone’s camera to Instagram stories, you must give Instagram, access to your iPhone’s camera and library.
Follow the steps mentioned below to check the app permissions on your iPhone. We’ve checked the app permissions for Instagram. You can follow the same steps for any app on your iPhone.
1. Open Settings.
2. Scroll down and you’ll see the list of the apps that you have on your iPhone.
3. Tap on the app.
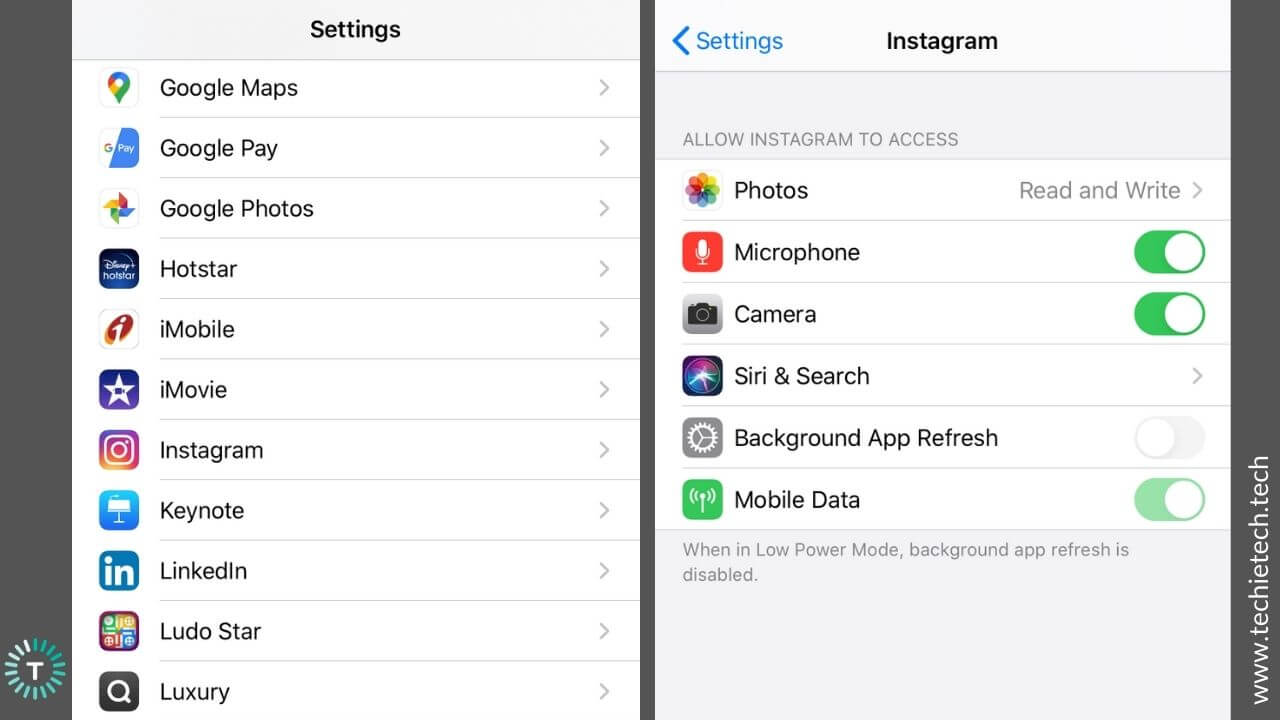
4. Make sure that you’ve enabled all the necessary permissions.
Also read: How to fix Instagram not working, loading, or crashing issues.
What to do if you can’t find the Camera app on your iPhone?
Imagine that you want to capture a photo of your favorite moment but you just can’t find the camera app on your iPhone. This is really maddening. To get you out of such situations, we’ve mentioned a quick fix here.
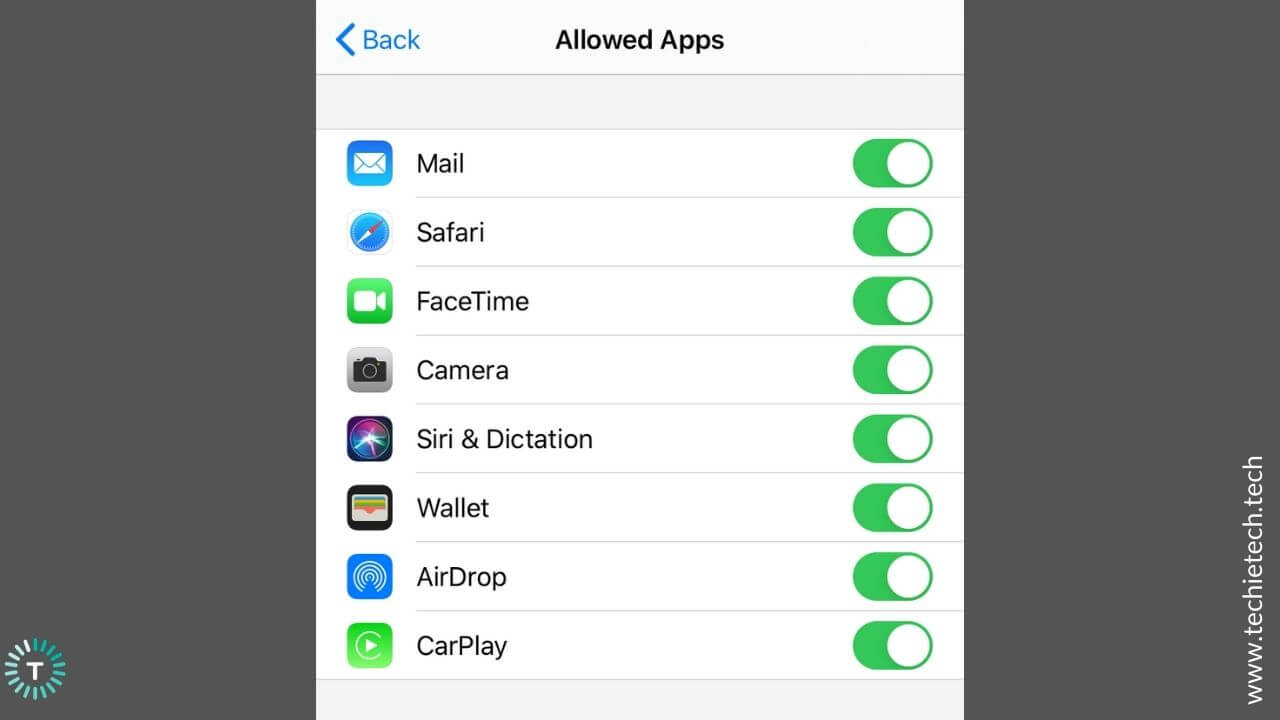
There can be situations when you have accidentally restricted all the apps on your iPhone, just because your kid uses your phone too much. If you haven’t done that, it is still possible that you’ve mistakenly put a few restrictions on your iPhone. Therefore, it’s a great idea to check content restrictions on your iPhone. Here’s how to do it:
1. Head to Settings > Screen Time
2. Tap Content & Privacy Restrictions
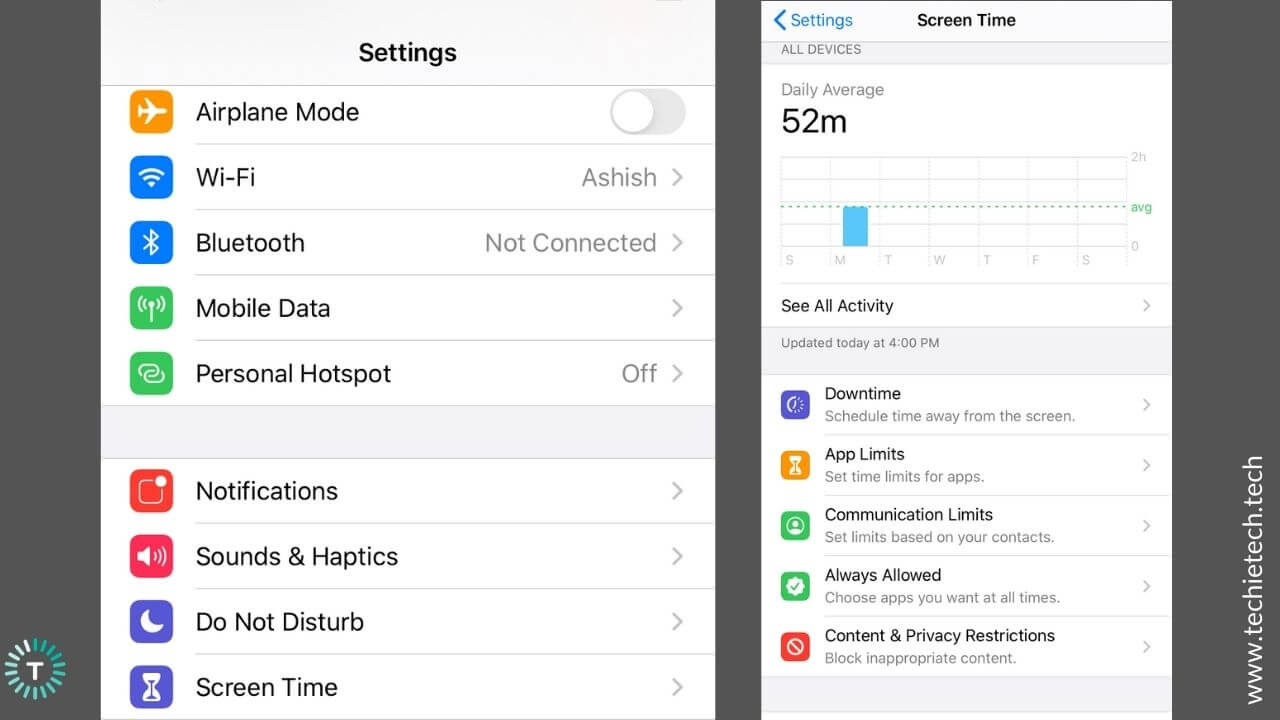
3. Tap Allowed Apps
4. Enter your Screen Time passcode
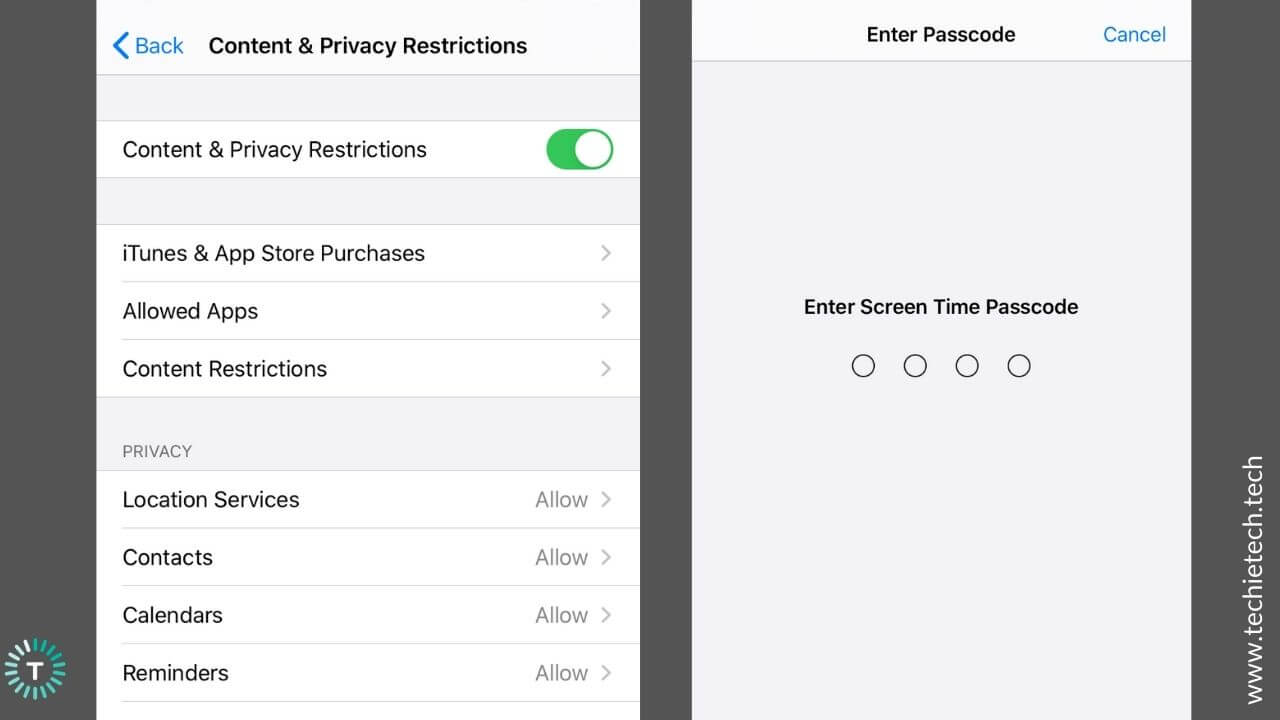
5. Make sure that you’ve turned the slider ON for Camera.
Want to hide apps on your iPhone? Make sure to check our article on how to hide apps on iPhone or iPad.
If you still can’t get the iPhone camera and flashlight to work, or if you’ve tried everything and are still getting blurry photos on your iPhone, it could be due to some major software issues. But, you need not worry as we’ve mentioned 4 effective ways to fix software issues that could be interfering with your iPhone’s camera.
How to fix Software issues on iPhone Camera?
1. Using a third-party camera app? Update it
If you’re using a third-party camera app, like Retrica or YouCam perfect, to click photos or record videos on your iPhone, check if that app has any pending update to be installed in the App Store. App developers frequently release updates with new features as well as fix patches to clear out the in-app errors that are causing issues on your phone. Therefore, if you’re facing issues with the third-party camera app, make sure that you’ve updated the app to the latest version.
Here are the steps to update apps on iPhone 8 and above:
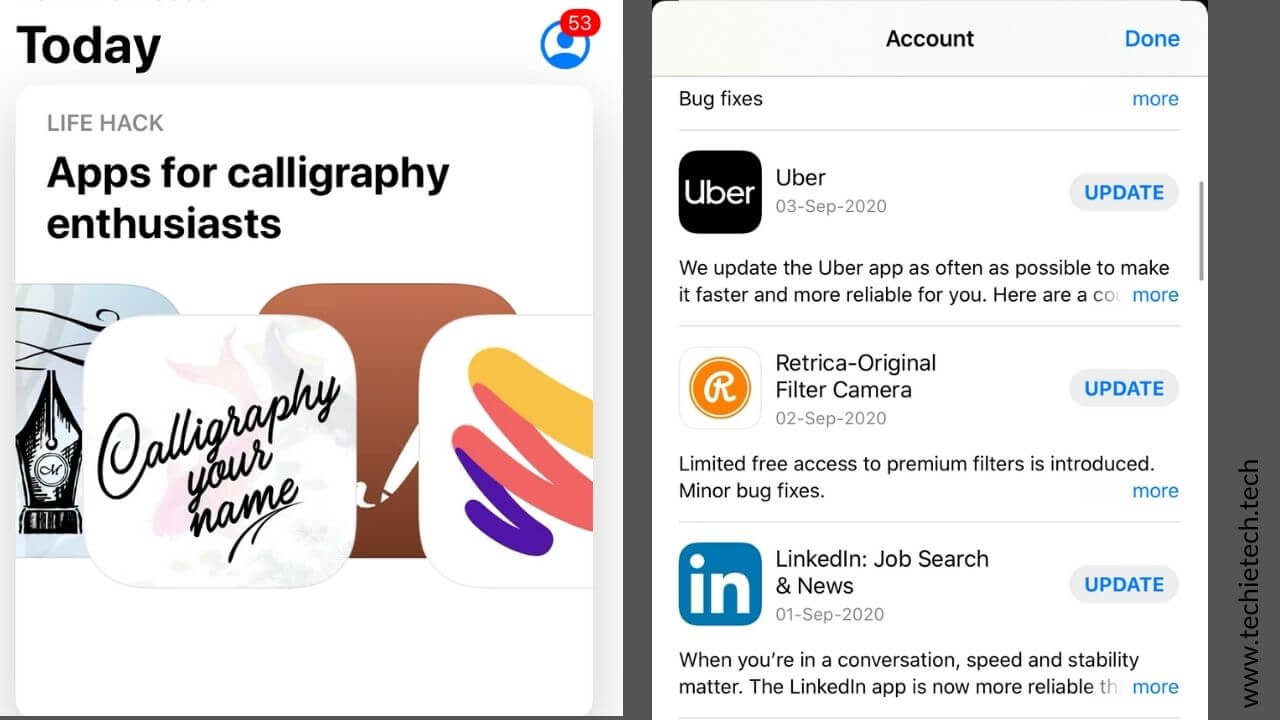
1. Open the App store
2. You’ll see the Today tab at the bottom of your screen. Tap it.
3. Tap the user profile present on the top-right corner of your screen.
4. This will bring your account details.
5. Move down to the section of the available updates.
6. You’ll see a list of apps for which updates are available. If you find your third-party camera app, tap UPDATE next to it.
You can also scroll through the most recent app reviews to see if other users are also facing similar issues.
2. Update iOS
If you’re using the stock camera app, and your iPhone’s camera is still not working or showing black screen issues, you must update iOS. The older version on iOS could cause some camera problems on your iPhone. This is an effective technique for fixing camera not working issues on older iOS devices, like iPhone 7 or earlier models. For updating iOS, follow the steps mentioned below:
1. Go to Settings.
2. Tap on the Software Update.
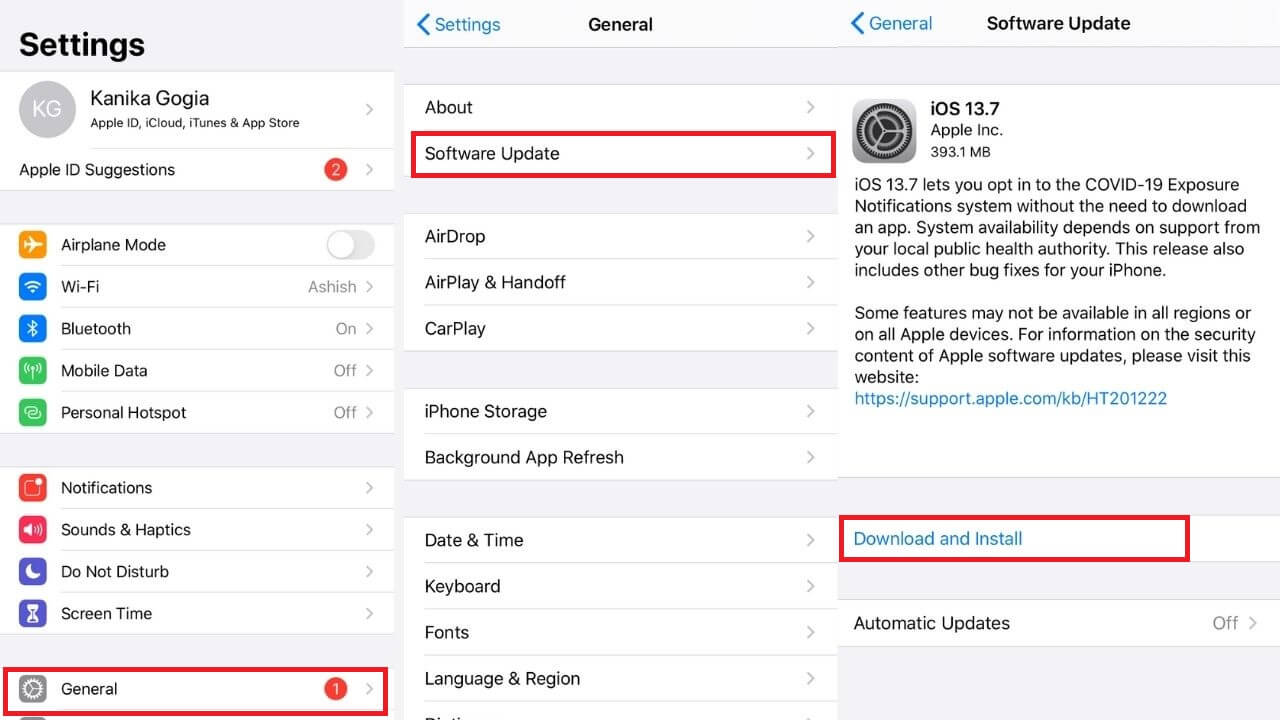
3. If any update is available, install it.
3. Reset all settings on your iPhone
If you’re still not able to fix your iPhone camera problems, you must reset all settings on your iOS device. Doing this will reset your wallpaper, clear out your Wi-Fi passwords, and restore other settings to their defaults. Also, it’s worth mentioning that resetting all settings will not delete any files or data on your iPhone. Therefore, there’s no need to backup your data in this process.
Here are the steps to reset your iPhone settings:
1. Go to Settings > General
2. Scroll down and tap on the Reset option.
3. Select Reset All Settings

4. Now you’ll be asked to enter your passcode.
5. Confirm your decision and proceed.
4. DFU Restore your iPhone
If you’ve tried all the methods to fix the iPhone camera black screen or not working issues, and nothing has helped you, perform a DFU (Device Firmware Update) Restore. This method will reload the software and firmware of your iPhone.
It’s worth mentioning that DFU Restore will delete all of your iPhone data. Therefore make sure to use iTunes or iCloud to backup your device, before proceeding with the steps mentioned below.
Please note that if your iPhone is physically damaged, or if it’s water-damaged, putting your iPhone in DFU Mode may further damage the other hardware components that could prevent you from completing the restore process. Therefore,
this process is strictly not recommended for water-damaged iPhones.
The steps for performing a DFU restore are subject to the iPhone model that you’re using, we’ve mentioned the steps for iPhone 8 and above. For older iPhones, make sure to check out our detailed guide on how to put any iPhone model in DFU mode.
Here’s how to put iPhone 8 or above in DFU mode:
Firstly, connect your iPhone to a laptop or a computer using the original USB cable.
- Quick-press the Volume Up button.
- Quick-press the Volume Down button.
- Hold the Power button till the screen goes black.
- Hold the Power button and Volume down button at the same time.
- After 5 secs, release the Side button and continue to hold the Volume Down button until your iPhone appears in iTunes or Finder.
- If your iPhone’s screen turns completely black, you’ve successfully entered the DFU mode. If it doesn’t, you need to retry the process.
While you are performing the above steps, make sure:
- Nothing gets displayed on your iPhone when it’s in the DFU Mode.
- If you see the Apple logo on your screen, you must retry the process.
- If you get a message on the display telling you to connect your device to iTunes, you need to retry the process.
To exit the DFU mode, you need to force restart your iPhone.
To force restart iPhone 8 or later models, Quickly press the Volume Up button, then the Volume Down button, and finally hold down the Power button until your iPhone reboots. This should fix all the software camera errors on your iPhone.
With this, we’ve come to the end of our troubleshooting guide on how to fix the common iPhone camera problems. We hope this guide has helped you get rid of those annoying issues and got you back on shooting clear and beautiful photos & videos with your iPhone.
Also, don’t forget to check our roundup for the best wireless car chargers/pads for iPhone.