Is Wi-Fi not working on your iPhone 13? Does Wi-Fi keep disconnecting on your iPhone 13 Mini? Do you feel that your iPhone 13 Pro doesn’t connect to Wi-Fi automatically? Does your iPhone 13 Pro Max throw the incorrect password error even if you’ve entered the correct one? Is your iPhone 13 connected to Wi-Fi but there’s no internet? Are you facing iOS 15 Wi-Fi problems?
If the answer to any of the questions is YES or if you’re facing similar issues on your iPhone 13 Series, you’ve landed at the right place.
Internet issues are frustrating, especially if you’re in the middle of something very important. We completely understand this, and therefore, we’re here to help you. We’ve tossed a troubleshooting guide, enlisting 17 effective ways to fix Wi-Fi connectivity problems on
iPhone 13, 13 Mini, 13 Pro, as well as 13 Pro Max.
No more waiting, let’s get started with our troubleshooting guide on how to fix Wi-Fi not working problems on the iPhone 13.
Quick FAQs
1. Why is Wi-Fi not working on my iPhone 13?
Some of the most common reasons for iPhone 13 not detecting Wi-Fi, iPhone 13 Pro won’t connect to Wi-Fi, or iPhone 13 Pro Max WiFi problems include:
- Your iPhone is too far from your Wi-Fi router
- Incorrect password
- Using a VPN
- Loose connections or faulty cables in your Wi-Fi setup
- Corrupted or incorrect network settings on your iPhone
- Enabling Airplane mode
- Using iCloud Private Relay
2. Why is iPhone 13 not detecting my Wi-Fi network?
It can be possible that the iPhone 13 is not detecting your home Wi-Fi network or your iPhone 13 Pro Max Wi-Fi isn’t working. If you’re facing such issues, it can be possible that your iPhone is too far from your Wi-Fi router. To verify, try moving close to the router and see if Wi-Fi is working on your iPhone 13. Also, you can toggle Wi-Fi on your iPhone and see if you can find and connect to your home Wi-Fi network. Next, loose connections or faulty cables could also cause iPhone 13 won’t detect Wi-Fi problems. Therefore, you should check and ensure that all the cables are connected properly and the internet light is blinking on your iPhone.
While you’re here, you should also try rebooting the router. We’re saying this because sometimes, the Wi-Fi router may experience some minor crashes and that’s why your iPhone is not connecting to Wi-Fi. Moving further, you must keep your iPhone updated with the latest version of iOS, disable Wi-Fi Assist, and Reset network settings to fix iPhone 13 Wi-Fi issues.
3. Why is my iPhone 13 Pro connected to Wi-Fi but not working?
There can be instances when your iPhone 13 Wi-Fi is connected but not working or your iPhone 13 Pro connects to a Wi-Fi network but doesn’t load any internet content. One of the most common reasons for this is issues with the Wi-Fi router. To fix this, you must turn OFF the router and unplug its AC adapter. Then, you need to wait for at least 30 seconds to 1 minute before you plug the adapter and turn ON the Wi-Fi router. It’s worth mentioning that if the Wi-Fi router is overheating, you should let it cool down for about 10 to 15 minutes. Once you’re done with this, check if it has helped you fix iPhone 13 Pro Wi-Fi not working problems.
Moving further, if the Wi-Fi is working just fine on other devices except for your iPhone, you must check and disable iCloud Private Relay on your device. For this, you should head to
Settings > [Your Name] > iCloud > Private Relay and disable this feature. Lastly, you can also forget and re-connect to the Wi-Fi to fix connection issues on your iPhone 13 Pro.
Disclaimer: Proceed at your own risk, TechieTechTech will not be responsible if anything goes wrong with your device.
17 Ways to fix Wi-Fi not working on iPhone 13 Problem
1. Toggle Wi-Fi
If Wi-Fi is not working on your iPhone 13 or your iPhone 13 Mini won’t connect to Wi-Fi, the first thing that you should do is toggle Wi-Fi. This super easy method helps to fix minor issues that are interfering with the wireless networks. Besides, if your iPhone 13 can’t detect or connect to a Wi-Fi network or the Wi-Fi connection keeps dropping on your
iPhone 13 Pro Max, just toggle the Wi-Fi switch.
Here’s how to toggle Wi-Fi on iPhone 13:
- Head to Settings > Wi-Fi
- Toggle the Wi-Fi switch to turn it OFF
- Now, wait for a few seconds, and toggle the switch again. This will turn back the Wi-Fi ON.
Alternatively, you can head to the Control Center and tap the Wi-Fi icon. Now, wait for 5-10 seconds, then tap the icon again.
This should fix Wi-Fi issues on your iPhone 13. If this doesn’t help, proceed with the steps mentioned below.
Also Read: How to fix 5G not working on iPhone 13 series
2. Toggle Airplane Mode
If your iPhone 13 won’t connect to a Wi-Fi network or you’re facing Wi-Fi connection issues on your iPhone 13 Pro Max, just must toggle Airplane mode. It’s a super-easy and quick method to fix a variety of network problems on any smartphone, including the latest iPhone 13 Series. Therefore, if you’re facing connection problems like iPhone 13 not connecting to Wi-Fi automatically, Wi-Fi calling not working on iPhone 13 Mini, or iPhone 13 Pro unable to connect to a Wi-Fi network, make sure to toggle Airplane mode. In addition, this quick hack has proven to be super-effective in fixing other network problems like no service issues on iPhone 13 or being unable to use 5G networks on iPhone 13 Pro Max.
Here are two methods to toggle Airplane mode on your iPhone 13:
- Open Control Center, tap Airplane mode. Wait for a few seconds (4-5) and tap Airplane mode again.
- Open Settings > Airplane mode. Turn the slider ON, wait for 4-5 seconds and turn it OFF.
Once you’ve toggle Airplane mode, go back and check Wi-Fi is working on your iPhone 13.
Also Read: iOS 15 vs iOS 14
3. Update iOS
When you can’t use Wi-Fi calling on your iPhone 13 or your iPhone 13 Pro can’t connect to Wi-Fi, you must verify if your iPhone is running the latest version of iOS. It’s worth knowing that the older version on iOS may interfere with the normal functioning of your iPhone and can cause other performance-related issues. Fortunately, Apple regularly releases updates with bug fixes and other improvements. To be on the safer side, it’s a great idea to make sure that your iPhone 13 is running the latest stable version of iOS.
You can update iOS by using these two methods:
- Updating via OTA (over-the-air)
- Updating through iTunes.
Since Wi-Fi isn’t working on your iPhone 13, it is not feasible to proceed with the first method. In such a case, you need to go for the second method. To update iOS through iTunes, you’ll need a Windows or macOS device with the latest version of the iTunes app or Finder (in case you’re using a Mac running macOS Catalina).
Once you’re ready, proceed with the following steps.
- Connect your iPhone 13 to a computer using the original or certified USB cable.
- Now, open iTunes and locate your iPhone 13
- Click General or Settings
- Click on the Check for Update button
- Now, select Download and Update to start the update
- If prompted, enter your passcode.
Now, follow the onscreen prompts to finish updating the iPhone 13. Once you’re done, check if it has fixed Wi-Fi issues on your iPhone 13, 13 Mini, 13 Pro, or 13 Pro Max.
If you’re facing any issue after updating iOS, make sure to head to our troubleshooting guide on How to fix an iPhone not working after an Update problem.
4. Turn on Auto-Join
If your iPhone 13 Pro won’t connect to Wi-Fi automatically, you must verify if you’ve enabled the Auto-Join feature in the Wi-Fi settings on your device. Enabling this feature will allow your iPhone to automatically connect the previously used (and saved) Wi-Fi network when your phone is within its range. If your iPhone 13 is unable to connect to Wi-Fi automatically, you must manually connect it to the network first and then enable auto-join. If this feature is disabled, your iPhone 13 Mini or 13 Pro Max won’t probably connect to Wi-Fi automatically.
Here’s how to enable the Auto-Join Wi-Fi feature on iPhone 13:
- Move to Settings > Wi-Fi
- Now, tap on the Name of the Wi-Fi network for which the Auto-Join feature is not working
- Check if you’ve enabled Auto-Join. If it’s disabled, toggle to Enable it.
If you’ve already enabled auto-join, but your iPhone 13 Pro won’t connect automatically to the Wi-Fi network, move on to the other steps mentioned below.
Also Read: How to fix battery drain on iPhone 13
5. Disable iCloud Private Relay
If your iPhone 13 Mini is connected to Wi-Fi but there’s no internet or if Wi-Fi is working too slow on your iPhone 13, you can disable iCloud Private Relay. This is an iOS 15 privacy feature that prevents your iPhone from being tracked across various Wi-Fi networks. It’s worth mentioning that the iCloud Private Relay is a part of the iCloud+ subscription and is currently in beta in iOS 15. Besides, it’s not available in all countries and regions. That means not all websites, networks, or services that you use will be compatible with iCloud Private Relay.
Therefore, if you’re facing iOS 15 Wi-Fi issues, try disabling iCloud Private Relay.
Here’s how to disable iCloud Private Relay:
- Go to Settings > [your name]
- Tap iCloud > Private Relay
- Now, swipe the slider to turn the feature OFF
Once you’ve disabled iCloud Private Relay, check if Wi-Fi is working properly on your iPhone 13.
Also Read: Best iOS 15 Tips and Tricks
6. Turn off Wi-Fi Assist
When your iPhone 13 Mini can’t connect to Wi-Fi or you’re struggling with Wi-Fi-related problems on the iPhone 13 Pro, check if you’ve enabled the Wi-Fi Assist feature on your iPhone. This iOS feature allows your iPhone to switch to cellular data if there’s a poor or unstable Wi-Fi network. Therefore, if the Wi-Fi connection is unstable, your iPhone keeps reconnecting, and after some time, it gets stuck in a loop. To fix Wi-Fi not working problems on iPhone 13 or 13 Pro, turn this feature off and then try connecting to the Wi-Fi network.
Here’s how to disable Wi-Fi Assist on iPhone 13:
- Go to Settings
- Navigate to Cellular settings
- Scroll down, locate and turn OFF Wi-Fi Assist.
7. Restart your iPhone
There can be instances when the Wi-Fi icon isn’t displayed in the status bar of your iPhone 13 or if your iPhone 13 Pro is connected to Wi-Fi but the internet isn’t working, you must reboot your phone. Doing this will fix those minor issues and glitches that accumulate over time and interfere with your iPhone. When you restart your iPhone 13, it will also clear the internal memory (RAM) and give a fresh start to the device.
Once you’ve rebooted your iPhone, check if Wi-Fi is working properly or not.
Here’s a pro tip: To ensure smooth functioning of your iPhone, make a habit to restart your device at regular intervals (once a week or two is good).
Also Read: How to fix iPhone 12 Overheating on iOS 15
8. Forget and Reconnect to the Wi-Fi Network
If you’re facing iOS 15 Wi-Fi issues or your iPhone 13 Pro shows an incorrect password error, this could be due to corrupt network settings. It might be possible that the Wi-Fi network information has corrupted on your iPhone, or the connection parameters have been changed on the wireless access point. In such situations, deleting the network information will refresh your device’s Wi-Fi and re-establish the connection between your iPhone 13 and the wireless network. Doing this will also remove the saved information on your iPhone that might be interfering with the authentication. Therefore, if your iPhone 13 can’t connect to WiFi or your iPhone 13 Pro Max throws the incorrect password error, you must forget and reconnect to the Wi-Fi network.
Before you proceed to the below steps, make sure that you must remember the Wi-Fi password. You would have to enter that again to re-establish the connection.
- Open Settings > Wi-Fi
- You see a list of all the Wi-Fi networks that you’ve added to your iPhone.
- Locate the name of the Wi-Fi network you’re facing trouble with.
- Tap the small i-icon present next to the Wi-Fi network.
- Select Forget This Network
- You will see a prompt asking to confirm the Forget network action
- Now, Toggle Wi-Fi On/Off
- Reconnect to the same Wi-Fi network
Once you’re done with the above steps, check if the incorrect Wi-Fi password issue on iPhone 13 Pro Max is fixed or not. In case this doesn’t help, move to the next method.
Also Read: iPhone 13 Pro and iPhone 13 Pro Max Problems and Solutions
9. Reset Network Settings on your iPhone 13
If Wi-Fi isn’t working on your iPhone 13 or your iPhone 13 Pro won’t connect to Wi-Fi, you can try resetting network settings on your phone.
Doing this will wipe off any conflicting data that are interfering with the normal functioning of your iPhone. It’s one of the most effective methods to fix network and wireless connectivity issues. So, make sure to give it a try.
When you reset network settings, it will wipe off all your current network settings including server settings, connected Bluetooth devices, APNs, and other information. Besides, your saved Wi-Fi networks and passwords will also be deleted. They should automatically restore themselves if you’ve synchronized your Keychain with iCloud. However, you must note down the VPN information somewhere, as it will also be reset during this process.
Here’s how to reset network settings on your iPhone 13 Series:
- Go to Settings > General
- Scroll down and tap Reset
- Now, tap Reset Network Settings
- When prompted, enter your iPhone’s passcode
- Tap Reset Network Settings to confirm your decision
Your iPhone will then restart on its own and load up the default network settings. Once the process is completed, check if it has helped you fix Wi-Fi not working issues on iPhone 13 or 13 Pro.
Also Read: How to fix FaceTime not working on iPhone or iPad
10. Restart the Router
If you’re still facing iPhone 13 Wi-Fi problems or your iPhone 13 Pro Max can’t detect Wi-Fi, it’s time to check your network equipment. There can be instances when your modem/wireless router is experiencing some minor crashes, and as a result, you’re facing Wi-Fi connectivity problems on the iPhone 13 Pro. In such situations, you can try rebooting the Wi-Fi router. Doing this will clear out all the bugs in the network and give a fresh restart to the router. Rebooting the Wi-Fi router has proved to be an effective method in fixing the Wi-Fi issues on the iPhone. So, it’s worth giving it a try.
Here’s how to power-recycle your Wi-Fi router:
- Press the power button to turn OFF the modem/router
- Make sure to unplug the router and other networking from the power source.
- After 30 seconds to a minute, plug the AC adapter back in, and press the power button to turn the router ON. Besides, if the router overheats, turn it off and let it cool down for at least 10 to 15 minutes.
Now, wait for the light indicators to become stable, and make sure the Wi-Fi and Internet indicators are green. If the Wi-Fi/Internet signals are red, the connected devices don’t have internet access. In 3 to 5 minutes, the router should boot up properly and connect to the internet. Once the router has properly booted, connect your iPhone 13 Mini to the WiFi, and check if the issue has been fixed. If this doesn’t help, move to the next step.
Also Read: How to fix AirDrop not working on iPhone
11. Update your Router’s Firmware
In case the power-cycling doesn’t work, you might need to update the router’s firmware to fix iPhone 13 Wi-Fi problems. Moreover, if you can’t use a Wi-Fi network on any of your devices, you must update the router’s firmware. For this, you first need to type in your
router’s IP address in the search bar of a browser. You’ll see an alert on the screen “Your connection is not private.” Now, click on proceed <IP address> to move ahead.
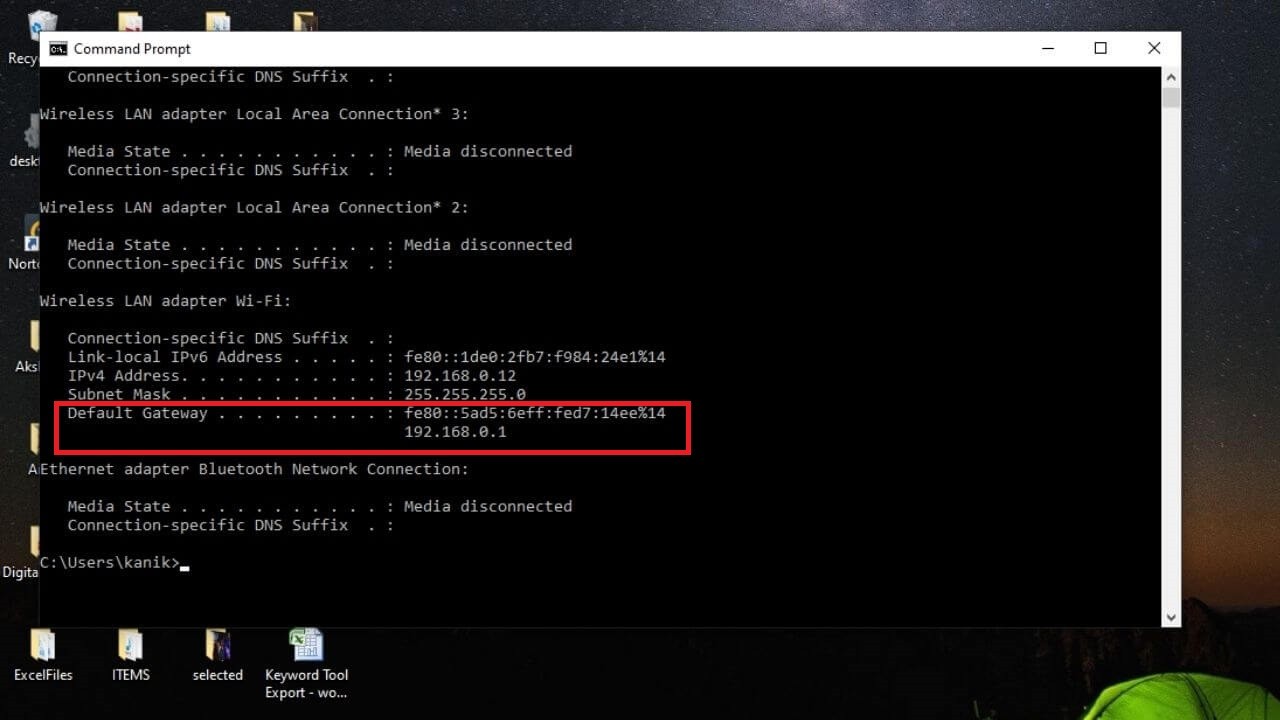
Here’s how to find the router’s IP address:
1. In the search bar of Windows, Type command prompt and press Enter
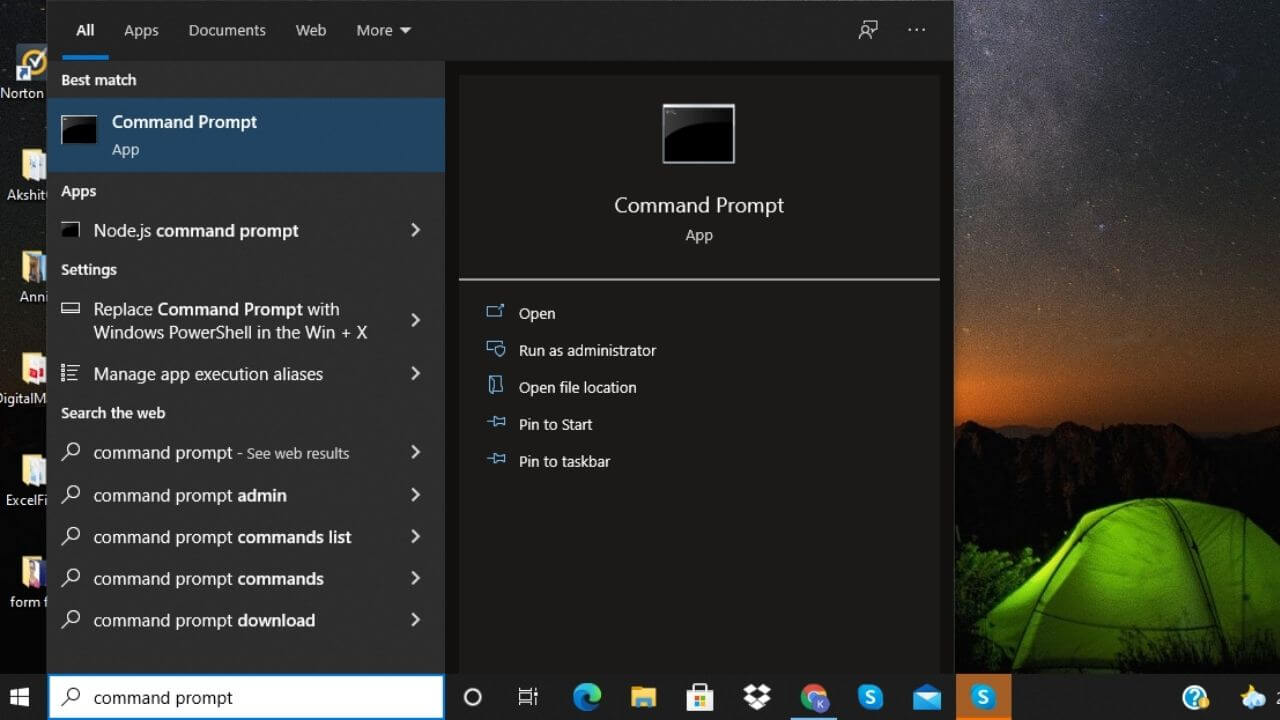
2. Now, type ipconfig in the command line and press Enter
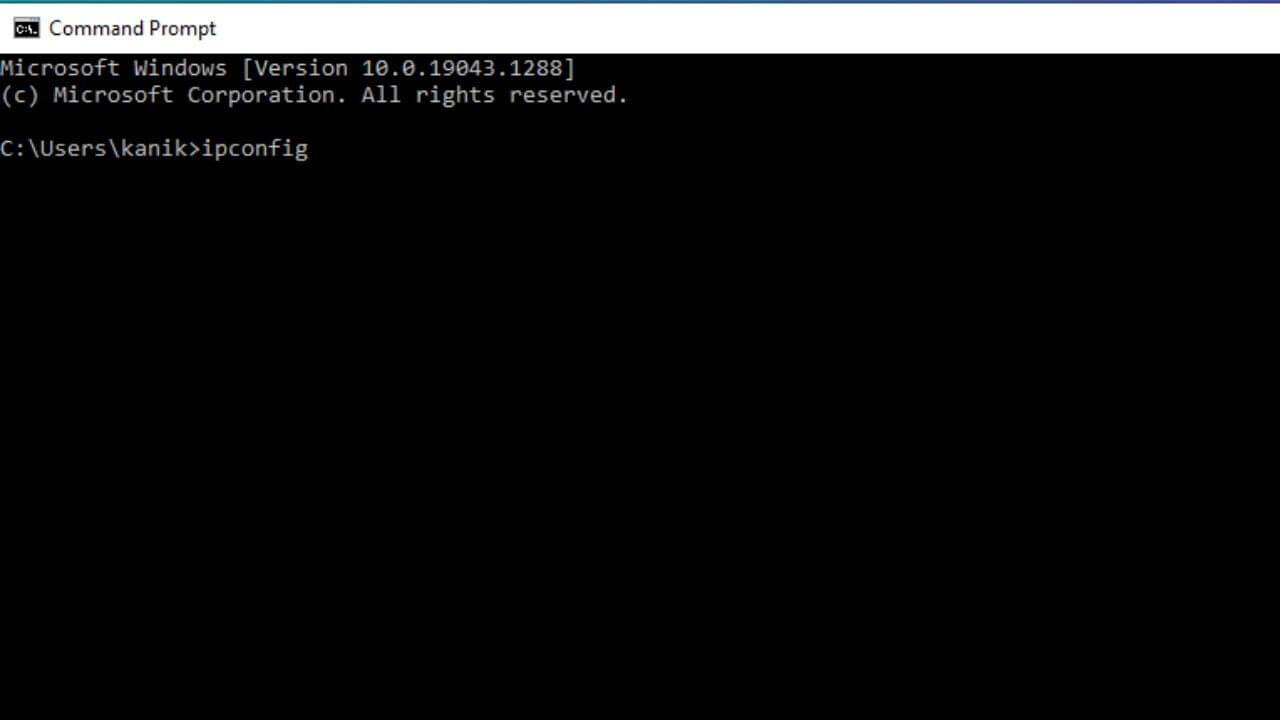
3. You’ll see the router’s IP address next to the Default Gateway.
Now, move ahead with the following steps:
- Enter your Username and Password (if you’re logging in for the first time, you can get these details on the manual, or your internet service provider must have provided it). If you can’t find them, try looking at the bottom of your router.
- Locate Firmware or Update section
- Move to the router manufacturer’s website
- Now, Download the firmware update file for your router
- Extract the file and move it to the desktop
- In the Update section on the webpage, click Choose File/Browse
- Select the router update file that you extracted and moved to the desktop in step 5
- Proceed with the Upgrade process
- Once the firmware has updated, reboot the router.
This method should fix the unstable or no Wi-Fi connection problems on iPhone 13 and 13 Mini.
If Wi-Fi is still not working on your iPhone 13 or you’re able to use that Wi-Fi network on any device, you might need to call your Internet Service Provider (ISP). For the time being, you can connect to a different Wi-Fi network or use Mobile Data.
Also Read: How to fix iMessage not working on iPhone
12. Disable Wi-Fi Networking Services
If you’re unable to fix WiFi not working or not connected to the internet issue on iPhone 13, you should try disabling the Wi-Fi networking in location services. Impressively, several users reported that this method has helped them fix WiFi not working problems on the iPhone 13 Pro as well as 13 Pro Max. Therefore, make sure to give this a try.
Here’s how to disable Wi-Fi networking services on the iPhone 13:
- Go to Settings > Privacy
- Tap on the Location Services
- Now, scroll down, find, and tap on System Services
- Turn OFF Wi-Fi Networking.
After you’re done with this, make sure to toggle Wi-Fi (Step 1) or just reboot your iPhone 13 (Step 7) and check if the Wi-Fi is working properly.
13. Disable VPN
If you’re using VPN, it could be the reason why the Wi-Fi isn’t working on your iPhone 13. If you have enabled VPN from the settings or a 3rd party VPN app from the App Store, you can face Wi-Fi connectivity issues on your iPhone 13 Mini. Many websites don’t allow users to use VPN. As a result, you may get webpage won’t load, webpage crash, or other errors. In addition, the VPN apps’ network data might get corrupted, and as a result, you may get a Wi-Fi connection failure or a spotty Wi-Fi connection.
To avoid any complications, it’s a good idea to disable the VPN on your iPhone 13 Series. Here’s how to do it:
- Open Settings
- Move to VPN settings
- Now, toggle the Status from Connected to Not Connected.
14. Setup Custom DNS (Domain Name System)
If your iPhone 13 Mini is unable to connect to Wi-Fi or you’re getting very slow Wi-Fi speed on iPhone 13 Pro, it could be due to a faulty or slow DNS server from your ISP. To fix this, you must switch to Google DNS or Open DNS. Besides, if Wi-Fi disconnects frequently on your iPhone 13 Pro Max, setting a custom DNS should help you fix that too.
Here are the steps to set up a custom DNS on iPhone 13:
- Go to Settings > Wi-Fi.
- Locate and tap your Wi-Fi Network.
- Now, tap on the numbers to the right under DHCP after locating DNS
- Type Google DNS in Primary DNS and Secondary DNS separated by comma (8.8.8.8, 8.8.4.4)
- Or else, you can use OpenDNS (208.67.220.123, 208.67.222.123).
Also Read: How to improve battery health of iPhone 13
15. Factory Reset your iPhone 13
If other devices can connect to a Wi-Fi network but your iPhone 13 or 13 Pro is still throwing connectivity issues, you can resort to the Factory Reset option. Besides, if you don’t see the Wi-Fi symbol on your iPhone 13 Mini, you can perform a Factory Reset.
It’s worth mentioning that this process will automatically restore your iPhone 13 to default factory settings. Therefore, it also deletes everything from your phone, including media, email accounts, contacts, all downloaded apps & their data, passwords, and other stuff.
So, just make sure to back up your iPhone before you proceed with the mentioned steps.
Wondering what’s the easiest way to back up your iPhone? Don’t miss our detailed guide on how to backup any iPhone model.
Here’s how to Factory Reset your iPhone 13:
- Move to Settings > General
- From the bottom of your screen, tap the Reset option.
- Select Erase All Content and Settings.
- A pop up will appear asking if you want to back up the data or erase it right away
- Confirm your decision. You’ll now see the Erase iPhone option.
- Once confirmed, the process would take a few minutes to complete.
After the process is completed, your iPhone will be restored to the default factory settings. You can set up your iPhone as a new device or restore your backup.
16. DFU Restore your iPhone 13
If nothing has helped you fix Wi-Fi not working on iPhone 13 Pro or Wi-Fi calling problems on your iPhone 13 Pro Max, perform a DFU (Device Firmware Update) Restore. It’s the deepest way to restore a device. When you perform a DFU restore on your iPhone 13, it will reload the software and firmware of your device. We recommend you to keep this hack for the last. First, try all the methods that we’ve mentioned above, and if nothing helps, you can perform a DFU Restore.
It’s worth mentioning that DFU Restore is conceivably dangerous too. So, you must try this method when you understand all the associated risks and are ready to take responsibility for any adverse results. To know the process of DFU Restore in detail, head to our guide on how to put an iPhone in DFU mode.
Before you proceed to the below steps, it’s worth knowing that DFU Restore will erase everything from your iPhone 13. Therefore, make sure to back up your important data. Also, you need to install the latest version of iTunes on your computer.
Here’s our detailed guide on how to backup any iPhone.
Here’s how to put your iPhone 13, 13 Mini, 13 Pro, 13 Pro Max to DFU Mode:
- Turn ON your iPhone (if it isn’t already)
- Use a certified Lightning cable to connect your iPhone to a laptop or computer.
- For Macs running macOS Mojave (or earlier) and PCs, open iTunes. On Macs with macOS Catalina 10.15 or newer, open Finder.
- Now, quickly press and release the Volume Up button followed by the Volume Down button.
- Hold the Side button till your screen goes black. Then, release the Side button.
- Then, hold the Side button and Volume down button simultaneously.
- After 5 secs, release the Side button and continue to hold the Volume Down button until your iPhone appears in iTunes or Finder.
- Once your iPhone’s display turns completely black, you’ve successfully entered the DFU mode.
While performing the above steps, make sure:
- Nothing is displayed on your iPhone when it’s in the DFU Mode.
- If you see the Apple logo or you get the message- “connect your device to iTunes”, you need to retry the above steps.
To exit the DFU mode, you must force restart your iPhone 13. For this, Quickly press the Volume Up button, followed by the Volume Down button, and finally, hold down the Side button until your iPhone reboots.
Also Read: How to remove any device from Apple ID
17. Contact Apple
Tried everything and still no luck? If Wi-Fi isn’t working on your iPhone 13 or keeps disconnecting on your iPhone 13 Pro Max, you must contact Apple support. It can be possible that something’s wrong with the internal components of your iPhone. In such cases, you shouldn’t resort to any cheap alternatives or DIYs, instead, head straight to the Apple store and seek some professional help. Even better, make an appointment at Apple’s store Genius Bar so that you don’t have to wait around.
That was all from our side on how to fix Wi-Fi problems on iPhone 13, 13 Mini, 13 Pro, and 13 Pro Max. We hope this troubleshooting guide has helped you fix Wi-Fi connectivity issues on the iPhone 13 Series.
Which trick worked for you? Share your views in the comments section below.
Don’t miss our troubleshooting guide on how to fix overheating problems on iPhone 13 Series.