MacBook is a fantastic machine that can handle your everyday as well as professional tasks. You can watch movies, play online games, work on an important video editing project, use the best apps, and do much more. For this, you just need to connect your MacBook to a Wi-Fi network and get online. Usually, it’s super easy to connect your Mac to Wi-Fi. Just click the Wi-Fi icon, select the network, enter the password, and you’re all set to go. However, things might not be that simple and smooth always. Sometimes, your Mac won’t connect to Wi-Fi, no matter how much you try. If you’re also stuck with MacBook Pro M1 not connecting to Wi-Fi problems, then let me tell you that you are not alone. This is one of the
most commonly reported and annoying issues that you might face on your Mac.
We know how frustrating it is to deal with a MacBook Air that won’t connect to Wi-Fi. We have faced this issue and tried multiple ways to get it fixed. We learned a lot of stuff and that’s why we’re here to help you fix your MacBook Pro not connecting to Wi-Fi problems. We’ll tell you why your Mac isn’t connecting to Wi-Fi and what you can do to fix MacBook Air Wi-Fi issues.
In this article, we’ve listed 16 tried & tested ways to fix Mac Wi-Fi not working problems. No matter if your M1 MacBook Air Wi-Fi disconnects suddenly or your M2 MacBook Pro is not connecting to Wi-Fi after an update, you’ll find the perfect solution for your problem. Moreover, if you’re struggling with terrible situations where your MacBook won’t connect to Wi-Fi but all your other devices will, we’ve addressed such issues too.
So, without any ado, let’s get you back online.
Please note that this guide will work for Intel-based, M1, M1 Pro, M1 Max, M2, M2 Pro, and M2 Max MacBook models.
Why is my Mac not connecting to Wi-Fi?
Below are some of the most common reasons why your MacBook won’t connect to Wi-Fi.
1. Wrong Wi-Fi network
One of the most common and easily overlooked reasons why your MacBook Pro M2 won’t connect to Wi-Fi is the wrong network connection. It’s 2023, every home has a Wi-Fi connection today. Thanks to modern Wi-Fi routers, we can enjoy a great wireless range that extends beyond our homes. There can be instances see your neighbor’s open Wi-Fi network on your devices. Sometimes, you might come across an open Wi-Fi network that has a similar name to your home’s Wi-Fi. Now, it makes quite difficult to figure out which one is yours. Therefore, we always recommend keeping a unique name for your Wi-Fi network so there’s no confusion at all.
In short, if your MacBook won’t connect to Wi-Fi but your other devices will, you must take a moment and ensure that you’re connecting to the right network.
2. Incorrect passwords
An incorrect password is another common reason why your Mac isn’t connecting to your home’s Wi-Fi. You might have skipped or mistyped a character while entering the password. Also, there can be instances when you’ve recently updated your Wi-Fi plan and changed the password but your MacBook has still saved that old password. In such cases, your MacBook Air won’t connect to the internet. To avoid any complications, ensure you’ve entered the right password on your Mac. If your MacBook Pro keeps saying you’ve entered the wrong Wi-Fi password even if it is correct, you must forget and re-connect to the Wi-Fi network.
3. No active internet
The very obvious reason why your MacBook Pro isn’t connecting to the internet over Wi-Fi is that there’s no active internet connection. It is very common for devices to show a full-bar Wi-Fi icon and still not be able to connect to the internet. This usually happens due to a faulty network device like a router, cable, or network switch, an expired Wi-Fi plan, some fault at the ISP’s end, a bug in your device’s software, and whatnot. In such cases, you must try using the internet on other devices like
smartphones or tablets that are connected to the same Wi-Fi network.
4. Weak signal strength
Weak signal strength can cause several Wi-Fi-related issues on your MacBook. If your MacBook and router are placed too far from each other, you’ll have to deal with MacBook Pro M1 Wi-Fi keeps disconnecting, slow internet on Mac, and other issues. Also, if you use poor network equipment, you might have to deal with MacBook Pro M1 Wi-Fi issues. To be on the safer side, you must use your MacBook within the acceptable range of the Wi-Fi router. It’s a nice idea to place the router in a central location at your home or closest to your WFH setup. Avoid placing the router at the corners of your house as it might cause low or no signals in certain areas of your home. That said, some powerful mesh routers offer flawless Wi-Fi connectivity in large houses.
You must also make sure that your Wi-Fi router is free from any kind of interference. Cordless phones, microwave ovens, Bluetooth devices, video cameras, and other devices may produce electromagnetic interference that prevents your Mac from connecting to the Wi-Fi. To escape these problems, avoid placing the router near any device that can transmit electric signals.
5. Wrong date & time
Your MacBook Air won’t connect to Wi-Fi if it has the wrong date & time settings. So, if you’ve started facing MacBook Air M2 Wi-Fi issues after you’ve moved to a new region, you must check the date & time on your Mac. To make sure you always get the correct date & time, you can choose your MacBook to automatically set the date and time using a network time server. To know how to do that, move to step 4 mentioned below.
6. Outdated software
Outdated software on your MacBook can cause Wi-Fi not turning ON and several other performance-related issues. To ensure smooth functioning, you must always run your MacBook on the latest version of macOS. Updates not only bring new features but are also packed with security patches & bug fixes that help improve overall performance. So, if your Mac often loses internet connection, you must update macOS to the latest stable version.
7. Faulty cables or loose connections in the Wi-Fi setup
Lastly, any loose connections or faulty cables in the Wi-Fi setup could also cause MacBook Air won’t detect Wi-Fi or MacBook Pro won’t show Wi-Fi problems. Therefore, you should always double-check that all cables are connected properly and the internet light is blinking on the router.
Now that you the common reasons why your MacBook Pro M1 is not connecting to WiFi, let’s move to the troubleshooting methods.
Also Read: How to fix MacBook Pro not turning ON problems
Disclaimer: Proceed at your own risk, TechieTechTech will not be responsible if anything goes wrong with your device.
16 Tested ways to fix a MacBook that won’t connect to Wi-Fi
Method 1: Check your Wi-Fi network and the password
When your MacBook Air is not connecting to Wi-Fi or a hotspot, you must check if you’re trying to connect to the right Wi-Fi network. There can be instances when you’re trying to connect to an open network that doesn’t provide a proper internet connection. This is one of the main reasons why your MacBook Pro won’t connect to Wi-Fi. Also, if you see an exclamation mark near the Wi-Fi symbol on your Mac, it means your MacBook is connected to a Wi-Fi network but there’s no internet. In such a case, you must always double-check that you’re trying to connect to the right network. We always recommend keeping a unique name for your Wi-Fi network so there’s no confusion
. Make sure you don’t go for common names like My Home. Instead, you can choose popular short quotes as the name for your Wi-Fi.
Apart from correct Wi-Fi networks, you must also ensure that you’ve entered the correct password. We are saying this because incorrect passwords are one of the most common reasons why your MacBook Pro M2 won’t connect to your home Wi-Fi. Frankly speaking, we sometimes get a little overconfident while entering the passwords that we’ll feed it extremely fast. Sometimes we type quickly and hit save in order to avoid sharing passwords with others. Well, it happens with a lot of users including us. That said, CAPSLOCK mistakes or single-character mistypes can cause
MacBook Pro 2022 won’t connect to internet problems. Moreover, there can be instances when one of your family members has changed the password and you’re still entering the older one.
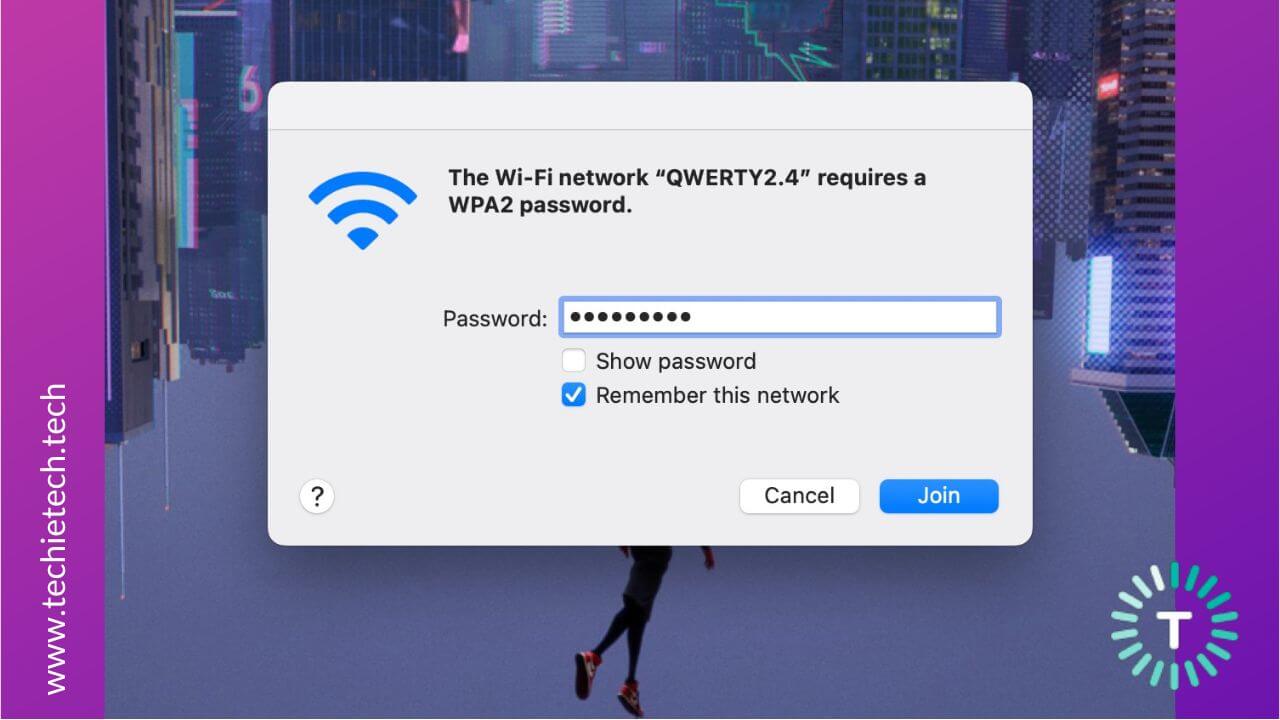
To be on the safer side, you must double-check the entered password. Also, if your MacBook is not accepting the Wi-Fi password or your MacBook Pro M2 shows an incorrect password error, you must re-type the password to eliminate any connectivity issues.
Method 2: Verify if the internet is working
Are you wondering why your iPhone and MacBook aren’t connecting to Wi-Fi? Well, there can be issues with internet connectivity. It can be possible that the internet services are down or unstable in your area. When this happens, you won’t be able to use the internet on your MacBook Pro even if it is connected to the Wi-Fi network.
To verify this, you can try using the internet on other devices like your iPhone, iPad, Android smartphone, or even smart home devices that are connected to the same Wi-Fi network. Or you can check the Internet light on your internet modem box or router. Alternatively, you can contact your internet service provider (ISP) and ask them about the status of the internet or its speed.
If there are some issues with the internet services, Wi-Fi won’t work on your MacBook, smartphone, streaming device, TV, or any other device. In such a case, you can’t do anything but sit back and wait for things to get fixed. On the flip side, if your MacBook won’t connect to Wi-Fi but your iPhone will, you must try the other steps mentioned below.
Also Read: Our top recommendations on the Best Accessories for M2 MacBook Pro
Method 3: Check if your MacBook is within the wireless range
Weak signal strength is one of the most common reasons why your MacBook is connected to Wi-Fi but there’s no internet. Also, if Wi-Fi signals drop frequently on your MacBook Air M1 or your MacBook Pro M1 Wi-Fi keeps disconnecting, it is because of weak signal strength. In such cases, you must check and ensure that your Mac is placed in the acceptable wireless range of the router. If your MacBook is too far from the Wi-Fi router, you’ll find yourself with MacBook Pro Wi-Fi connection keeps dropping problems.
For a stable connection in your home, it’s a nice idea to keep your router in a central position like the common lounge area or your living room so you get a good connection on all your devices. If you have a WFH setup, you must place the router near that area. That said, the signal strength completely depends on how good your Wi-Fi router is. Some powerful mesh routers offer excellent connectivity in large houses.
Method 4: Check the date & time settings
It may sound strange but the incorrect date, time, or location can trigger M1 MacBook not connecting to Wi-Fi problems. This usually happens when you’ve recently been in a different time zone or country and the date & time aren’t updated.
To fix MacBook Pro 2021 not connecting to Wi-Fi, you must check the date & time on your machine. If you want your Mac to automatically change the date & time according to your current region, you must turn ON the “
Set time and date automatically” option.
Here’s how to change the date & time settings on your MacBook:
- Head to Apple Menu > System Settings > General
- Select Date & Time and set the date & time automatically
- Then, turn on “Set time and date automatically”, click Set, and enter a network time server for your region.
- Also, turn ON “Set time zone automatically using your current location”.
Also Read: How to fix charging issues on a MacBook
Method 5: Disconnect USB accessories
If your Apple MacBook is not connecting to Wi-Fi, try unplugging all of your USB devices and accessories from your machine. The list includes a mouse, keyboard, printer, hard drive, flash drive, and more. We’re saying this because sometimes USB accessories tend to interfere with the Wi-Fi network or internet connection which eventually leads to MacBook Pro 2021 not connecting to Wi-Fi after sleep issues. To avoid any complications, unplug all the USB accessories from your Mac.
Once you’ve unplugged the USB accessories, restart your MacBook and then try connecting to the Wi-Fi network again. If you’re able to do so, it’s evident that one of your devices was responsible for why your Mac Wi-Fi won’t turn ON.
Also Read: Best Accessories for 16-inch MacBook Pro
Method 6: Restart your MacBook and the Wi-Fi router
One of the easiest ways to fix the MacBook Pro M1 Max not connecting to Wi-Fi problem is to restart your Mac and the router provided by your ISP. It will help you rule out minor glitches, software bugs, and other errors that might be responsible for MacBook not connecting to Wi-Fi after update problems.
Also, if your MacBook Pro isn’t showing any Wi-Fi networks, you must give it a restart. We know it is the most traditional trick in the book, but it can help you fix Wi-Fi connectivity issues on any device. So, make sure you do not skip this step.
Here’s how to restart your MacBook Air or MacBook Pro models:
1. Open Apple Menu > Restart.
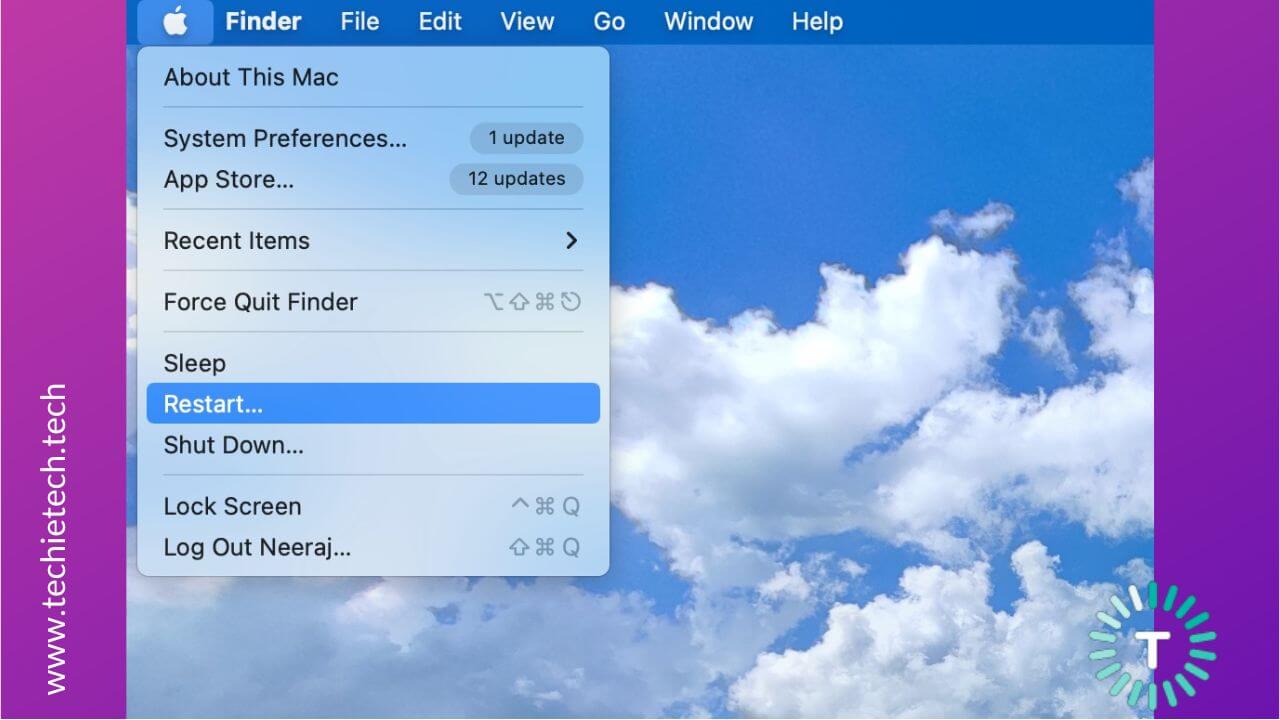
2. If your MacBook becomes unresponsive, you need to press and hold the Power button on your Mac until its shuts off. After a few seconds, press the Power button to start your MacBook.
Next, make sure to restart the router to fix MacBook Pro Wi-Fi connection issues. Here’s how to do that:
- Unplug the power and Ethernet cords from the router.
- Make sure you wait for at least 60 seconds before moving any further.
- Plug the power and Ethernet cables back into the router.
- Then, spare at least 2 to 3 minutes so the router can re-establish the connection.
Once you’ve restarted your MacBook and the router, check if the MacBook Pro Wi-Fi issues are fixed. If you’re still struggling with the same problem, move to the other pointers mentioned below.
Also Read: How to fix TouchID not working on MacBook
Method 7: Forget & Re-connect to the Wi-Fi network
Is your MacBook Air M2 not connecting to Wi-Fi after you changed the password? Did you change your Wi-Fi password recently? If so, we recommend updating the new password on your Mac. Incorrect or corrupt network settings are also one of the common reasons why your MacBook Pro is not connecting to Wi-Fi automatically. Also, if the
connection parameters have been changed on the wireless access point, you might face connectivity issues on your devices. Therefore, if your MacBook Pro won’t connect to Wi-Fi but other devices will, you must forget the Wi-Fi network that you’re using and reconnect to it using a new password. Also, if your M2 MacBook Pro keeps saying your Wi-Fi password is wrong, you can try this hack.
Doing this will refresh the Wi-Fi and re-establish the connection between your Mac and the wireless network. It will also remove the saved information on your MacBook that might be interfering with the authentication. So, make sure to give it a try.
Here’s how to forget the Wi-Fi network that you’re currently using on your MacBook:
- Open the Apple menu > System Settings.
- Select Wi-Fi in the sidebar.
- Choose Details available next to the network you’re using.
- Then, select Forget This Network.
- Select Remove to confirm your decision.
- If you want to forget the network you’ve joined but aren’t currently using, click here.
Once you’ve done this, reconnect to that Wi-Fi network with the updated password.
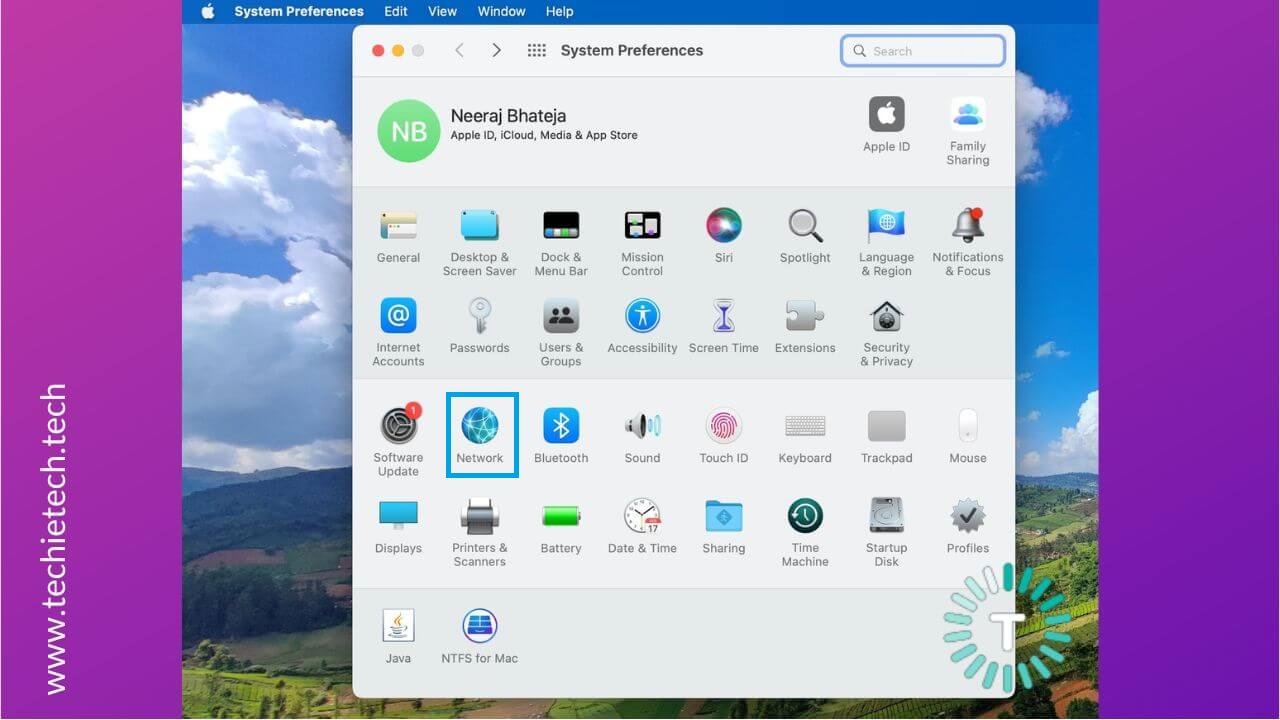
Method 8: Update macOS
If your MacBook is still not connecting to Wi-Fi, it’s time to check for software updates. Well, it isn’t just about the M1 MacBook Pro Wi-Fi problem, keeping your macOS up to date can fix many system issues and deliver a smooth performance.
On the flip side, running an older or outdated version of the software can cause some unexpected errors. So, it is usually wise to go for the latest (stable & public) version of macOS when it is ready to install and certified bug-free by experts. This happens a few months after public release of the software. Do not rush to update your device as soon as the public release is live. It’s usually full of bugs. We suggest waiting for atleast a few months.
To update macOS on your MacBook, choose Apple menu > System Preferences > Software Update. If an update is available, click the button to install it. The button might be named Install Now, Update now, Upgrade Now, or Restart Now.

While you’re updating your MacBook, also check pending firmware updates for your Wi-Fi router. If your router is running on old firmware, you might face
Wi-Fi issues on every device at your home. Once you’ve updated your MacBook and the Wi-Fi router, check if you can access the internet on your Mac.
If your devices are already up to date and your MacBook Pro still won’t connect to Wi-Fi, move to the next step.
Also Read: How to fix MacBook Pro Touch Bar not working problems
Method 9: Check VPN and security software
Using a VPN is another common reason why your M1 MacBook Air won’t connect to any Wi-Fi network. Although VPNs take care of your online privacy & security, they might also interfere with your internet connection. Many websites don’t
allow you to use VPN. As a result, you may face website crashes or other Wi-Fi issues on your M1 MacBook Pro. In some situations, the VPN apps’ network data might get corrupted which leads to Wi-Fi connection failure on your M2 Macs.
To avoid any complications, you must disable VPN or any other security software that you’re using on your Mac.
Here’s how to disable VPN on your MacBook:
1. Launch Apple Menu > System Preferences and select Network.
2. Select the VPN menu
3. Then, disable your VPN service.
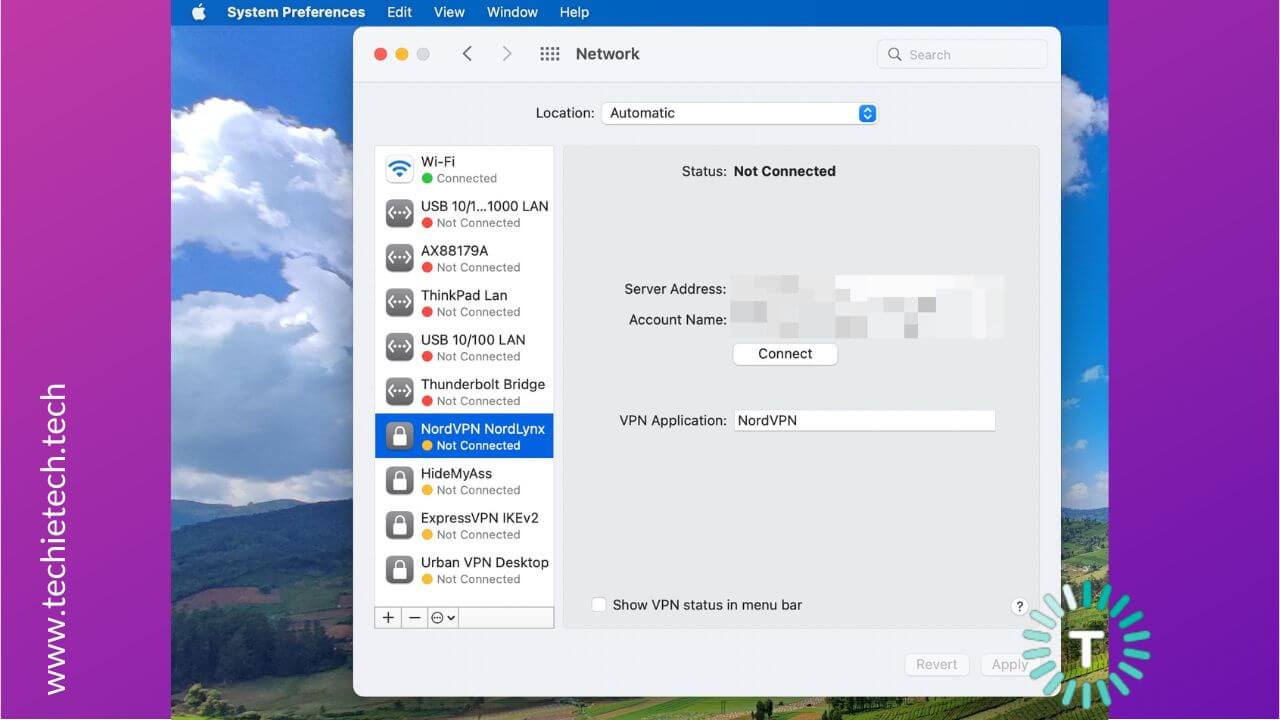
4. You can also disable the VPN via the respective app.
Method 10: Run Apple Wireless Diagnostics
When your MacBook won’t connect to Wi-Fi but other devices are, you can use the Apple Wireless Diagnostics tool to examine your Mac’s wireless services. It won’t fix the MacBook Pro Wi-Fi issues, but it will help you identify the root cause. This tool comes in handy in those weird situations where your MacBook appears to be connected to Wi-Fi but you can’t open any website, send/receive emails, stream music, or watch movies.
Here’s how to use Wireless Diagnostics on your MacBook:
1. If any apps are opened on your MacBook, close them.
2. If you aren’t already connected, try to join the Wi-Fi network that you’re having problems with.
3. Then, press and hold the Option key, click Wi-Fi status in the menu bar, and select Open Wireless Diagnostics. Alternatively, you can launch Wireless Diagnostics via the Spotlight Search.
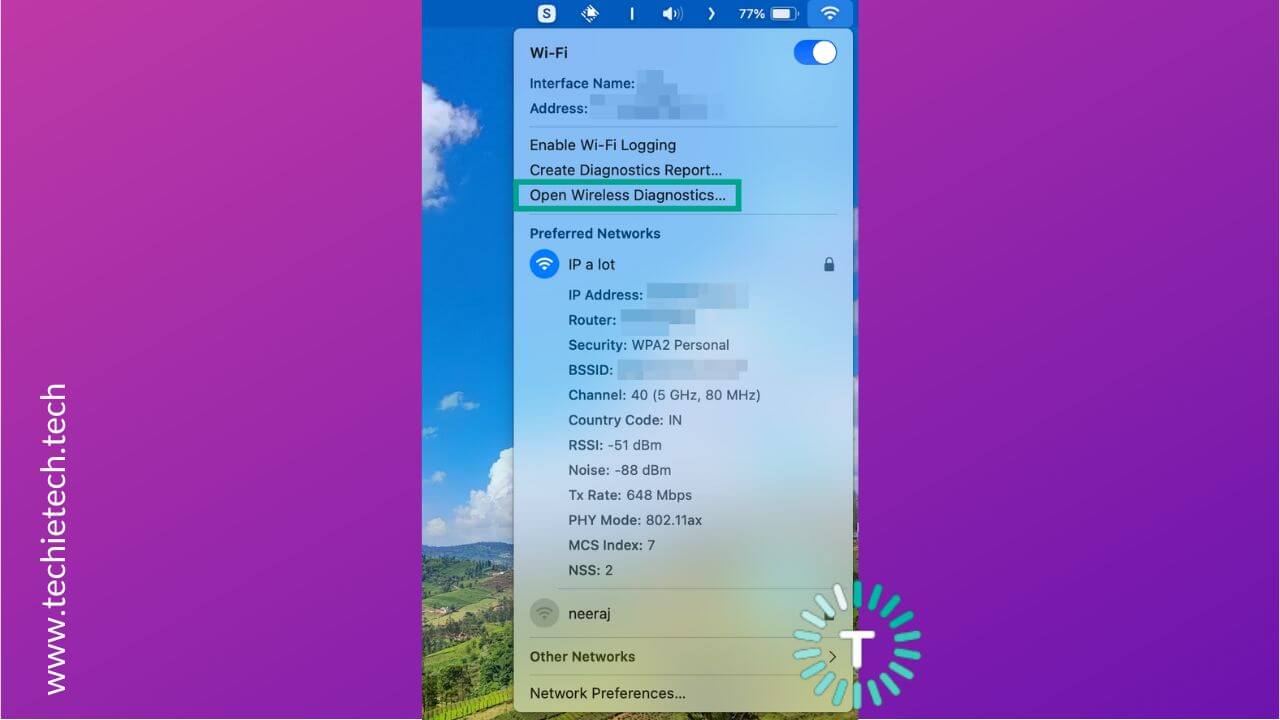
4. Follow the on-screen instructions. If you don’t receive any instructions, then just click on Create Diagnostics Report.
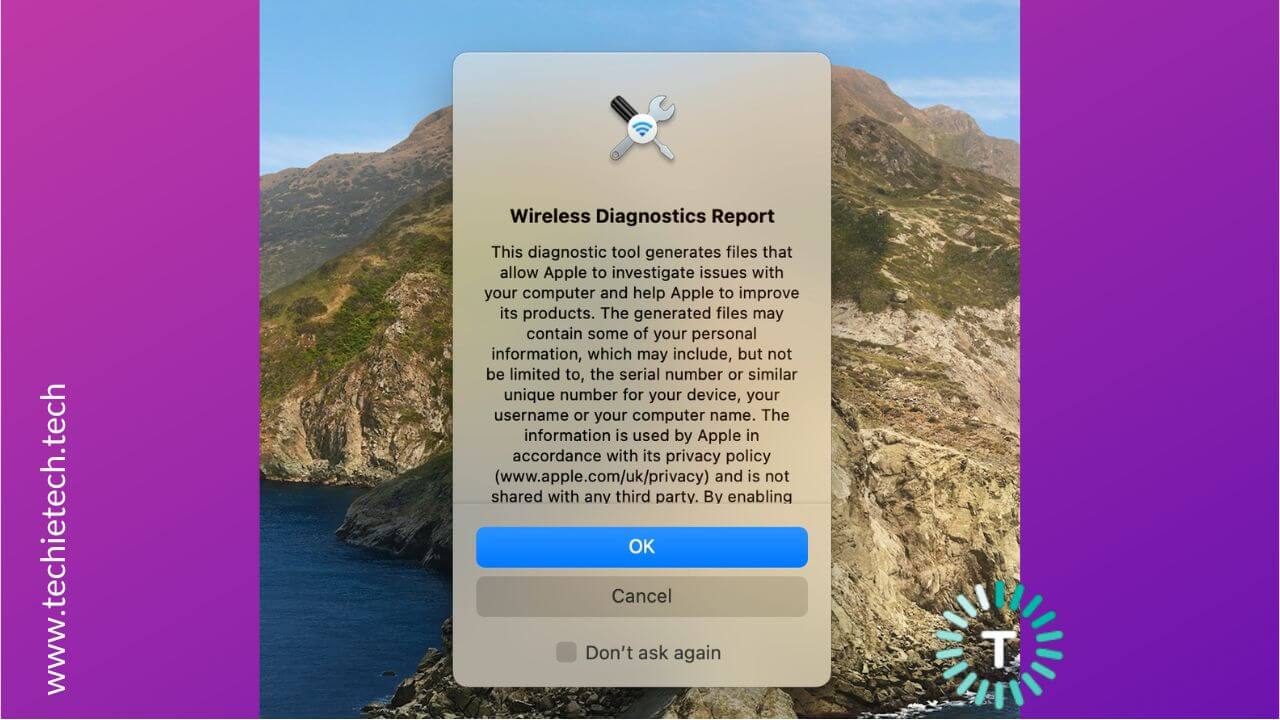
Once the analysis is done, Wireless Diagnostics will generate a compressed file that contains the list of detected issues and possible solutions. You can use this file when discussing the issue with your ISP or an IT professional.
The filename starts with WirelessDiagnostics and is saved in the folder /var/tmp.
Also Read: The 16 Best Ultrawide Monitors for Intel, M1, & M2 MacBooks
Method 11: Reset SMC (for Intel Macs only)
If your MacBook Pro 2015 is not connecting to Wi-Fi, you must try resetting the SMC. For reference, System Management Controller or SMC is a chip on your Mac that’s responsible for thermal management, system functions & more on your machine. Resetting SMC can help you fix several uncommon issues on your MacBook Air & MacBook Pro models. Therefore, if your MacBook Pro is not connecting to Wi-Fi or iPhone hotspot, you can try this hack.
It’s worth mentioning that you can reset SMC on all Intel-based models only. In the case of M1, M1 Pro, M1 Max, M2, M2 Pro, or M2 Max MacBooks, there’s no need to reset SMC. You just have to plug your MacBook into power, then either shut it down and turn it ON again or simply restart it. You need not perform any other step for Apple Silicon Macs.
Disclaimer: The steps to Reset SMC on a MacBook are dependent on the model you’re using.
How to Reset SMC on MacBooks that have T2 Chip (MacBook Air & MacBook Pro released after 2018):
Before you Reset SMC, follow these steps:
- Shut down your Mac.
- Once your machine is completely turned OFF, press and hold the Power button (or TouchID key) for 10 seconds. Then release the button.
- After a few seconds, you can turn ON your MacBook.
Follow the steps mentioned below to reset the SMC:
- Shut down your MacBook.
- From the built-in keyboard, press and hold the Shift + Control + Option (Alt) keys.
- Make sure you hold the three keys for 7 seconds. Then, press and hold the Power button simultaneously.
- Keep holding all four keys for another 7 seconds.
- Then, release them and wait for a few seconds.
- Press the Power button to turn ON your MacBook.
For steps to reset SMC on an older model, click here.
Method 12: Reset PRAM/NVRAM (for Intel Macs only)
Another reliable way to fix MacBook Air 2017 not connecting to Wi-Fi is to reset PRAM or NVRAM on your device.
For those who don’t know, PRAM (Parameter Random Access Memory) and NVRAM (Non-volatile RAM) are two small areas in the memory that store and quickly access data like display resolution, startup disk selection, and more. This stored data persists even when you shut down your MacBook. Sometimes, minor issues & glitches might cause Wi-Fi issues on your Mac. In such cases, resetting PRAM or NVRAM can wipe off virtual cobwebs and fix Wi-Fi not working on MacBook problems.
M1 MacBook Air & MacBook Pro comes with NVRAM but it works differently. If needed, your Apple Silicon Mac will automatically reset the NVRAM on startup. You don’t need to manually reset NVRAM on the M1 or M2 MacBooks.
Note: Resetting NVRAM/PRAM won’t hamper the performance or natural functioning of your MacBook. That said, there’s no need to do it very often.
How to reset PRAM/NVRAM on a MacBook Pro?
The steps for resetting NVRAM and PRAM on an Intel MacBook are the same. Here’s how to do it:
- Turn OFF your Mac
- While rebooting your MacBook, press and hold Command + Option + P + R before the grey screen appears.
- After you see the Apple logo or hear the reboot sound, release the keys.
- Allow your machine to turn ON by itself.
- If your Mac doesn’t turn ON automatically or shuts down in the middle, you’ll have to force restart the machine. To do this, press and hold the Command button while pressing the power button.
Also Read: Best Charging Stations for Apple products
Method 13: Change your DNS Settings
If your MacBook Air is unable to connect to Wi-Fi or your MacBook Pro is connected to Wi-Fi but there’s no internet, it could be due to a faulty DNS server from your ISP. In such cases, you can switch to a free, public DNS like the one offered by Google. Setting a custom DNS is also helpful in situations where Wi-Fi disconnects frequently on your MacBook Air or you get a very slow Wi-Fi speed on your MacBook Pro.
For reference, DNS or Domain Name System is a naming database that translates human-readable domain names into machine-readable IP addresses. For example, when you enter “example.com” into a web browser, DNS maps that name into a corresponding IP address that might look something like 192.158.1.38. In simpler terms, DNS is responsible for finding the correct IP address of the website that you search for in the web browser.
Here’s how to set a custom DNS on your MacBook:
1. Head to Apple Menu > System Preferences and open Network Preferences. You can also choose Network Preferences from the Wi-Fi icon in the top menu bar.
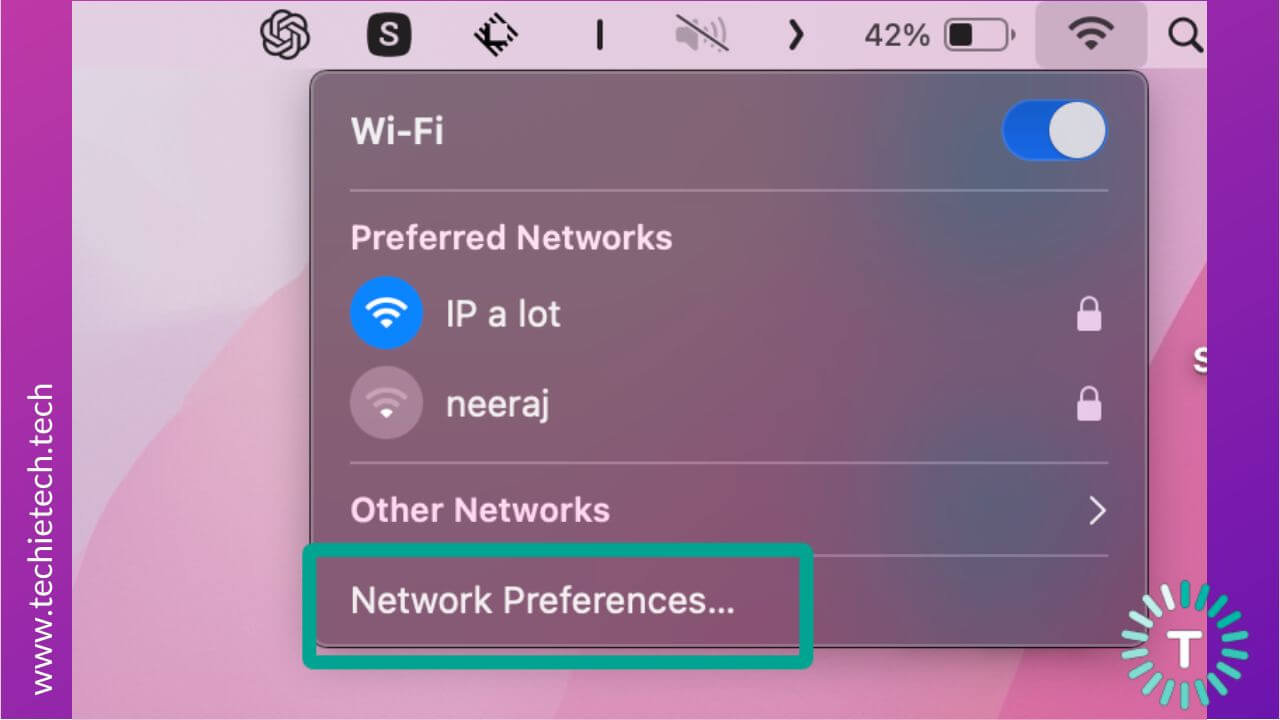
2. Select the Advanced option available at the bottom.
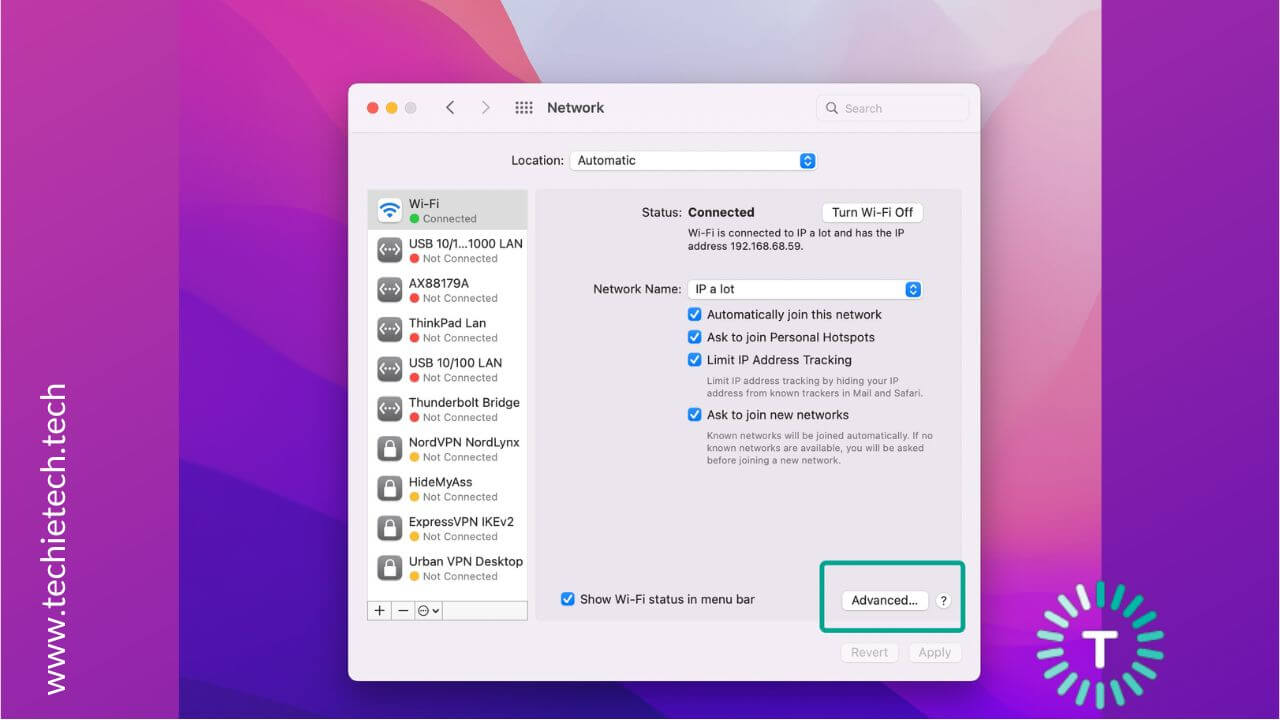
3. Then, from the menu option, select the DNS tab.
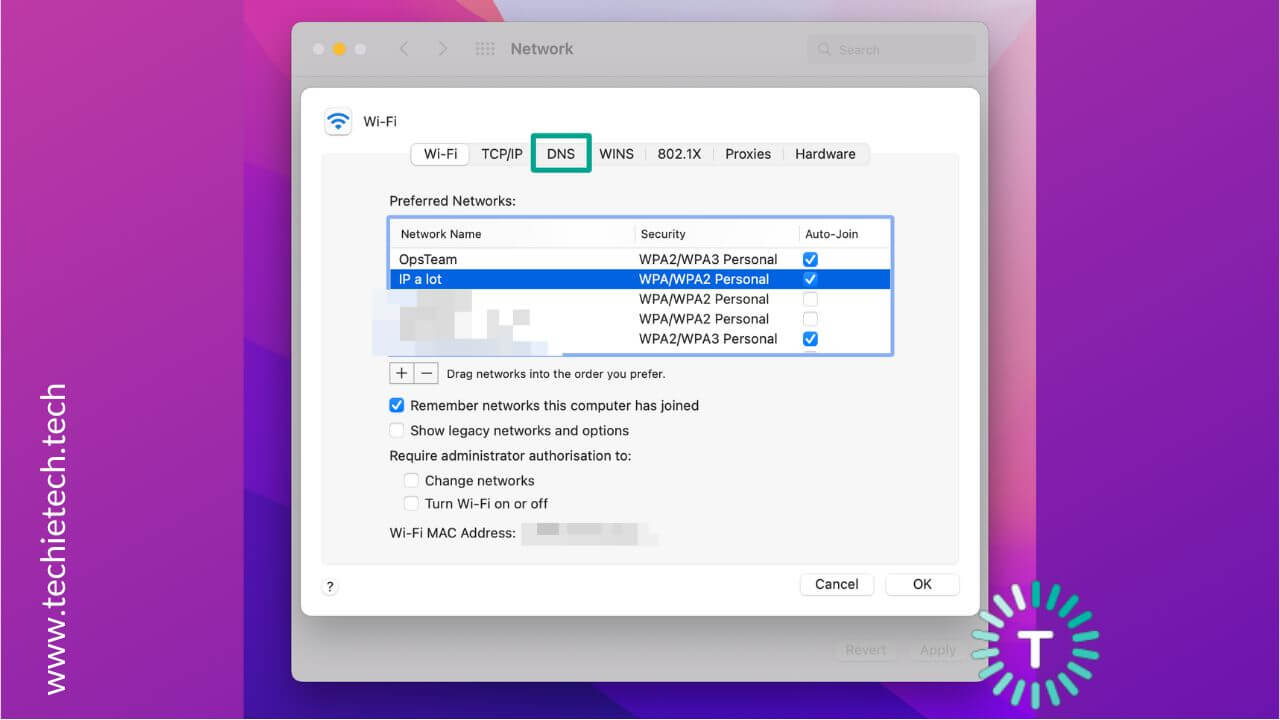
4. Go to the plus (+) icon
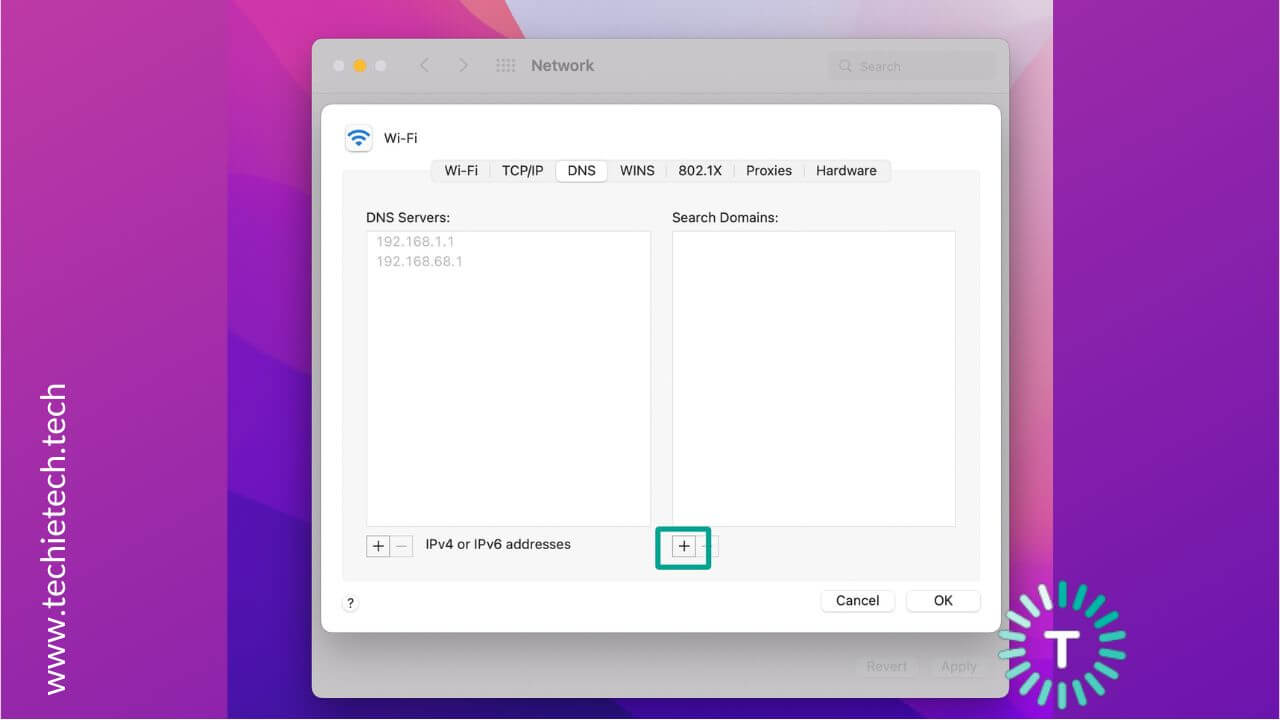
5. Add the Google DNS addresses (8.8.8.8 or 8.8.4.4)
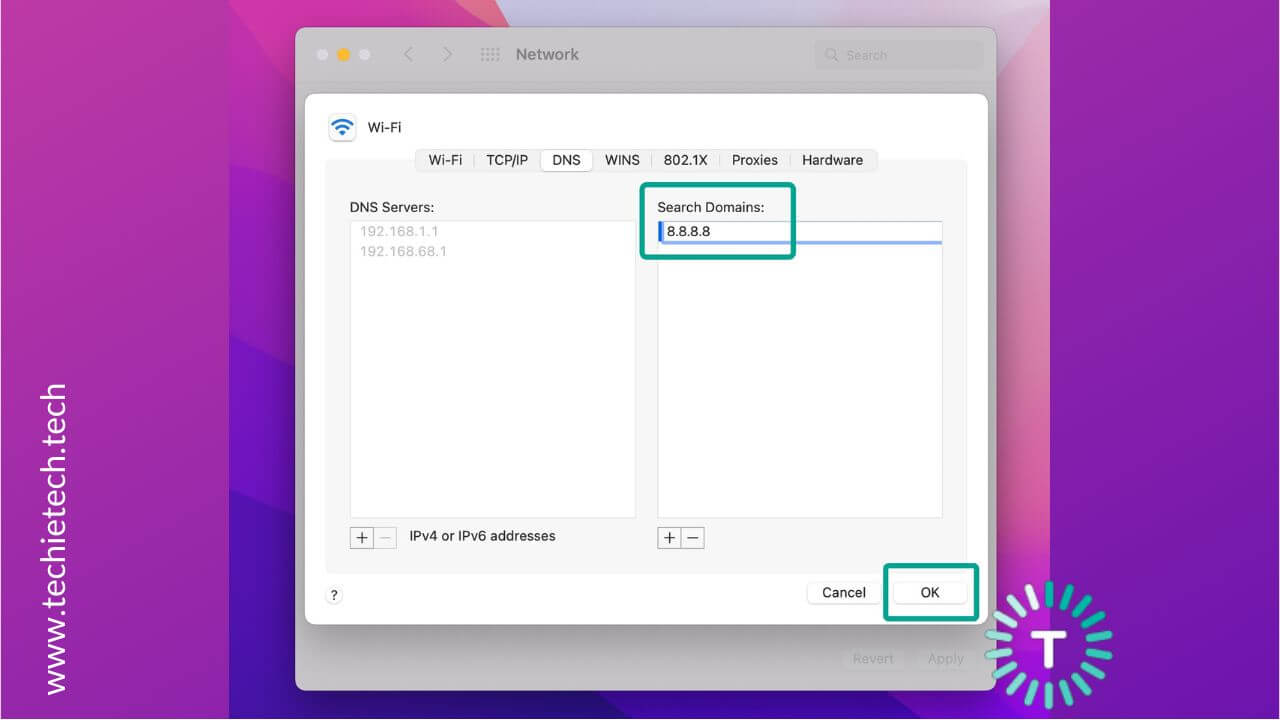
6. Click OK.
7. Now, you can try browsing the internet on your MacBook.
Method 14: Renew your DHCP lease
The DHCP (Dynamic Host Configuration Protocol) is a network management protocol that permits network devices like your router and MacBook to communicate with each other. The DHCP lease assigns IP addresses to your Mac so it can connect to the network. When the DHCP lease is compromised, it can cause Wi-Fi issues on your MacBook Pro M1. Fortunately, renewing your DHCP lease can help you fix a MacBook Air that won’t connect to the internet over Wi-Fi networks.
The overall process is simple and takes a few minutes. Let’s see how to do it:
1. Connect to the Wi-Fi network
2. Go to Apple Menu > System Settings > Network
3. Select Wi-Fi
3. Choose Wi-Fi you’re connected to and select the Details option.
4. Select TCP/IP tab and hit the Renew DHCP Lease option.
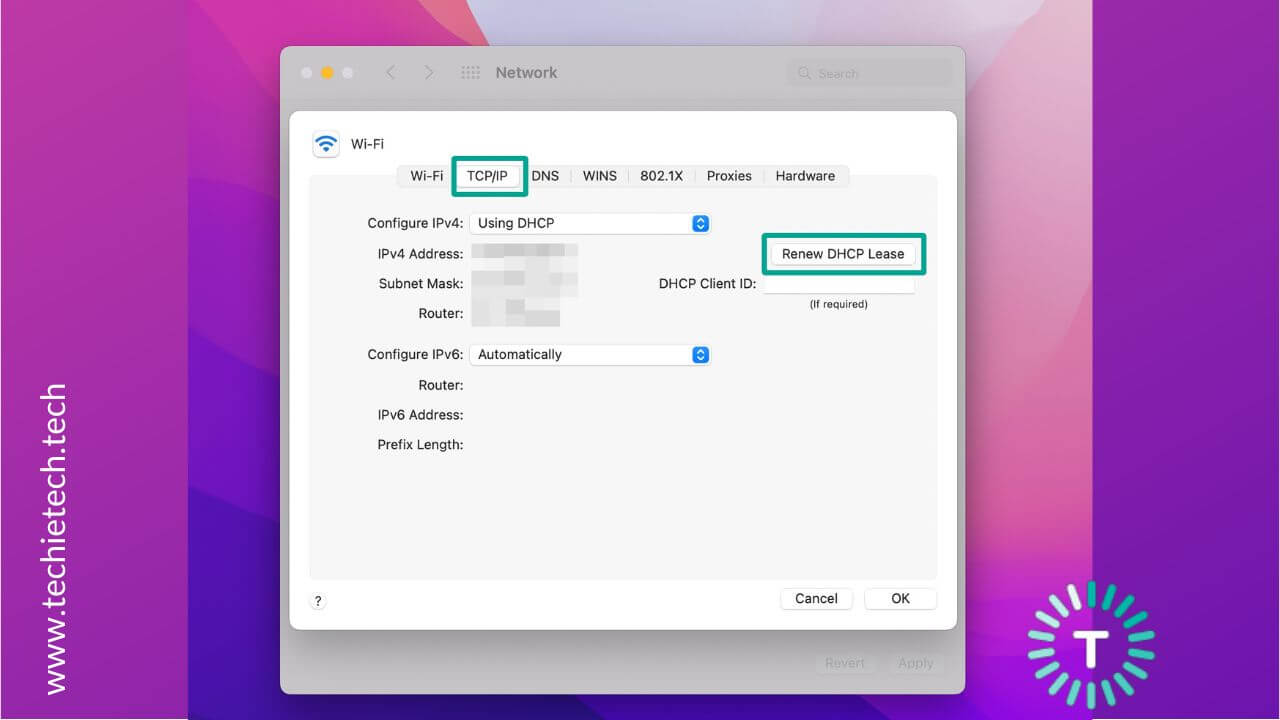
5. When you see the prompt, click the Apply button.
6. Lastly, click OK to close the sub-window.
Also Read: Best USB-C Adapters for 14” & 16” MacBook Pro
Method 15: Contact your ISP
In case your iPhone and MacBook aren’t connecting to Wi-Fi, you must contact your Internet Service Provider. You must ask them whether your Wi-Fi plan is expired or you’ve exceeded the data limit. If this happens to be your case, your Mac won’t connect to Wi-Fi. Moving on, in some rare situations, there might be some issues at your ISP’s end. For instance, the servers might be down or there could be outage problems. When this happens, Wi-Fi won’t work on your MacBook Pro or any other device like smartphones, tablets, laptops, and smart home devices. In such cases, you can’t do anything except wait until things get right.
If everything is sorted at the ISP’s end and you’ve got an active Wi-Fi plan, it’s time to get your router checked for any hardware issues.
Also Read: How to fix overheating issues on a MacBook
Method 16: Reach out to Apple support
If none of the above steps worked for you, there could be some complex system bug or issue with the internet components of your machine. In such a case, we recommend seeking some professional help. You must contact Apple support and get your MacBook diagnosed for any hardware failures. If your Mac is under the warranty, you can easily get it repaired. Don’t forget to
make an online appointment at the Genius Bar so you don’t have to wait in the walk-in line.
We strongly recommend staying away from cheaper alternatives or DIYs as they can void the warranty or leave your MacBook beyond repair.
Also Read: How to Calibrate MacBook Battery?
That’s all for now. We hope this troubleshooting guide helped you fix a MacBook that won’t connect to Wi-Fi or the internet.
How did you fix MacBook Wi-Fi problems? Don’t forget to share your experiences in the comments below.