![How to Fix Wi-Fi Not Working Issue on iPhone 14 Series [16 Ways]](https://media.techietech.tech/2022/12/How-to-Fix-Wi-Fi-Not-Working-Issue-on-iPhone-14-Series-16-Ways.jpg)
The iPhone 14 series has been a blockbuster hit. Ever since Apple launched the iPhone 14, 14 Plus, and 14 Pro models, they have been in the spotlight. But, like many other smartphones, the iPhone 14 lineup was also surrounded by major controversies. We read a lot of iPhone 14 issues, including SIM card not supported errors, battery drain problems, overheating issues, charging problems, and whatnot. One of the major concerns that we read a lot about during our research was Wi-Fi not working issue on iPhone 14 series.
Talking of the issues, users took to Reddit and other forums to complain about Wi-Fi connectivity issues on their iPhone 14 series. Some users reported that their iPhone 14 Pro Max doesn’t connect to Wi-Fi automatically. Is your problem the same? Are you also facing iOS 16 Wi-Fi problems? Is the Wi-Fi signal keeps dropping on your iPhone 14?
If the answer to any of these questions is YES or you are facing similar Wi-Fi problems on iPhone 14 series, you have landed in the right place for the solution. With the world living on the edge of the internet, it can be quite frustrating for you to face Wi-Fi connectivity issues on your iPhone. Well, we understand this problem and have curated this well-researched troubleshooting guide to help you fix iPhone 14 Wi-Fi issues. Here, we have mentioned 15 tried & tested ways to fix Wi-Fi connectivity problems on iPhone 14, 14 Plus, 14 Pro, and 14 Pro Max.
Let’s not wait any longer and start with the guide. Before we jump right into the solutions to fix Wi-Fi not working problems on the iPhone 14, let’s talk about common Wi-Fi issues you might be facing.
Common Wi-Fi issues users face on iPhone 14, iPhone 14 Plus, iPhone 14 Pro, and iPhone 14 Pro Max
a) Wi-Fi connected on iPhone 14 but not working
If you experience this issue, the first thing you need to check is if the green light about the Internet mark is blinking on the router. If you found out this, the Wi-Fi issue is most likely limited to your iPhone.
b) iPhone 14 Pro not connecting to Wi-Fi automatically
As soon as you toggle ON the Wi-Fi on your iPhone, the Auto-join feature ensures that your device is automatically connected to the Wi-Fi. If your iPhone 14 is not automatically connecting to Wi-Fi, there are chances that the Auto-join feature has something to do with it. So, make sure to fix the problem related to the feature. To resolve this issue you can jump to the fourth method.
c) iPhone 14 Plus connected to Wi-Fi but no internet
If your iPhone 14 series is connected to Wi-Fi but you can’t access the internet, it is possible that there’s something wrong with the router or on the ISP’s end. You can cross-check the internet availability by connecting the same Wi-Fi network on other devices and see if the internet works. If it doesn’t help, make sure to fix the router or get in touch with your internet service provider.
d) iPhone 14 Pro Max won’t connect to Wi-Fi (incorrect password)
Well, not the surprising cause, but incorrect passwords are one of many reasons why your iPhone 14 is not connected to Wi-Fi. So, make sure double check the credentials.
e) iPhone 14 series unable to connect to Wi-Fi
The major culprits in most of the Wi-Fi issues on iPhone 14 are either the router or the iPhone itself. There are fewer chances that ISPs have anything to do with it. However, it’s quite possible for them to run into some kind of network issue.
Therefore, to solve these and other Wi-Fi problems on the iPhone 14 series, it is best that you try out the different methods we have listed in the next section.
Without much ado, let’s jump on to the top tried and tested ways to resolve Wi-Fi not working problem on iPhone 14, iPhone 14 Plus, iPhone 14 Pro, and iPhone 14 Pro Max.
List of the top 16 tried & tested methods to fix Wi-Fi not working on iPhone 14 series
1. Disable Low Power Mode
The Low Power Mode is an excellent feature offered on an iPhone that lets you save battery by disabling or restricting different functions. But, this mode also limits device internet connectivity options as well. When the low power mode is enabled, the cellular data is automatically disabled, whereas Wi-Fi runs with various restrictions. Therefore, when you’re experiencing Wi-Fi issues on your iPhone 14 series, it’s best to disable the Low Power Mode feature.
Here’s how to disable low power mode on iPhone 14 series:
- Go to Settings
- Then, tap on Battery
- Now, toggle OFF the switch beside the Low Power Mode option
Now, you can check if the Wi-Fi not working issue on iPhone 14 Pro and iPhone 14 Plus is fixed or not.
2. Restart your iPhone 14 to fix Wi-Fi connection problems
Even though Wi-Fi connection issues are major problems, you’d be surprised to know that they can be caused due to a small bug or glitch. Therefore, when the internet is not working on your iPhone 14 even if it is connected to Wi-Fi, you just need to restart your device. Yes, a simple reboot can come in handy in fixing minor system glitches or bugs that are interfering with the Wi-Fi. Not only that, when you restart your device, it will also clear the RAM and ensures a fresh start to the device.
Here’s how to restart an iPhone 14 to resolve Wi-Fi not working issues:
- First, simultaneously press and hold Volume Up (or Volume Down) and the Side button until the power-off slider appears.
- Now, drag the slider, then wait 30 seconds for your device to turn off
- Then, to restart your device, press and hold the side button (placed at the right of your iPhone) until you see the Apple logo.
Once you’re done restarting the iPhone 14, make sure to check if the Wi-Fi connectivity issues are fixed or not. Just in case, you are unable to fix the issue, we urge you to try out the methods mentioned below.
Also Read: How to fix 5G not working on iPhone 13 series
3. Toggle Wi-Fi Off and On
If you can’t connect your iPhone 14 to a Wi-Fi network, the first thing you should try is turning the Wi-Fi OFF and then turning it back ON. It is probably the easiest method to fix the Wi-Fi connection issues on
iPhone 14 Pro models. So, make sure to give it a try. By doing this, you can fix minor issues that are interfering with the Wi-Fi networks. Not only it helps in establishing a connection between your iPhone and Wi-Fi but can be extremely helpful if your iPhone 14 doesn’t detect nearby Wi-Fi networks or Wi-Fi keeps dropping on your iPhone 14 Pro.
If you haven’t tried this method already, please make sure to follow the steps mentioned below:
- Head to Settings on the iPhone
- Tap WiFi
- Then, toggle the switch beside Wi-Fi to turn it OFF (if it’s ON)
- Now, wait for a few seconds and toggle the switch ON
Alternate method:
You can also turn ON/OFF Wi-Fi on your iPhone 14 series by visiting the Control Center. You just have to go to Control Center > tap on the Wi-Fi icon (if it is turned ON, it will be turned OFF). Then, wait for a few seconds and tap on the Wi-Fi icon again to turn it ON.
Once you have executed these steps, make sure to check if you are able to connect to the desired Wi-Fi network on iPhone 14 Plus. On contrary, if you are unable to fix the issue where Wi-Fi is connected but there is no internet, please follow the next methods.
Also read: How to enable Advanced Encryption for iCloud Backup (End-to-End iCloud Encryption)
4. Toggle the Airplane mode ON and OFF
Won’t your iPhone 14 still connect to a Wi-Fi network or you’re still facing Wi-Fi connectivity issues on iPhone 14 Pro Max? Well, to cope with this problem, you can just toggle the Airplane mode on your iPhone. It is one of the quickest and easiest methods that can fix a variety of Wi-Fi-related issues like iPhone 14 not connecting to Wi-Fi automatically or Wi-Fi calling not working on iPhone 14 Plus.
Here’s how to toggle Airplane mode on your iPhone 14 (2-ways)
Via iPhone’s Control Center:
- Open Control Center
- Then, tap Airplane mode
- Wait for a few seconds, then tap Airplane mode again
Via iPhone Settings:
- Open Settings
- Go to Airplane mode
- Then, turn the slider ON
- Now, wait for 4-5 seconds and turn it OFF, again
Once you’ve successfully performed the aforementioned steps, please make sure to check if iPhone 14 Pro Wi-Fi problems are fixed or not. If yes, good for you, if not keep reading this guide. We have many tried and tested ways listed here.
Note: This quick hack is extremely handy in fixing 5G issues and no service issues on iPhones.
5. Restart the Router to resolve the Wi-Fi connection issue on iPhone 14
If a normal bug or glitch is interfering with your iPhone 14 series, you’ll be able to fix Wi-Fi not connecting problems by following the above methods. However, there are chances that your router could be at fault as well. Therefore, before trying
tips and tricks on your iPhone, it’s ideal to look out for any problem associated with the Wi-Fi router. You might be unaware but the Wi-Fi issues on iPhone 14 Plus could be the result of minor crashes on the modem/wireless router. In such a case, rebooting (power cycling) the router can be handy.
Here’s how to perform the power-cycling on a Wi-Fi router:
- Initially, turn OFF the router by pressing the power button
- Once, the router is turned off, make sure to unplug its AC adapter
- Now, wait for at least 30 seconds, then plug the adapter back into the power outlet
- Then, press the power button again to turn it back ON
If you found out that the router is overheating, it is best to let it cool down by leaving it turned off for another 15-20 minutes.
What to do after the router is turned ON?
Once you’ve turned on the router, wait for the Wi-Fi or internet indicator to show a stable green light. If you see red light, it means there’s no active internet connection which could be due to several reasons (like a fault at ISP’s end, an inactive Wi-Fi plan, etc.). Since it takes about 3-5 minutes for a router to boot up, you need to wait patiently.
If iPhone 14 Wi-Fi issues still persist, don’t forget to try out other effective methods given below.
6. Update Router Firmware
If the power-cycling method didn’t work for you, there might be the need to update the router’s firmware to fix iPhone 14 not connecting to Wi-Fi. First, you should type in the router’s IP address in the search bar of the browser. Then, you’re likely to see a warning on the screen with a message – ‘Your connection is not private.’ Now, click proceed <IP address> to move ahead with the steps.
If you are a newbie and don’t know how to find the IP address of your router, please make sure to follow the steps given below:
1. First, type the command prompt in the search bar of your PC
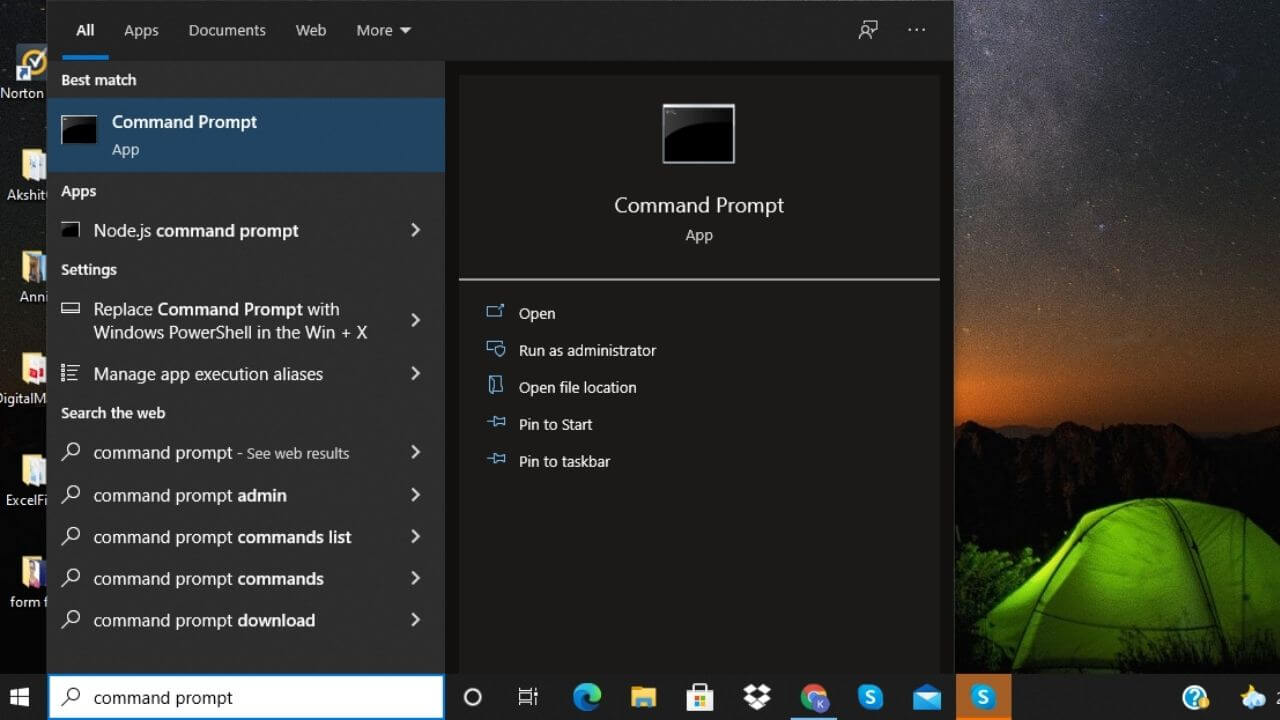
2. Then, press Enter
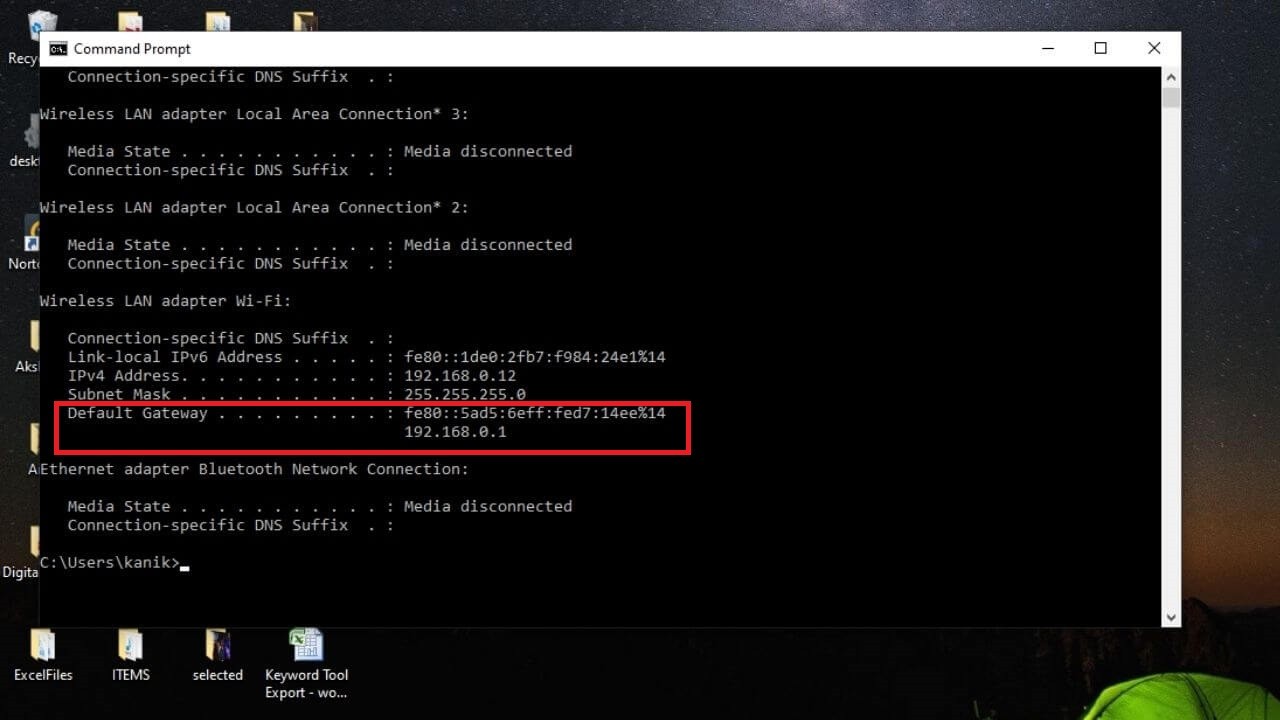
3. Now, type ipconfig in the command line and press Enter
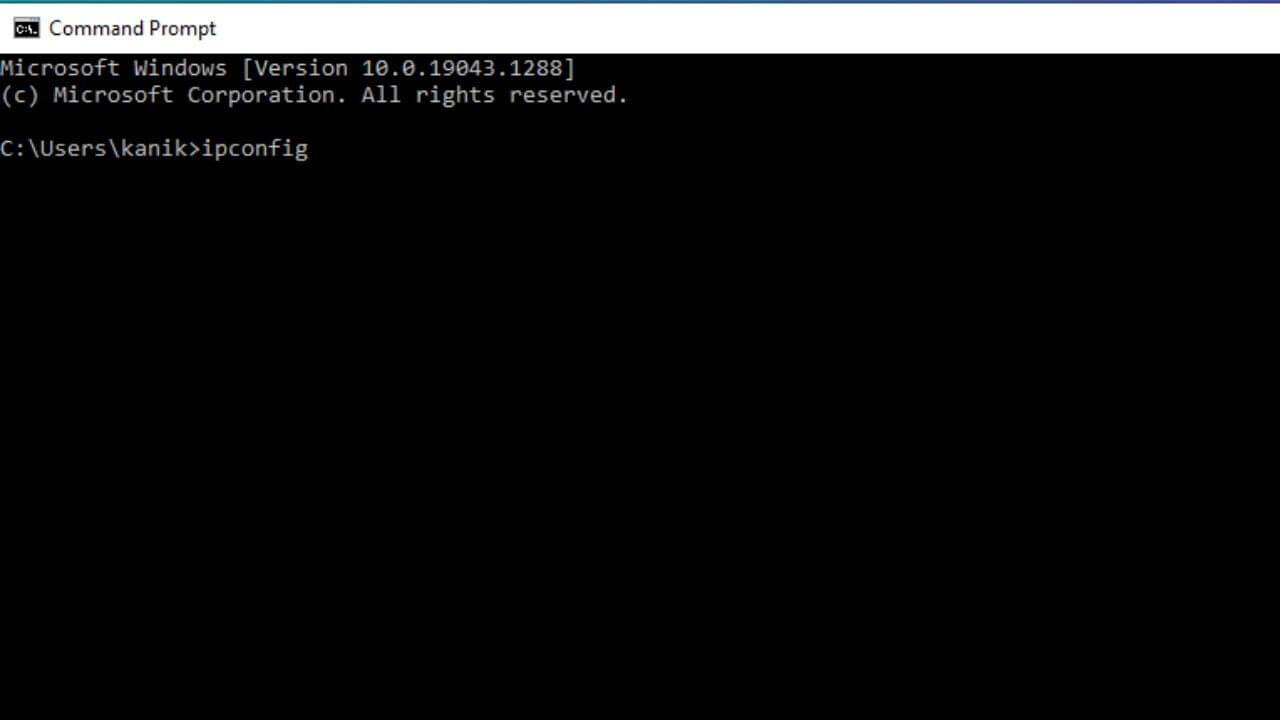
4. You’ll see your router IP address next to the Default Gateway
Once you’ve found the IP address of the router, please follow the steps given as under:
- First of all, enter your Username and Password. FYI, you can get these details in the router’s manual or it must have been conveyed by your ISP. Just in case you don’t find them, make sure to check the bottom of your router.
- Locate the Firmware or Update section
- Then, go to the router’s manufacturer’s website
- Next, download the firmware update file for your router
- After that, extract the file and move it to the desktop
- From the Update section on the webpage, click on the Choose File/Browse option
- Select the router update file that you moved to the desktop in Step 5
- Then, start the Upgrading, and wait until the process ends
- Once the firmware is updated, then reboot your router.
We understand it is quite complex, but if you successfully complete these steps, you are likely to solve almost every Wi-Fi-related issue on iPhone 14 series. If you are among those unlucky ones who couldn’t fix the Wi-Fi dropping signals issues, there’s nothing more you can do than try out the different troubleshooting methods we have mentioned below.
Also read: How to fix an iPhone not working after an Update problem
7. Update your iPhone 14 to the latest iOS version
When you are unable to use Wi-Fi calling on iPhone 14 Pro or your iPhone 14 Pro Max simply doesn’t connect to Wi-Fi, you must verify that your device is running on the latest iOS version. At the time of writing this piece, iOS 16.2 is the latest version. It brings some important iOS 16 bug fixes and additional functionalities. So, make sure you’ve installed it on your iPhone. You might wonder how a new software update helps fix Wi-Fi issues on your iPhone. Well, it’s worth mentioning that several bug fixes and security patches are introduced with a new iOS update. So if there’s anything that is bothering the Wi-Fi, a new update is likely to fix such a problem. Therefore, it is recommended to update your iPhone with the latest stable iOS version as soon as they are available.
Disclaimer: Please note that the Beta version doesn’t guarantee bug fixes, they tend to be the trial version. Therefore, we advise you to wait until the latest stable version of iOS is released.
If you are unaware, there are two methods to update your iPhone 14 to the latest iOS version, we have listed them below:
- Updating via OTA (over-the-air)
- Updating through iTunes
That said, the first method is not feasible since Wi-Fi is not connected/working on your iPhone 14. Therefore, we recommend trying the second possible way which is updating your iPhone through iTunes. However, there’s a catch. You can only update your iPhone using a Windows or macOS device. Please make sure that both devices have the latest version of the iTunes app or Finder (for users with Mac running on macOS Catalina).
Here’s how to update your iPhone 14 to the latest iOS version:
- First, connect your iPhone 14 model to a computer/PC using the original or certified USB cable.
- Then, open iTunes and locate your iPhone 14 model
- Now, click General or Settings
- Next, click on the Check for Update button
- Then, select Download and Update to start the update
- Once prompted, enter your passcode to confirm
Once you’re done with the steps given above, make sure to follow the onscreen prompts to finish the iOS update. Lastly, check if updating the iOS has done the trick in resolving Wi-Fi issues on your iPhone 14, 14 Plus, 14 Pro, or 14 Pro Max.
Just in case, you are having trouble while updating iOS on iPhone 14 series, don’t forget to check our troubleshooting guide on how to fix your iPhone stuck on preparing an update.
Also Read: iOS 16 vs iOS 15
8. Enable the Auto-join feature if your iPhone 14 is not automatically connecting to Wi-Fi
Are you worried because your iPhone 14 is not automatically connecting to Wi-Fi after you reach home? If yes, we urge you to check if the Auto-join feature is enabled or not. FYI, Auto-join is a helpful feature on iPhone that automatically connects your device to previously connected Wi-Fi when it is in the range. So, if the Auto-join feature is disabled on your iPhone 14, you have to connect to your home Wi-Fi every day after you return from the office. Before we proceed with the steps to enable the Auto-join feature, you must ensure that you’ve turned on the Wi-Fi on your iPhone 14 Plus.
Here’s how to enable Auto-join on iPhone:
- First, open the Settings on your iPhone
- Now, navigate to Wi-Fi
- Then, tap on the desired Wi-Fi network for which you want to enable the Auto-join feature
- Check if the Auto-join is enabled, if not, just toggle the switch beside to Enable the feature, and you’re done.
If you were frustrated by your iPhone 14 Plus not connecting to Wi-Fi automatically, doing this will fix the issue.
Disclaimer: If you happen to use the forget the network option, please note that you will have to turn on the Auto-join feature, again.
Also read: Common iOS 16 Problems & How to fix them
9. Forget Wi-Fi Network and Reconnect
Still not found a way to fix Wi-Fi connected on iPhone 14 Pro Max but no internet issue? Or, is your iPhone 14 Pro still showing an incorrect Wi-Fi password error? If you are unaware these common iOS 16 problems are possible due to corrupt Wi-Fi settings. Basically, when network settings get corrupted, the Wi-Fi network’s information is likely to get altered. Therefore, it is best to restart Wi-Fi and try establishing a fresh connection once again. That’s where the ‘forget Wi-Fi network’ feature comes into play. It is worth mentioning that, forgetting a Wi-Fi network will delete all the saved passwords and Wi-Fi data from your iPhone, and you have to reenter the password to reconnect to Wi-Fi.
Before you proceed with the below steps to fix iPhone 14 and 14 Plus not connecting to the Wi-Fi network, make sure you remember your Wi-Fi password. You would have to enter them again to reconnect the Wi-Fi.
Here’s how to forget the Wi-Fi network on your iPhone and reconnect back again:
- Open Settings
- Navigate to Wi-Fi (there you’ll see all the Wi-Fi networks in the range)
- Locate the name of the Wi-Fi network you’re facing a problem with
- Now, tap on the small ‘i’ icon next to the Wi-Fi network name
- Then, tap on the Forget This Network option (next, a prompt will appear on your device screen asking you to confirm the action)
- Once, you have confirmed the selection, reconnect to the same Wi-Fi network using the password and you’re done.
Once you’re done with the above steps, Wi-Fi issues on iPhone 14 Pro Max is likely to get fixed. In case this doesn’t help, move to the next method.
Also read: How to set up Passkeys on iPhone & Mac
10. Reset Network Settings
Another effective way to fix iPhone 14 Wi-Fi not working issue is resetting network settings. Please note that resetting network settings will erase all your current network settings including server settings, Wi-Fi networks, connected Bluetooth devices, APNs, and other network-related information from your iPhone 14. In short, this option will delete all the conflicting network data that interferes with the normal functioning of iPhones.Therefore, you need to reconnect your AirPods, Apple Watch, and even Wi-Fi after you reset the network settings.
Here’s how to reset the network settings on your iPhone to fix Wi-Fi connectivity issues:
- Head to Settings
- Tap on General
- Scroll through and tap on the Reset option
- Then, tap to select Reset network settings from the given options
- Next, enter your Passcode if you see a prompt on the screen
- Lastly, tap Reset Network Settings to confirm the selection.
As soon as you execute step 6, your iPhone will restart, and the default network settings will be reinstated. Now, you should be able to connect to the Wi-Fi. Not only that, this method is likely to
fix all the network-related issues on your iPhone as well.
11. Disable VPN
If you often use a VPN, it might be one of the reasons why Wi-Fi isn’t working on your iPhone 14. Yes, you read that right. Many websites don’t allow users to use VPNs. Therefore, you might experience webpages crashing, websites not being accessible, and several other errors. That’s not all, it is also possible that VPN’s app data has corrupted, as a result, you may experience weak Wi-Fi signals, spotty Wi-Fi connection, and several other issues.
Therefore, to avoid any complications and prevent Wi-Fi relates issues on your iPhone 14 Plus, it’s best to turn OFF the VPN. You can follow the steps given below to disable VPN on iPhone 14 series and other iPhone models.
Here’s how to turn OFF VPN to fix Wi-Fi connection issues on iPhone 14:
- Go to Settings
- Then, go to VPN settings
- At last, toggle to change the VPN status from Connected to Not Connected.
Once you’ve disabled the VPN, don’t forget to check whether the Wi-Fi not working problem on your iPhone 14 is fixed or not. If the issue persists, keep reading, we have a lot of troubleshooting methods waiting for you below.
Also read: How to Watch Netflix with VPN ft. NordVPN (Step-by-Step Tutorial)
12. Turn off Wi-Fi Assist
If you ever happen to use Wi-Fi assist feature and experience Wi-Fi-related issues on your iPhone 14, it’s because of the feature itself. Basically, the Wi-Fi assist feature allows you to use mobile data when the Wi-Fi connection is poor or unstable. While the feature is quite useful, things can get weirdly frustrating when your iPhone keeps reconnecting and gets stuck in a loop. Therefore, to ensure this doesn’t happen and you can use the internet peacefully, make sure to turn OFF this feature.
Here’s how to turn off the Wi-Fi assist feature on iPhone 14:
- Go to Settings
- Now, navigate to Cellular
- Lastly, find Wi-Fi Assist and turn it OFF
Also read: How to set up eSIM on iPhone [Step-by-Step Guide]
13. Setup Custom DNS (Domain Name System)
Do you experience slow Wi-Fi speed on your iPhone 14 Pro or Wi-Fi not connecting at all? Well, a faulty or slow DNS server from your ISP could be the possible reason behind this. If you want to fix iPhone 14 Wi-Fi issues, we recommend you switch to an Open DNS or Google DNS. You may not be aware but setting up a custom DNS can also resolve problems where the Wi-Fi disconnects frequently on iPhone 14 Pro Max.
Here’s how to set up a custom DNS on iPhone 14 series:
- Head to Settings on your iPhone and open Wi-Fi
- Now, tap on your Wi-Fi network
- In the DNS section, tap on the numbers under DHCP
- Next, type in the Google DNS in Primary DNS and Secondary DNS separated by a comma (8.8.8.8, 8.8.4.4)
- Alternatively, you can use OpenDNS (208.67.220.123, 208.67.222.123)
14. Factory Reset your iPhone 14
If you have come down to this method, I can understand that you are super-pissed by now. We know it is extremely frustrating to see your siblings use Wi-Fi, but your iPhone 14 Pro won’t connect to the same Wi-Fi. That means, your network device i.e. router is absolutely fine, but your iPhone is at fault. Sadly, this is a harsh procedure as it includes the deletion of every user’s data on your iPhone. Yes, you get that right, we are recommending you perform factory reset on your iPhone 14.
It’s worth mentioning that this method will restore your iPhone 14 to default factory settings. Meaning, all the data including email accounts, contacts, downloaded apps, photos, videos, and everything else. Therefore, make sure to back up your iPhone before you perform the factory reset method on your iPhone 14 Plus.
Here’s how to Factory Reset your iPhone 14:
- Head to Settings
- Tap General
- Then, scroll down and tap the Reset option
- Next, tap Erase All Content and Settings
- After that, you’ll see a pop-up asking if you want to back up your data or erase it right away.
- You can confirm your decision and your iPhone will start erasing. The process might take a few minutes to finish.
After you have finished the process, your iPhone will be restored to the default factory settings. Now, you can set up your iPhone as a new device or restore the backup you created before.
Also read: Here’s How to Fix iOS 16 Battery Drain Issues – 15 Tried & Tested Ways
15. DFU Restore your iPhone 14
Before we write anything, a friendly advice – KEEP THIS METHOD AS A LAST RESORT. The DFU (Device Firmware Update) Restore method is the deepest way of restoring your iPhone 14. When you execute this method, it will reload firmware and software on your iPhone 14 series. Besides, it is potentially risky for your iPhone, and possibly brick your device if anything goes wrong. Therefore, you must try this step by understanding all the risks associated and taking responsibility on your hands. We have mentioned it earlier and saying it again, TechieTechTech will not be responsible if anything goes wrong while trying the troubleshooting methods we have mentioned in this guide. We also urge you to back up your iPhone 14 before you perform the DFU Restore.
Here’s our detailed guide on how to put an iPhone in DFU Mode. Please make sure to read and thoroughly follow the steps on your iPhone 14 series. If you successfully complete this process, there is a high chance that Wi-Fi not working issue on iPhone 14 will be resolved, once and for all.
Just in case this method didn’t help you fix Wi-Fi issues on iPhone 14 series, the only way left from the user’s perspective is to contact Apple.
16. Contact Apple
Are you exhausted trying all the methods and still remain unable to fix Wi-Fi connection issues on the iPhone 14 series? Well, you need to contact Apple in this case. It might be possible that some internal issue could be the real culprit behind Wi-Fi not working on iPhone 14. If that’s the case, we don’t recommend going to a local mobile repair shop or trying your luck with the hardware of the device. You might damage it. Therefore, it’s best to get it checked from the Apple Store. If the Wi-Fi issue is not fixable from their end, there are chances that you might get a brand-new iPhone 14. However, for that, you’ll need to have all the papers related to the warranty and device with you.
FAQs related to Wi-Fi connectivity issues on iPhone 14 series
a) Why is Wi-Fi suddenly not working on your iPhone?
There are several reasons why Wi-Fi suddenly stopped working on your iPhone 14 series. It could be possible due to the following reasons we have listed below:
- The problem at the ISP’s end
- An issue with the Wi-Fi router
- Conflicted Wi-Fi settings on your iPhone
- Poor Wi-Fi signal
- An incorrect Wi-Fi password (password might be changed by another family member)
- Problem with network settings
- Outdated software
- Wrong date and time of your phone
b) Does iOS 16 have Wi-Fi problems?
Yes, like any other software update, iOS 16 might also throw Wi-Fi and other problems in the initial versions. Several users have reported that the latest iOS 16 updates are causing Wi-Fi issues on your iPhone 14. Some users have complained that the iOS 16.1 updates triggered a Wi-Fi stability issue (keeps disconnecting) on some iPhones. Apparently, users are facing issues where the Wi-Fi connection disconnects every 2-3 seconds, and connects back again. So, if you are among such users who are already facing iPhone 14 Wi-Fi issues, we urge you to check the aforementioned troubleshooting methods.
c) Why can’t you connect to Wi-Fi but others can?
Well, in such cases, your iPhone 14 is at fault. Since every other device at your home is connected to Wi-Fi, you should understand that there are no issues with the network device (router). Therefore, you should start focusing on troubleshooting the Wi-Fi issue by following different methods on your iPhone. We have listed some effective solutions if your iPhone 14 Plus doesn’t connect to Wi-Fi but other family members are facing no issues.
- Disconnect and reconnect to Wi-Fi
- Restart your device
- Forget Wi-Fi network
- Disable VPN
- Reset network settings
- Setup custom DNS
You can refer to the pointers similar to these above and proceed accordingly to fix Wi-Fi connection issues on iPhone 14 Pro and 14 Pro Max.
That’s all for now in this troubleshooting guide to fix Wi-Fi not working issue on iPhone 14 series. If you have an iPhone 13 and facing similar issues, please make sure to
check our guide on how to fix Wi-Fi connection issues on iPhone 13.