If you’re looking for ways to backup your iPhone, you’ve landed at just the right place. Many iOS users believe that all their data is being backed up automatically to iCloud until they see the “iPhone Backup Failed” message or face iCloud storage space issues on their devices. Now, that means, if you don’t follow a good strategy to backup your iPhone, you’re likely to lose all of your favorite photos, videos, contacts, and other data. In this guide, we’ll walk you through different ways to backup your iPhone and secure all your important data. Therefore, no matter if your device gets misplaced or damaged, you’ll always have access to your important data.
What is iPhone Backup and why do you need it?
When you create a backup of your iPhone, you are copying certain files and settings from your iPhone to your computer or cloud storage. Backing up your iPhone data is one of the best and easiest ways to ensure that you don’t lose any information in case your device gets damaged or stolen. Plus, if you’ve switched to a new device, you can easily transfer all your data and settings from the previous device to the new one, if you’ve got a backup. Also, if you’re facing any issues like iPhone camera not working, showing up No-Service issue, or if you’re struggling with the charging problems on your iPhone, and you wish to perform a DFU Restore or Factory Reset on your device, it’s very important to back up all your important data. Otherwise, all the existing data will be erased from your iPhone during such processes.
Now, when we’ve understood what a backup is and why do we actually need it, let’s get started with our detailed guide on how to backup an iPhone. You can follow this guide to back up any iPhone model, including the older iPhone 7 Plus, iPhone XR, the previous year’s flagship iPhone 11, as well as the latest iPhone 12 Series.
How to backup an iPhone (4 Methods)
Now, you’ll be thinking how do I backup my iPhone, right? Well, there are several ways to create a backup of your iPhone data. iTunes and iCloud are two amazing methods offered by Apple itself. If you use iTunes to back up your iPhone, all the data will be stored locally on your computer. Whereas, if you go for iCloud, your data will be stored in iCloud storage, and can be accessed anytime using a Wi-Fi network. Whereas, in the case of iTunes, you need the computer that you’ve stored the backups on, to access your data.
Besides iTunes and iCloud, there are a few other ways to get the same job done.
We’ve mentioned different ways to backup an iPhone in this guide, you can pick the one that seems convenient to you. Also, you can combine different options to create the best combination to back up your iPhone. All the ways are listed in detail, therefore, even if you’re creating a backup of your iPhone for the first time, you can do it without any difficulties. So, let’s get started.
1. Using iCloud Backup
iCloud is Apple’s online backup service that allows you to backup not only photos and videos but also your text messages, applications data, files, and settings from your iPhone or iPad. The same goes for iTunes. iCloud is an in-built feature on every iPhone since iOS 5, and it backs up your iPhone’s data automatically. But first, you need to turn ON this feature on your device. It’s a super-easy way to secure your data. iCloud always encrypts your backups and allows you to create and use backups from anywhere, using a Wi-Fi network. You can avail upto 2TB of storage, out of which the first 5GB is free.
Here are a few important things that you must know about iCloud backups.
- You can create an iCloud backup using Wi-Fi on your device. There’s no need to connect your iPhone to a computer.
- The information stored in iCloud will be available across all your Apple devices, including your iPhone, iPad, iPod, iTouch, or Mac with iCloud turned ON. Some information can also be accessed via iCloud.com or iCloud for Windows app (if you’re using a Windows computer)
- iCloud backups don’t include the following:
- Data that’s already stored in iCloud, including Calendars, Contacts, Notes, iCloud Photos, Voice Memos, iMessages, SMS, MMS, and Health data.
- Data stored in other cloud services (like Gmail)
- Apple Pay information and Settings
- iCloud Music Library and App Store content
- Face ID or Touch ID settings
- Apple Mail data
How to Turn ON iCloud Backup on iPhone:
1. Head to Settings
2. Tap your name at the top
3. Tap iCloud > iCloud Backup and turn it ON
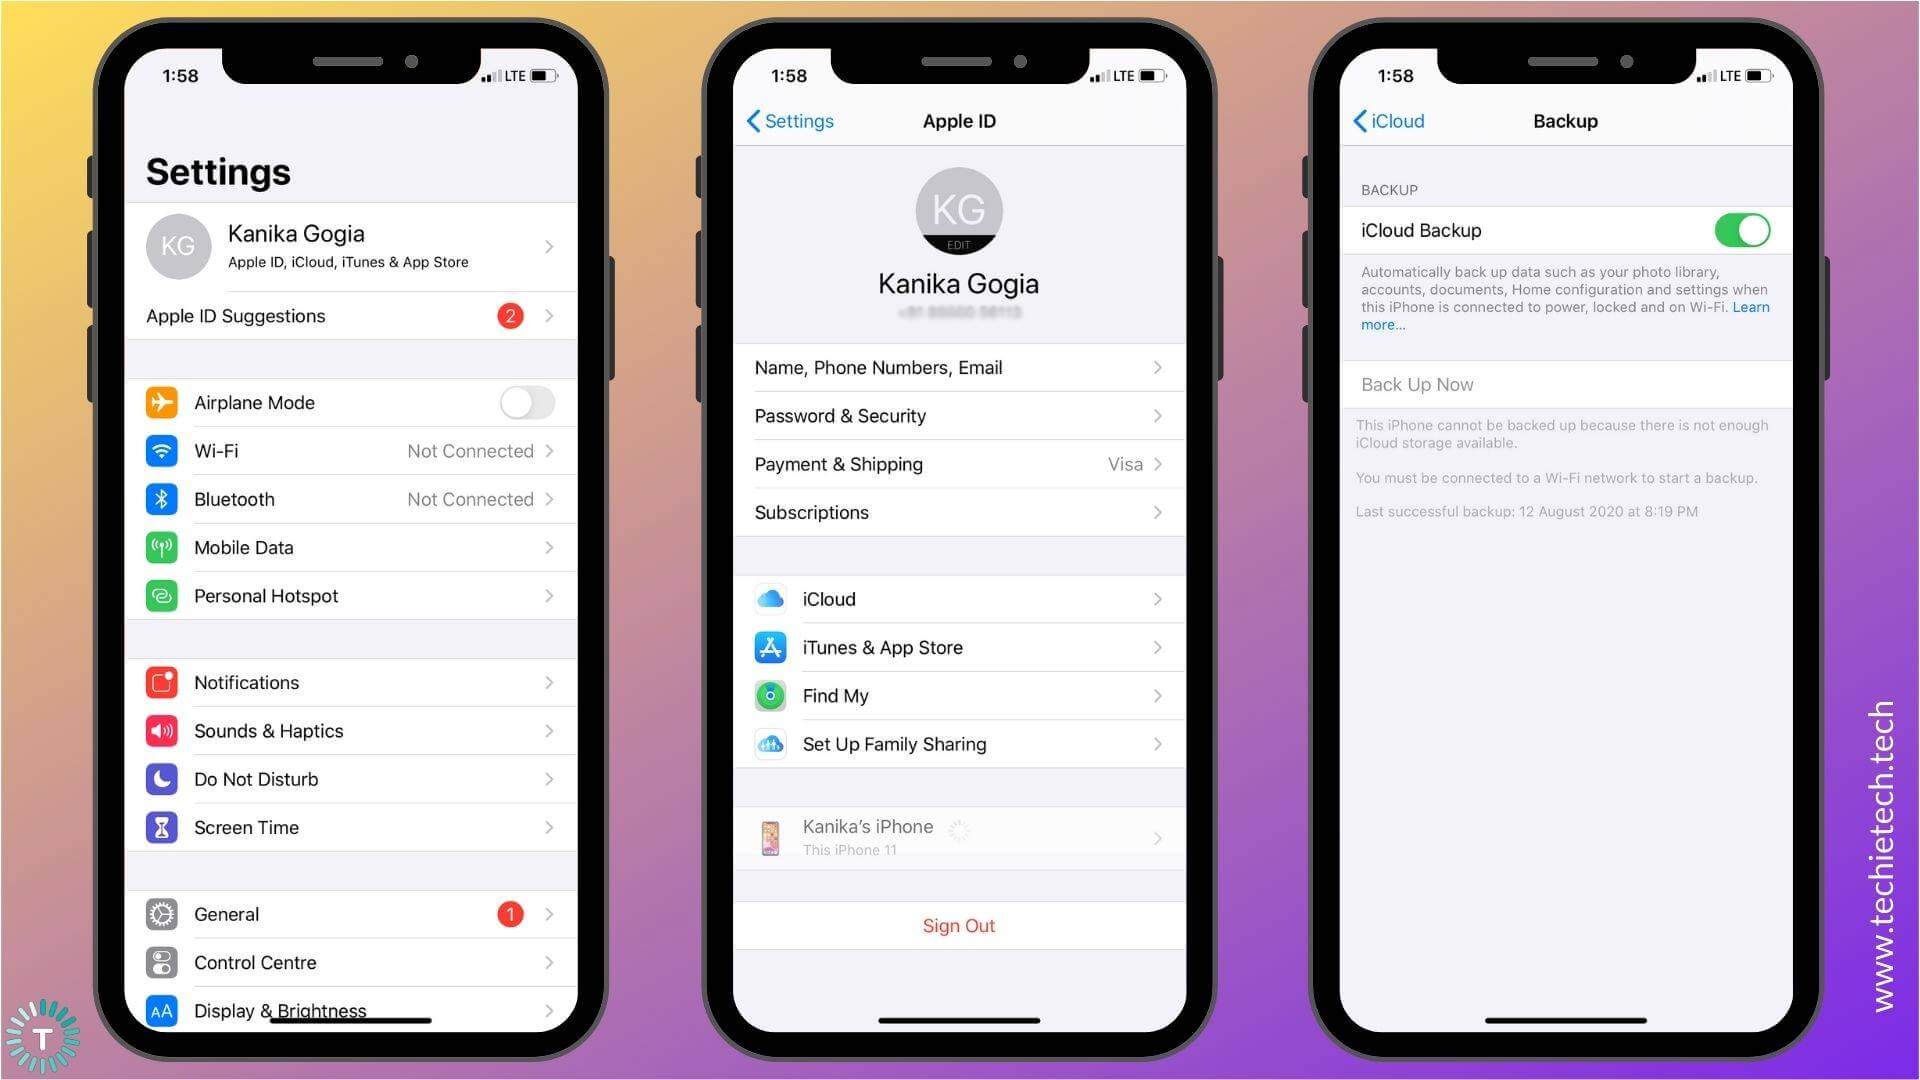
4. iCloud will automatically back up your iPhone whenever your device is locked, connected to power, and a Wi-Fi network.
If iCloud is already activated on your iPhone, you’ll see a list of apps and services that are using iCloud.
How to back up your iPhone using iCloud?
Once you’ve turned ON iCloud Backup, you can create a backup automatically or manually.
How to Automatically back up iPhone with iCloud
If you want to allow iCloud to automatically back up your iPhone every day, follow the steps mentioned below:
- Make sure you’ve turned ON iCloud Backup.
- Connect your iPhone to a power source.
- Connect it to a Wi-Fi network.
- Lock your iPhone’s screen.
- Regularly check that you’ve got enough iCloud storage space available for the backup.
How to Manually back up iPhone with iCloud
If you wish to manually back up your iPhone using iCloud, make sure that you’ve enough space available in iCloud storage, and then connect to a Wi-Fi network.

Now, head to Settings > Your name > iCloud > iCloud Backup and tap Back Up Now. make sure to stay connected to the Wi-Fi network until the process is completed.
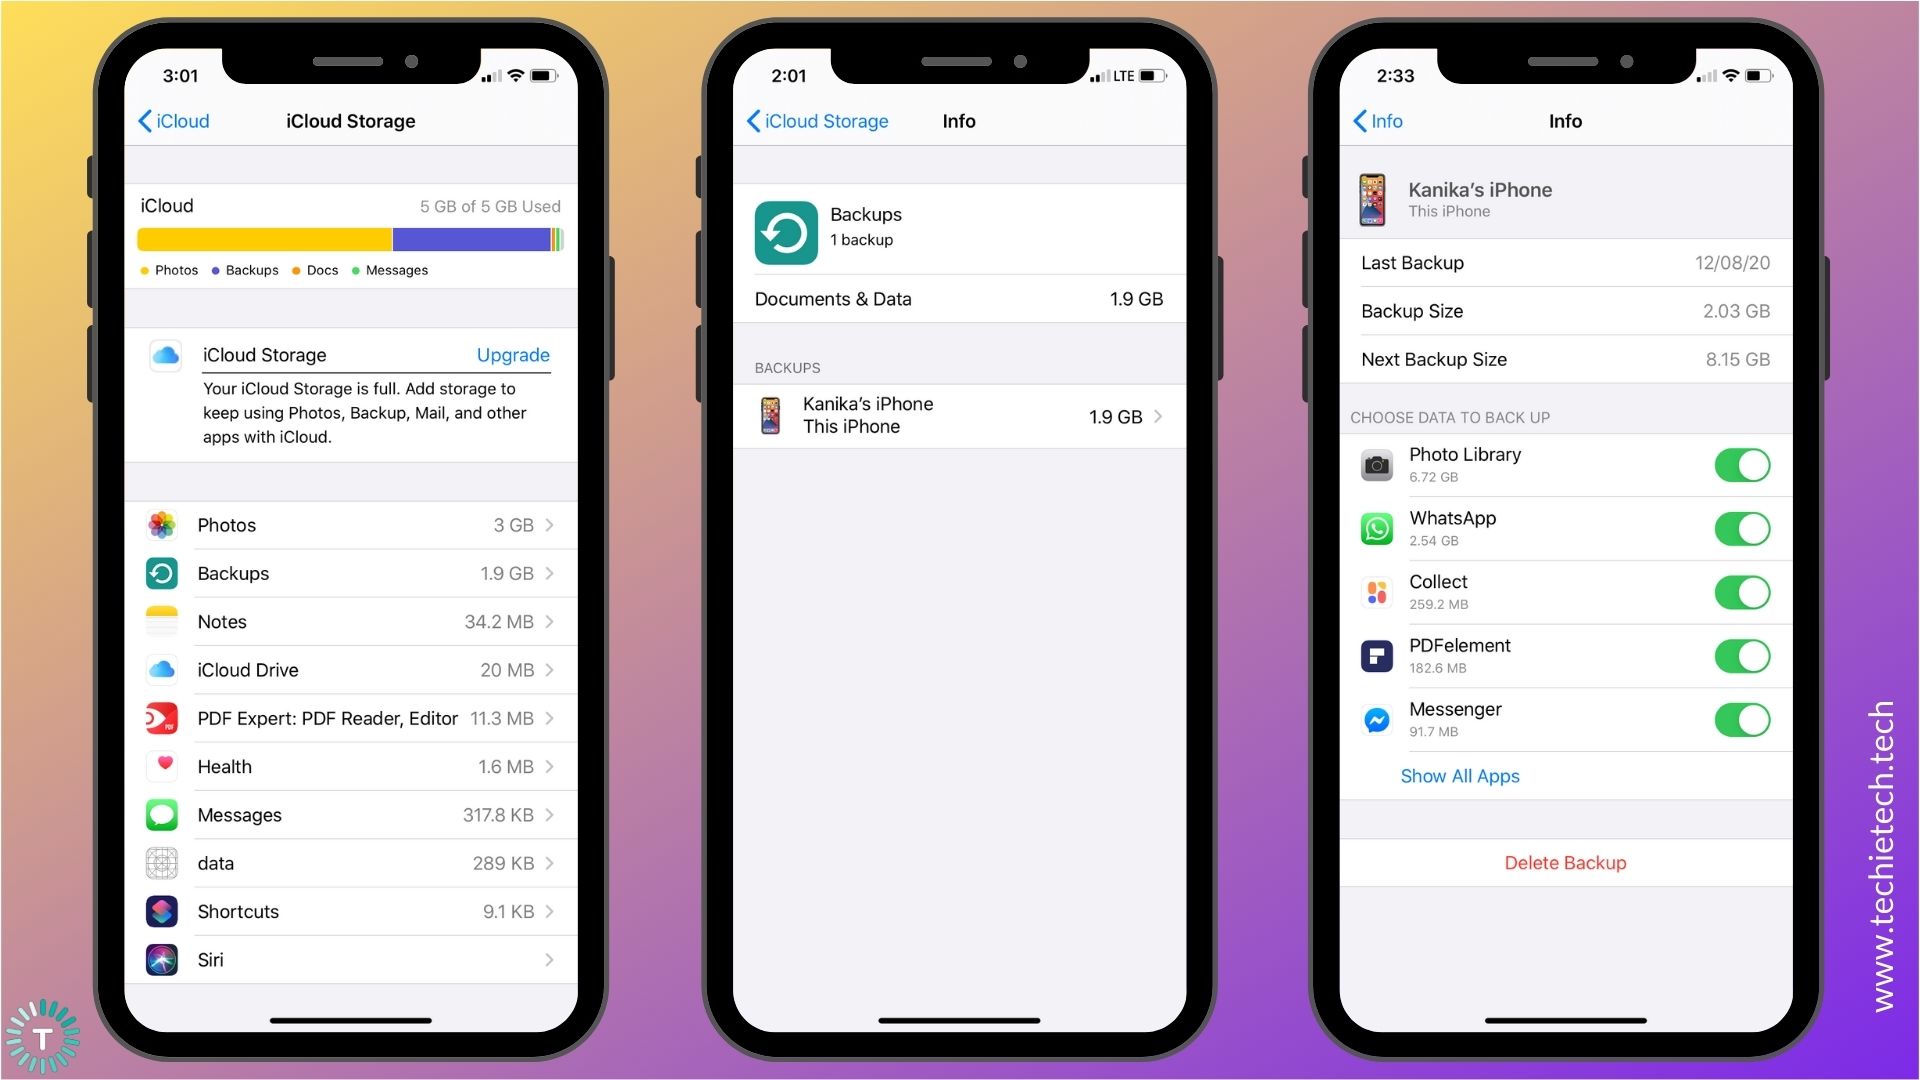
To view your iCloud backups, head to Settings, tap your name> iCloud > Manage Storage > Backups. If you wish to delete a backup, choose a backup from the list, then tap Delete Backup.
Backup specific apps on your iPhone
1. Go to Settings> [Your name] > iCloud > Manage Storage > Backups
2. Tap your device name
3. Under Choose Data to Back Up option, you can turn Backup ON or OFF for each app.
4. You can also see the amount of iCloud storage used by each app.
5. Also, some apps are backed up by Apple but are not included in the list. You cannot turn Backup OFF for such apps.
You’ll get 5GB of free iCloud storage when you sign in to iCloud (Apple ID). Photos and videos can take up a lot of space. If you’re someone who captures a lot of photos and videos, you can easily run out of free storage space. Also, your photos are uploaded to iCloud at full resolution, and when your device starts to run out of storage, those files may
get compressed and there is some loss of detail in quality.
You can buy more iCloud space for your iPhone, iPad, iPod, iTouch, or Mac. The subscription plan starts from $0.99 per month.
If you wish to buy more storage space, head to iCloud > Manage Storage > Upgrade.

You can now move to a new storage plan as per your requirements. It’s worth mentioning that the subscription plans of iCloud storage are significantly higher than the other online data storage services.
2. Using iTunes
iTunes is one of the oldest and most popular methods to back up your iPhone. It allows you to move your iPhone data to a hard drive, offering a super-easy & fast way to create a complete backup of your device. Firstly, you need to download iTunes on your computer, and then connect your iPhone to it.
One of the major advantages of using iTunes to create a backup of your iPhone is that it’s free of cost. You can back up your photos, videos, text messages, and more from your iPhone to a computer. There’s no storage space or network constraint, as long as your hard drive can handle the data. If you’ve got a computer with a large hard drive, using iTunes is a very convenient way to back up your iPhone. Plus, everything on your iPhone can be backed up and restored using iTunes.
iTunes will automatically back up your iPhone when you connect it to your computer. You can also manually back up your iPhone using iTunes any time.
Here are a few important things that you must know about the iTunes backup.
- It’s a manual process. Every time you wish to back up your iPhone using iTunes, you’ll have to connect your iPhone to a computer. The process takes a few minutes and is quite easy, but you have to remember backing up your iPhone. There are no such settings on your iPhone (like in the case of iCloud) that can backup your device using iTunes.
- Make sure that your computer’s hard drive has enough storage space available to store the backup. If you’ve got a 128GB or 256GB iPhone, and it’s nearly full, storage space can be an issue.
- It does not include the following data:
- Content from App Stores and iTunes.
- PDFs downloaded directly to Apple Books.
- Data synced from Finder or iTunes like books, photos, videos, and more.
- Data that’s already stored in iCloud like iCloud Photos, Messages, SMS, MMS, and iMessages.
- Apple Pay information and Settings
- Face ID or Touch ID settings
- Health, Activity, and Keychain data.
- Apple Mail data
How to back up the iPhone (using a Mac)
If you’re using a Mac with macOS Catalina 10.15, you can’t use iTunes, rather you’ll need Finder to back up your iPhone. In the case of a Mac with macOS Mojave 10.14 or earlier, you can back up your iPhone via iTunes.
Follow the steps mentioned below to back up your iPhone on macOS:
1. Connect your iPhone to a computer using its charging cable. If you’re using a Mac with macOS Catalina 10.15, open Finder. In the case of a Mac with macOS Mojave 10.14 or earlier, open iTunes.
2. If you’re connecting your iPhone and the computer for the first time, you’ll be asked to enter your iPhone’s passcode or to Trust This Computer. Follow the on-screen steps.
3. Now, select General from the top of the Finder window
4. Select “Backup all of the data on your iPhone to this Mac.”
5. If you want to encrypt your backup data and secure it with a password, select “Encrypt local backup.”
6. Click Backup Now.
If you wish to view all existing device backups, click Manage Backups. To delete a backup, click on any device backup, and choose Delete backup.
How to back up the iPhone using iTunes (using a Windows PC)
1. Connect your iPhone to a computer using its charging cable.
2. Open the iTunes app on your computer.
3. If you’re connecting your iPhone and the computer for the first time, you’ll be asked to enter your iPhone’s passcode or to Trust This Computer. Follow the on-screen steps.
4. Click on the iPhone button
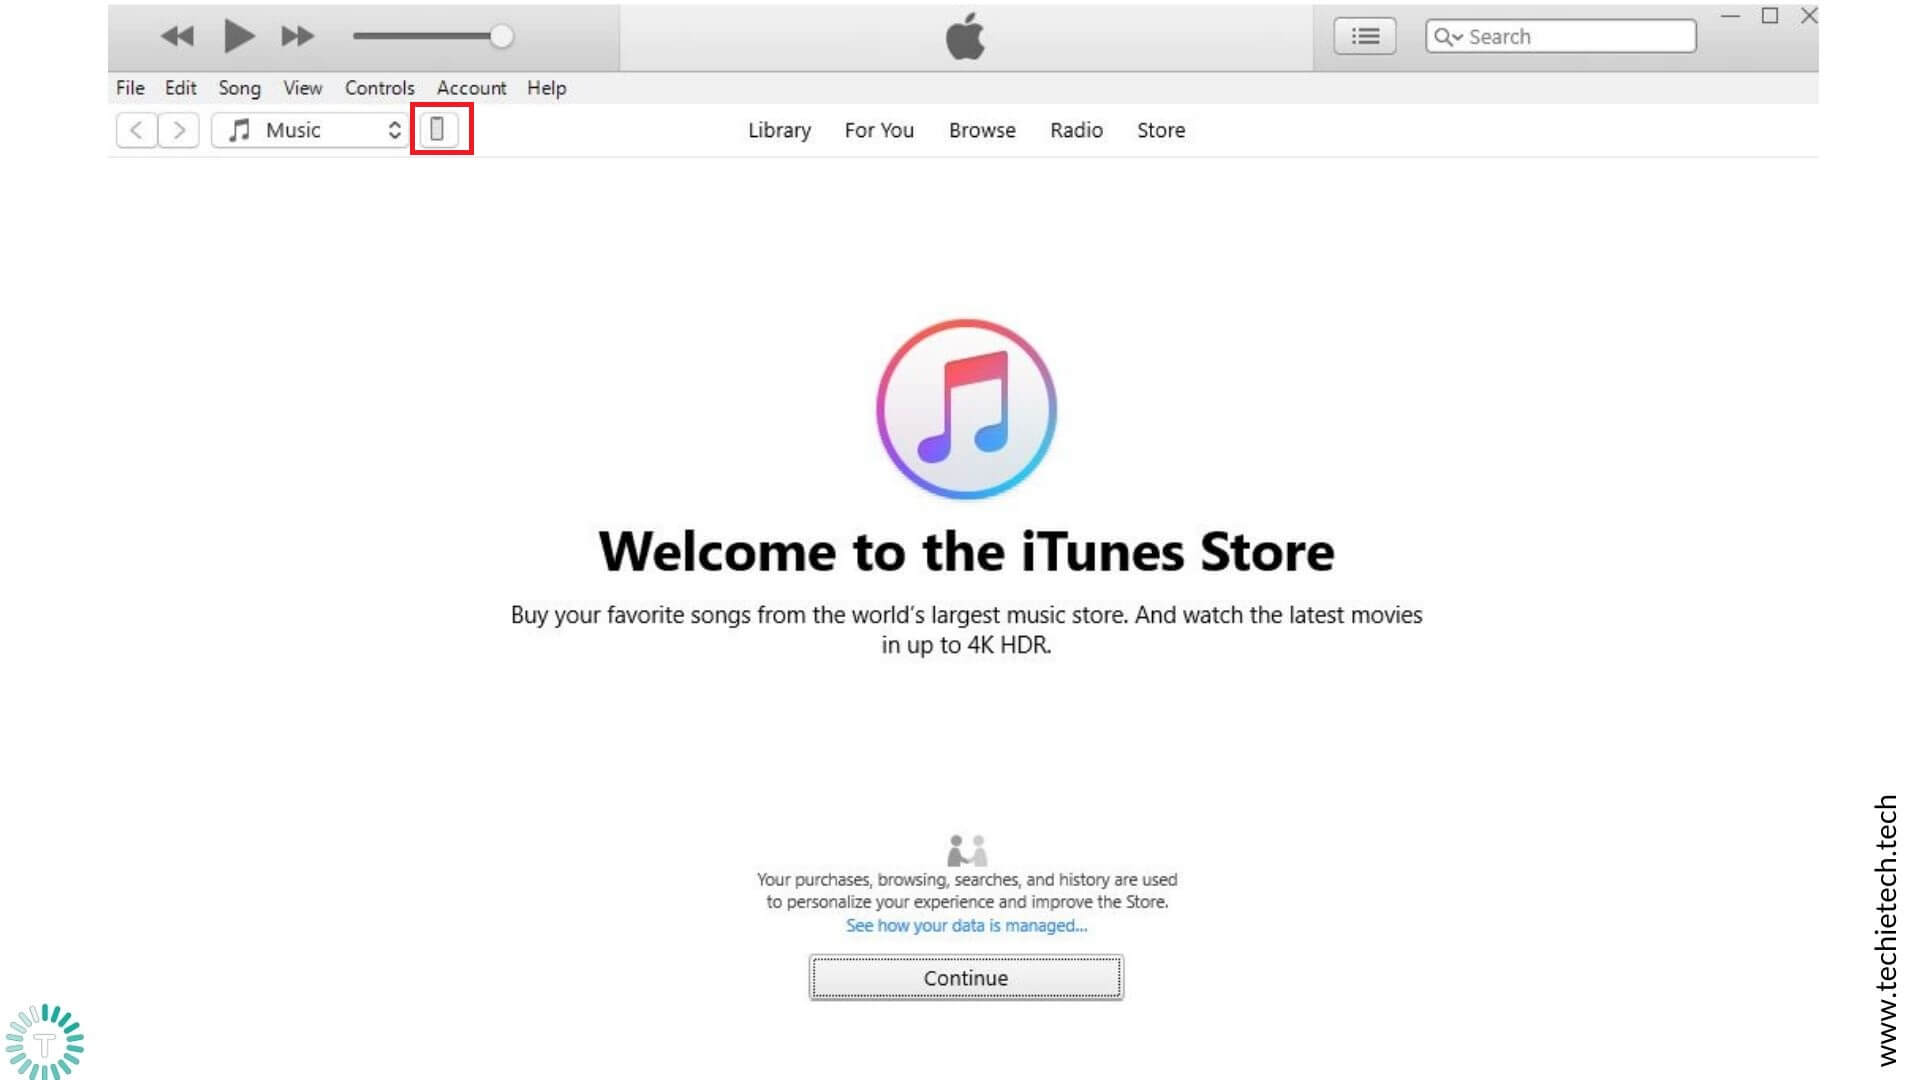
5. Click Summary
6. Select Backup Now
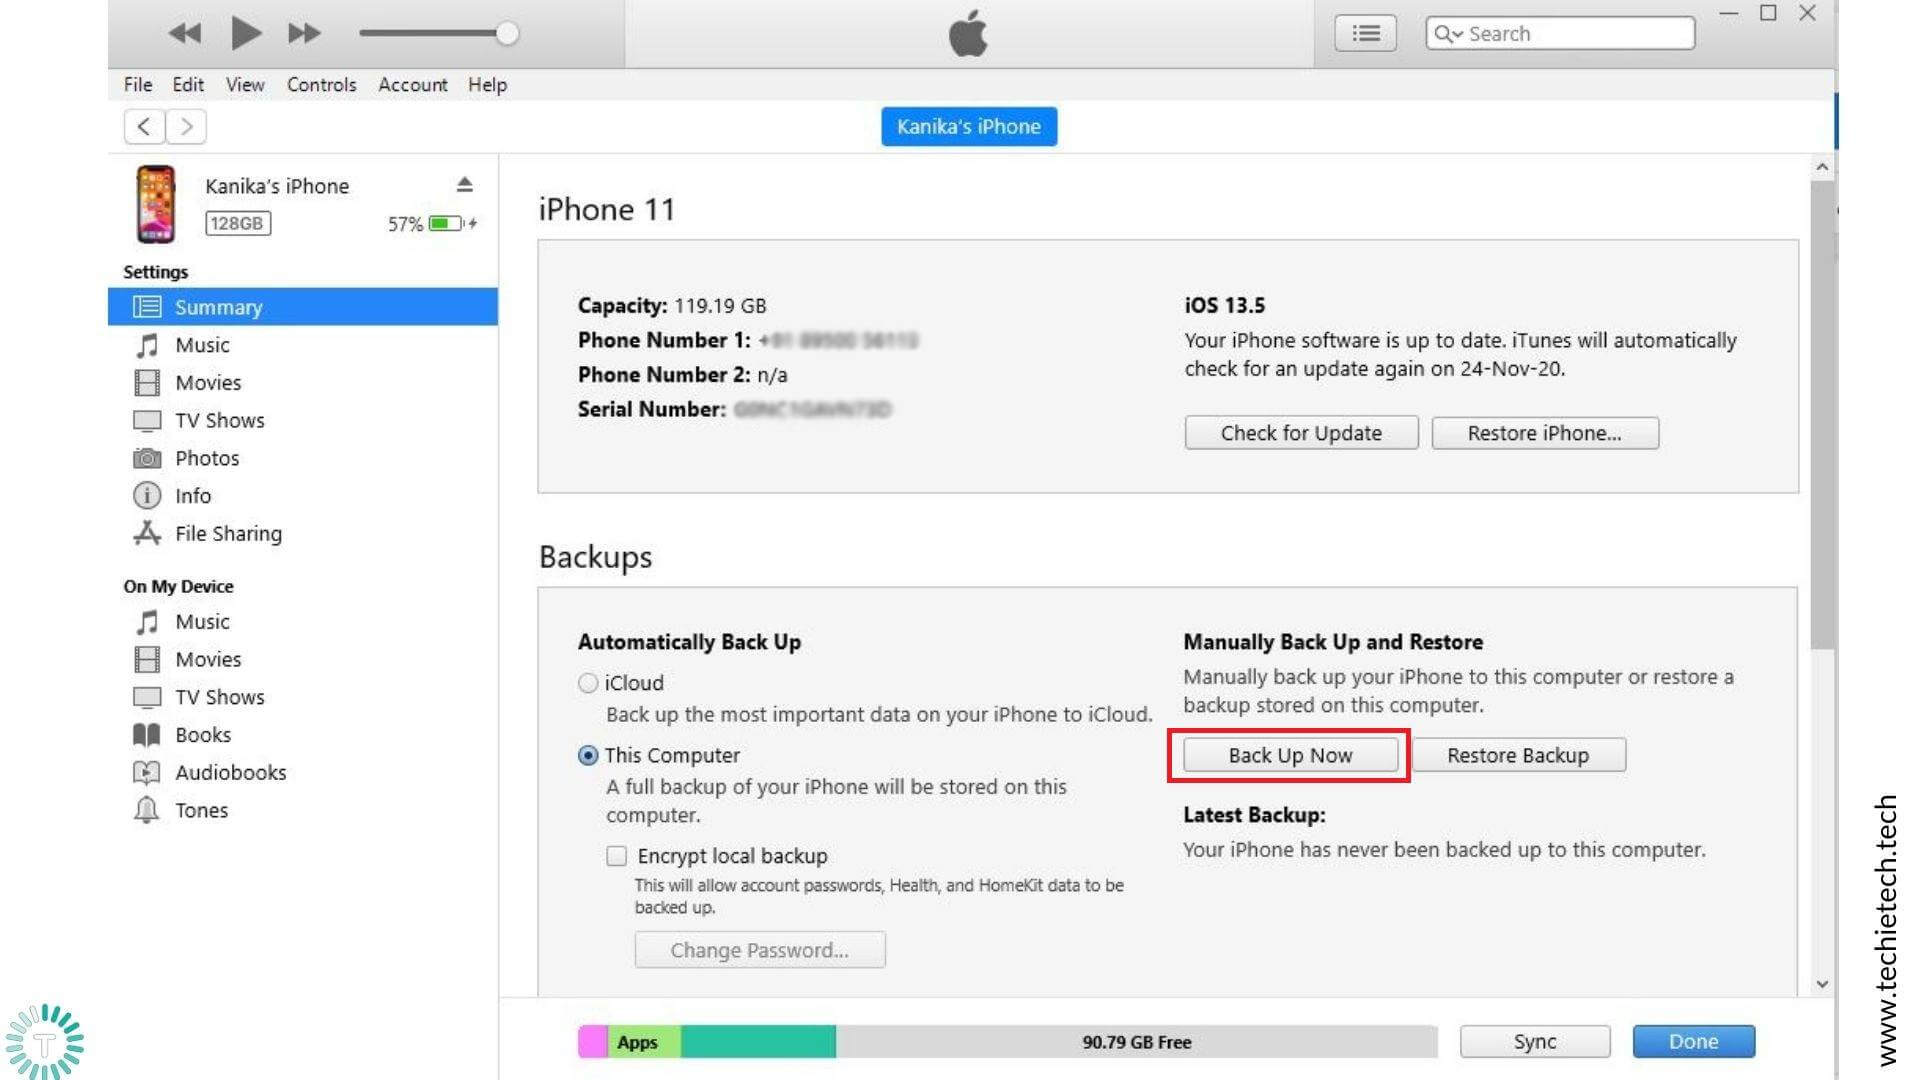
If you wish to see the backups stored on your computer, choose Edit > Preferences > Devices. If you see a lock icon in the list of backups, those are the encrypted backups.
How to restore your iPhone from a backup?
If you want to restore the backed-up data to your device, follow the steps mentioned below:
- Connect the iPhone to your computer.
- Open the iTunes app and click the Device button (near the top left of the iTunes window)
- Click Summary
- Select Restore backup
- If the backup is encrypted, you’ll be asked to enter the passcode to restore your files and settings.
3. Using Google Photos
If you want to back up your iPhone photos, you can also use Google’s backup service, Google Photos. It offers free, unlimited storage to manage your iPhone photos online. If you wish to use Google Photos backup, you’ll need a Google account and the Google Photos app from the App Store on your iPhone. Also, make sure that you’re connected to a good internet connection. Although Google Photos is not a complete backup solution, it’s a great option when you’ve run out of storage space for photos & videos on iCloud or if you don’t have a computer to backup your iPhone using iTunes.
Google allows you to upload the original quality media (photos & videos) from your iPhone. If you upload an image over 16MP, the photos are downscaled in terms of resolution. Also, the images are compressed so that they take up less space on the servers. It’s worth knowing Google allocates 15GB of free storage space as compared to the 5GB storage in the case of iCloud. This 15GB is
shared across apps like Google Photos, Drive, and Gmail. If the upload size is set to High Quality, you’ll get unlimited free storage for your photos and videos.
But, if it’s set to Original quality, the backed up photos and videos will count against your 15GB Google Account storage.
It’s worth mentioning that Google is integrating Google Photos into Google One. It is a subscription service that gives you more storage across Google Drive, Gmail, and Google Photos. Therefore, starting from June 1, 2021, the photos and videos in High Quality will also be counted towards the 15GB storage space.
You can back up .jpg, .png, .gif, .webp, and even RAW files. You can also back up Live photos and videos(up to 10GB in size) in various file types. Please note that you cannot back up items that are smaller than 256 x 256 in size.
Here’s how to back up iPhone photos using Google Photos:
1. Open the Google Photos app on your iPhone.
2. Sign in to your Google Account
3. Tap your account profile photo or initial present at the top right corner.
4. Tap Photos settings > Backup & sync
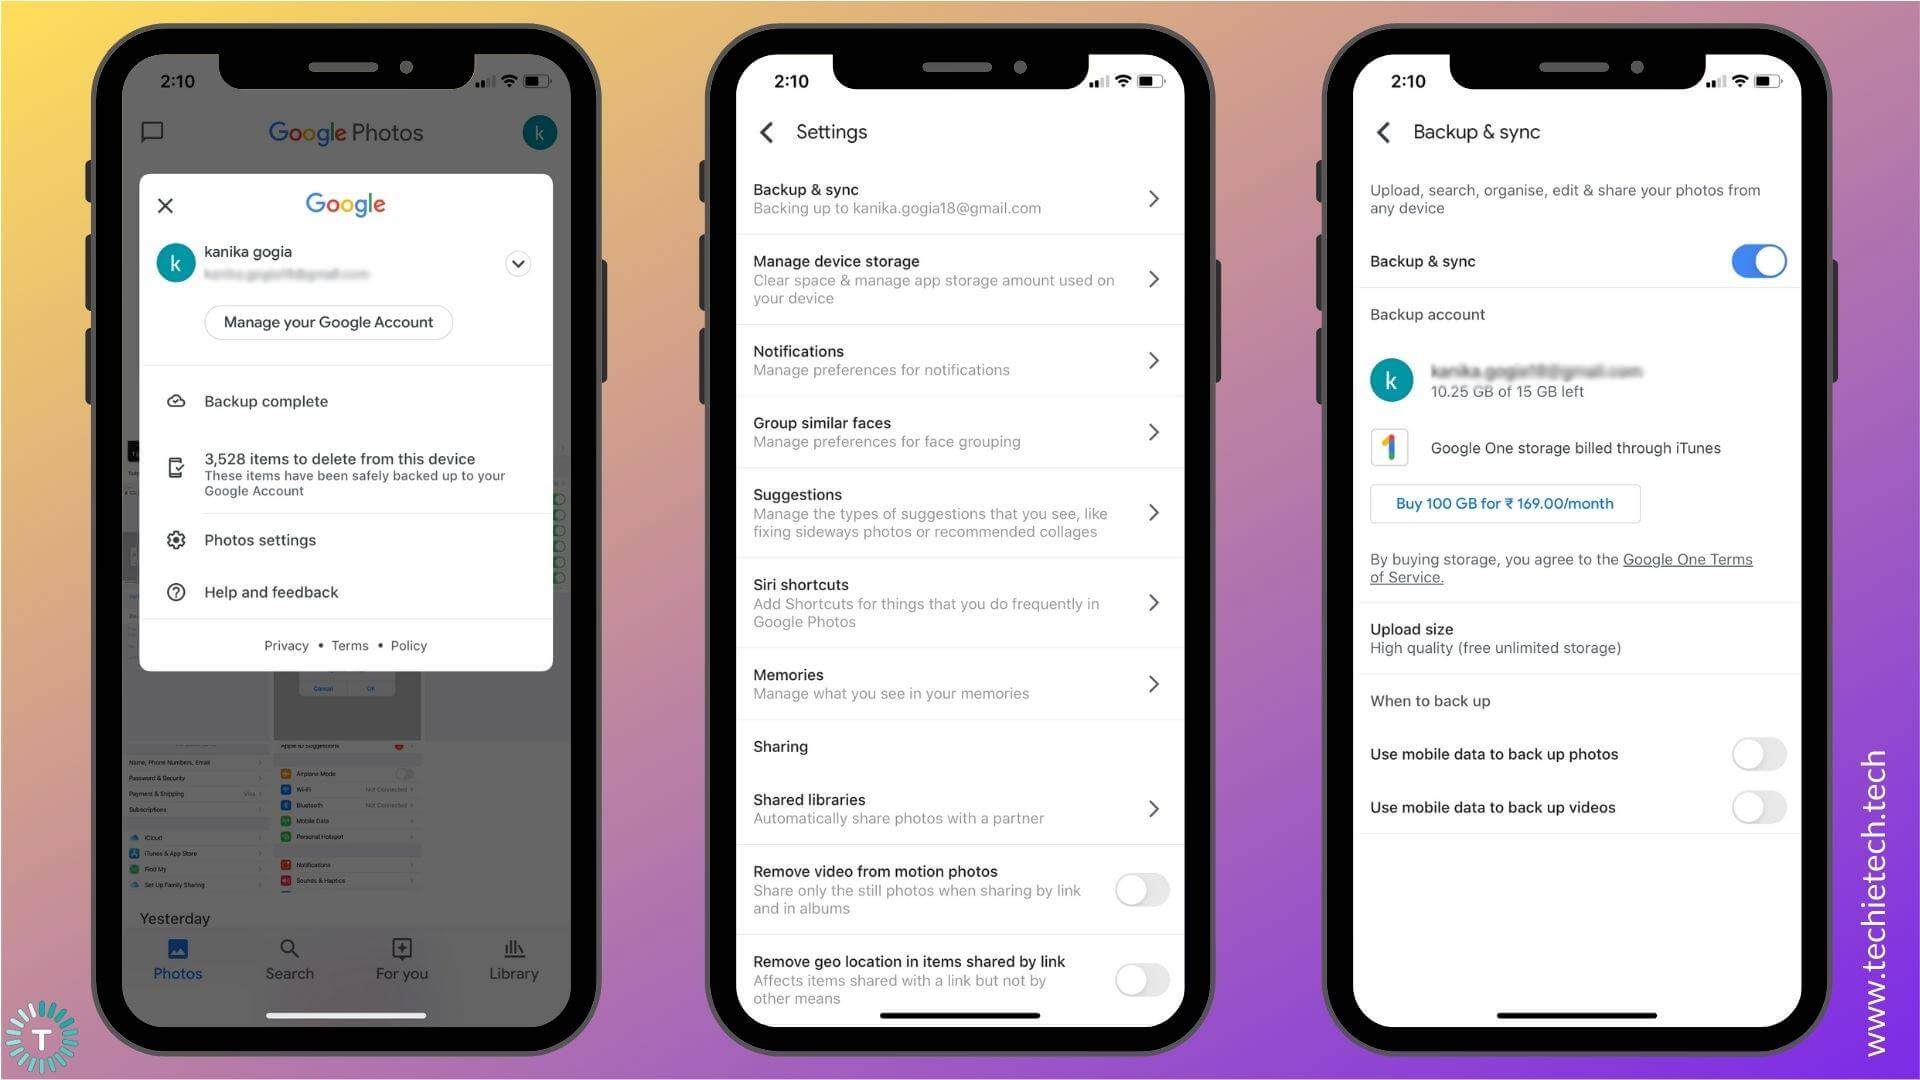
5. Turn the slider ON for Backup & sync
In case you see a message saying “allow the app to access your photos”, head to Settings > Privacy > Photos and turn ON Google Photos.
The photos and videos are uploaded automatically so there’s no need to manually move each file. If you wish to check if your photos are backed up to Google Photos, follow the steps mentioned below:
1. Open the Google Photos app on your iPhone.
2. Tap on your Google Account profile picture or initial on the top-right corner.

3. Now, you can see if the backup is complete or some items are pending for the backup.
If you’re using Google Photos to back up photos and videos of your iPhone, you can use iCloud to store your contacts, apps, settings, and other data. You can also use Gmail or Outlook to sync your contacts, mail, notes, and calendar. In this way, you can reap the benefits of different services without having to buy additional storage space.
Apart from Google Photos, various online storage services allow you to upload and store your photos, videos, and other files online.
Google Drive, Microsoft OneDrive, and DropBox are amongst the popular and widely used online storage services. One of the main advantages of using an online storage option is that you can upload your photos and videos, and access your files any time using an internet connection, even if you’re not using your own device. Moreover, many online storage services allow you to share your files with other people.
4. Using third-party apps
Besides iCloud, iTunes, and online storage options, several third-party applications allow you to back up your iPhone. But, when you decide to go for a third-party app to upload and store your iPhone data, you have to be extra careful and go for the reliable and positively reviewed apps, rather than the ones that claim to offer unlimited storage space to back up your iPhone for free.
iMazing and iPhone Backup Extractor are amongst the most popular and reliable third-party apps for backing up your iPhone data. iPhone Backup Extractor has an easy-breezy interface that lets you browse through the contents of the backup. This is super convenient and useful, isn’t it? It allows you to recover photos, videos, contacts, text messages, iMessages, voice recordings, call history,
WhatsApp chats, and more. The free version allows you to extract four files from a backup, and the fully-featured is priced at $69.5 and can be used on up to three computers.
iMazing is another widely used third-party app to back up the iPhone that gives you control over your data. It offers an automatic and wireless backup solution with end-to-end encryption. You can transfer your iPhone data to your Mac or a computer. You can also back up your iPhone to an external drive or a NAS (Network Attached Storage) of your choice. It lets you configure how frequently you want to back up your Apple device- daily, weekly, etc. Just like the iPhone Backup Extractor, iMazing also allows you to browse through the backed up data.
Besides these apps, you can also go for other third-party applications that allow you to backup your iPhone data. Again, make sure you’re using a secure, trustworthy, and reliable app to upload and store your data.
With this, we’ve come to the end of our step-by-step guide on how to backup your iPhone. As we’ve mentioned earlier, you can follow this guide to back up any iPhone model, starting from the older iPhone 6s to the latest iPhone 12 series. Also, do let us know which method did you like the most, in the comments section below.
Don’t forget to check our troubleshooting guides on how to fix WhatsApp, camera, Wi-Fi, and charging issues on the iPhone.