Apple dropped the iPhone 14 series back in September, and we’ve been excited about the Pro models – the iPhone 14 Pro and 14 Pro Max. Why? Because the base models are replicas of last year’s iPhone 13. And, the fact that the Pro models of the iPhone 14 lineup have received notable upgrades this time has grabbed lots of eyeballs. From the new A16 Bionic chip, Dynamic Island to the much-awaited 48MP camera, Apple has put much on the plate with this year’s high-end models.
As the title suggests we are here to talk about the iPhone 14 Pro camera and why it always shoots 12MP pictures and how you can bypass it to shoot just 48MP JPEGs, let’s find out how.
Why do iPhone 14 Pro and iPhone 14 Pro Max take 12MP photos?
The iPhone 14 Pro and iPhone 14 Pro Max come with a quad-pixel 48MP sensor. Not sure what does that even mean? Well, it combines four adjacent pixels into a large single pixel with the help of a process called
Pixel Binning. In layman’s terms, Pixel binning is computational photography technology used in modern image camera sensors where clusters of adjacent pixels are combined together (aka ‘binned’) to form a larger ‘superpixels’ (a single large pixel). By default, the iPhone groups all four pixels together from a 48MP sensor, and the resultant output is still a 12MP image.
That said pixel binning has its benefit, it reduces the time to process an image which allows users to quickly take pictures with almost zero lag. Since the image is binned to make a 12MP final image, the process is paced up as compared to processing a 48MP photo. Plus, the fact that binned picture has less noise you won’t be hooked by the grainy areas in a picture.
Don’t be confused with an explanation as it is not a new technique. It has been seen on previously launched flagship
Android smartphones like Galaxy S22 Ultra, Pixel 6 Pro, and more.
By now you should be aware that Apple has upgraded the old 12MP camera with a 48MP camera. But, was it surprising to know that the iPhone 14 Pro and Pro Max will produce a 12MP camera, by default? Yes? Well, don’t worry! There’s a way around getting rid of 12MP images and shooting glorious 48MP pictures. You can use what Apple calls the ‘ProRAW’ feature to shoot a 48MP image on your iPhone 14 Pro and 14 Pro Max.
You can check the step-by-step guide given in the next section to know exactly how to take 48MP Photos on the iPhone 14. Let’s not wait further and jump right into the method. Please note, iPhone 14 Pro series shoot 48MP pictures in ProRaw format by default. Keep reading, we will share a workaround on how to shoot 48MP pictures in JPG format as well.
Also read: Best Accessories to make the most out of your iPhone 14 Pro
How to Take 48MP Photos on the iPhone 14 Pro and 14 Pro Max With ProRAW
Apple intelligently uses the 48MP camera to give you the best 12MP shots on iPhone 14 Pro models by default. You are still left with an option to shoot at a full 48MP resolution using the ProRAW feature if you want to. The Cupertino giant introduced the high-quality RAW image format alongside the
iPhone 12 Pro and 12 Pro Max back in 2020. The feature is available in iOS camera settings and is widely used by photography enthusiasts who are not very fond of unnecessary processed over-sharpen images and prefer to meticulously edit their pictures.
Therefore, if you want your iPhone 14 Pro Max photos to be in full 48MP quality, you need to follow the steps given below:
Here’s how to shoot a 48MP image using Apple’s ProRAW feature on iPhone 14 Pro and iPhone 14 Pro Max:
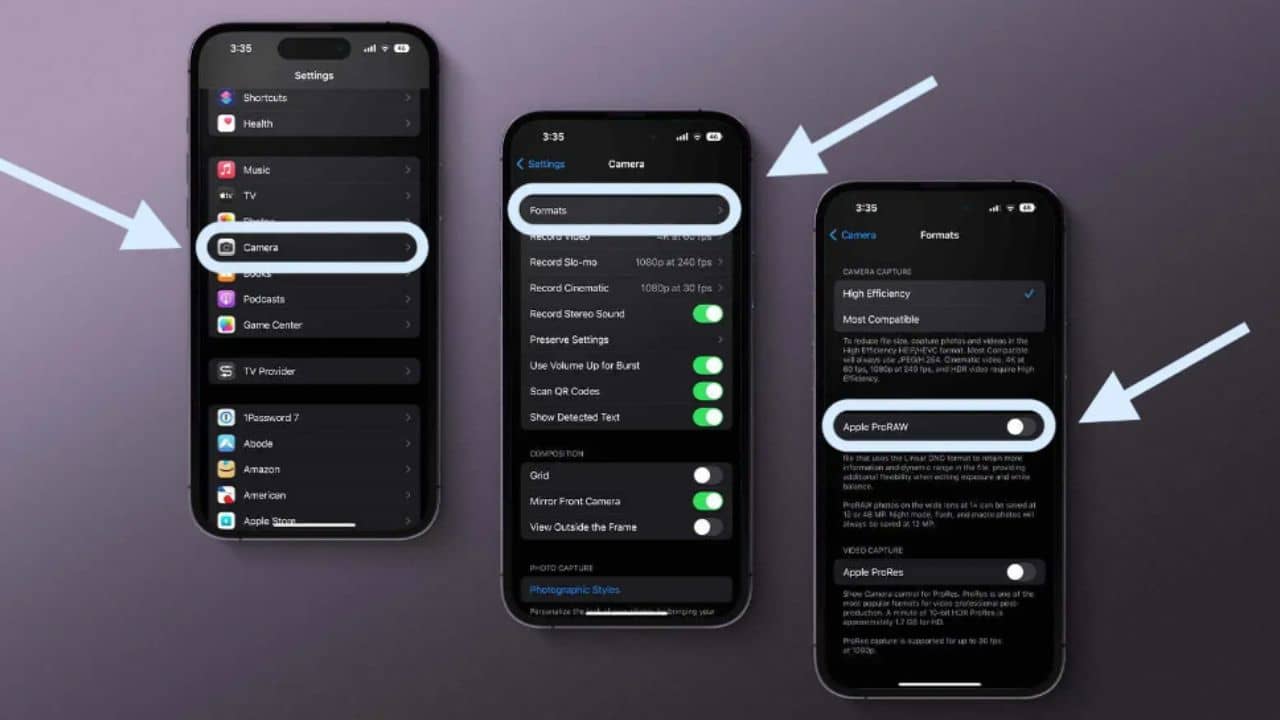
- Head to the Settings app on your iPhone.
- Next, scroll down and tap on Camera.
- Now, tap on Formats, located right at the top.
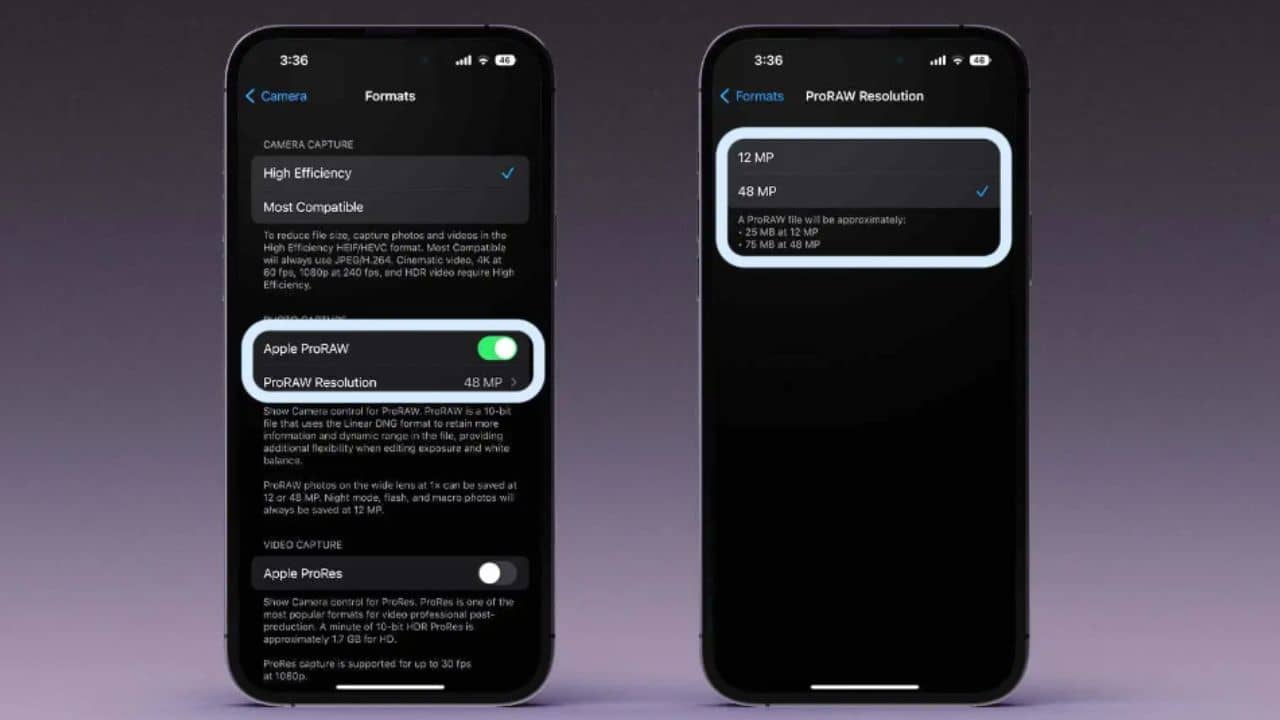
- Then, under Photo Capture, find the toggle for Apple ProRAW. Now, tap on it to enable this RAW format.
- Next, a new setting called ProRAW Resolution will pop up right underneath. Now, you have to tap on it and select the 48MP option.
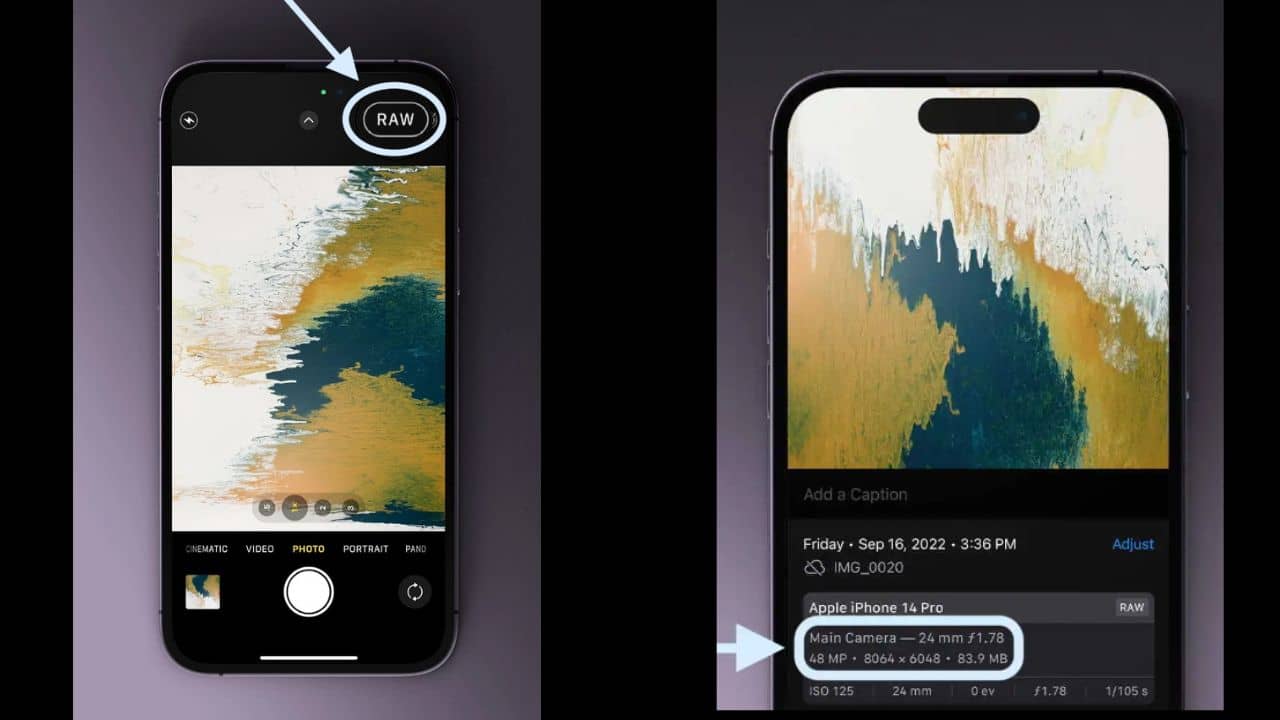
Once you’re done, open the Camera app, and you’ll see a RAW toggle above the viewfinder. It is set to OFF by default. So, whenever you feel like shooting a 48MP image, tap on the toggle to enable the RAW format, then hit the press button. Please note the gap time between shooting two photos using this feature is anywhere around 3-5 seconds, depending on the details of the image captured.
Drawbacks of taking 48MP images on iPhone 14 Pro
ProRAW definitely elevates the image resolution, but it does come at a cost of two major issues.
First and foremost, the ProRAW images shot on iPhone use the DNG file format, which is not as widely popular as the JPG/JPEG. Therefore, you’ll run into several compatibility issues. For instance, if you transfer RAW images to Android phones, it is possible that your Android gallery won’t be able to see DNG files. Remember, most of the social media and messaging platforms don’t support RAW image format, a lot of trouble right? Fortunately, you can view and edit DNG image files using third-party apps like Fotor, Adobe Photoshop, Lightroom, and more. In order to convert those ProRaw files into commonly used image formats like JPG or HEIC, you will need to edit those images using a photo editing app that supports RAW editing. iPhone’s default Photos app does support that but it is a troublesome process to edit every picture before sharing anywhere.
Another issue that hovers around the 48MP photos shot on iPhone 14 Pro and 14 Pro Max is the massive file size. You can expect any image file to be somewhere around 50MB-100MB depending on the details captured in it. As a result, these RAW photos take a toll on your iPhone’s storage even without you even knowing it. Another disadvantage is that there’s a 5-7 second delay between capturing 48MP stills. You could miss out on important moments if you try to shoot 48MP RAW pictures.
Must-read: iPhone 14 Pro: 7 Reasons to upgrade and 4 not to
How to convert ProRaw (.dng) photos into the HEIF (.heic) format and compress image size on iPhone 14 Pro
Not only me but you will also get annoyed by the fact that the 48MP ProRAW shot takes away iPhone’s storage by 50-100MB per image. While there’s no straightforward solution to fix this, there’s a shortcut named ProRaw to HEIF which will help you save your iPhone’s storage.
The ProRAW to HEIF shortcut gives the freedom to convert multiple ProRAW images to HEIF format, while substantially reducing the file size without compromising the original resolution.
You can download the ProRAW to HEIF shortcut by clicking here.
Here’s how to convert ProRAW photos to HEIF format and shrink the file size
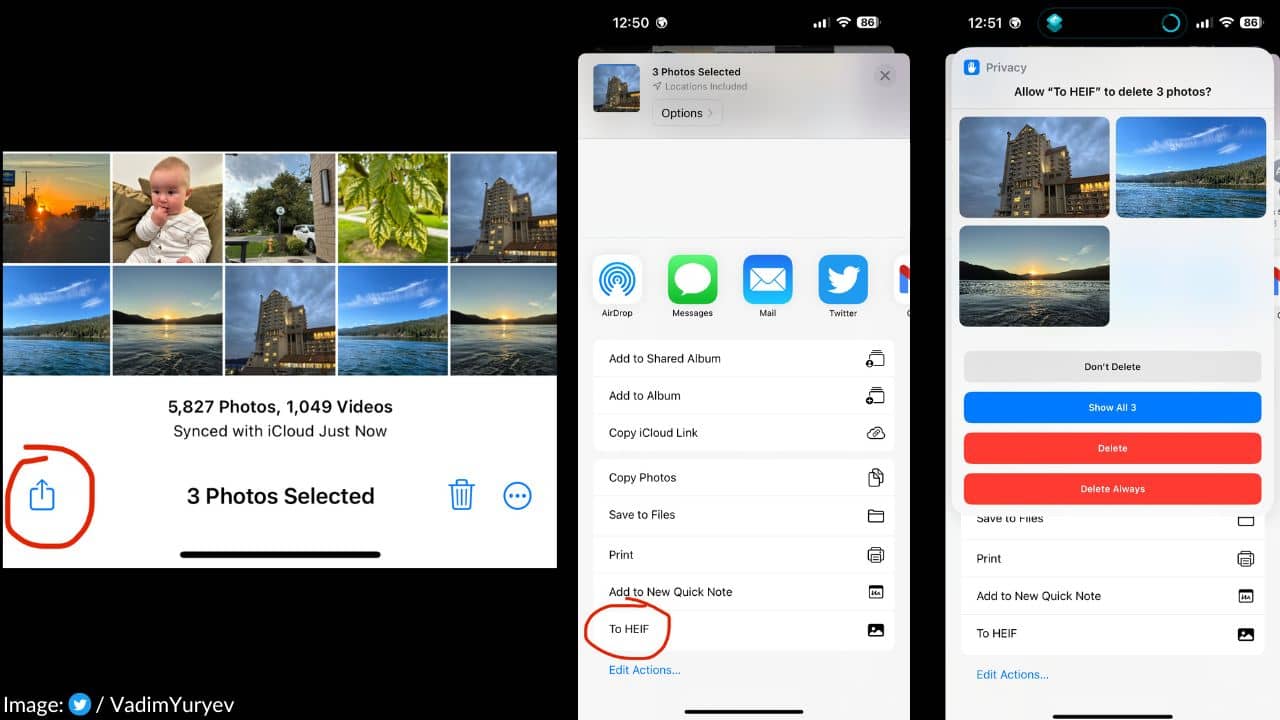
- Select the ProRAW photos
- Now, press the share button
- Then, scroll down and tap on ProRAW to HEIF option
As soon as you tap the shortcut, the conversion should begin and you’ll be shown the converted images. You’ll also get the option to keep or delete the ProRAW images as soon as the conversion is done.
Also read: Must-Have Accessories for iPhone 14
How to save photos using Most Compatible (.jpeg format) on iPhone 14 Pro
Well, if you are worried about transferring your iPhone images to one of your Android phones or Windows laptops, there’s a way around to do that too. Please note, it will be a daunting task for you to open and view HEIC files on an Android device as most devices don’t really support it. Therefore, you can simply change the image format to Most Compatible (.jpeg) from your camera settings rather than saving your photos in HEIF (.heic) format.
Here’s how to save iPhone photos in the most compatible (.jpeg) format:
- Go ahead and open up your Settings app.
- Now, scroll down to the Camera option.
- Tap on Camera.
- Now, look for the option that says ‘Formats’. Then, tap on it.
- Next, you’ll see two different options: High Efficiency and Most Compatible.
- Tap on the Most Compatible option and your iPhone will save uncompressed photos in a .JPG file format.
That’s all you’ve to do, and you’ll not face any transfer issues from your iPhone to an Android device or a
Windows laptop or PC.
Quick FAQs related to shooting 48MP photos on iPhone 14 Pro models
a) Does iPhone 14 have a 48MP camera?
Sadly, the base models of the iPhone 14 series, iPhone 14 and iPhone 14 Plus, didn’t see many upgrades over the iPhone 13 series. However, the Pro models, iPhone 14 Pro and iPhone 14 Pro Max were launched with several upgrades and major ones were related to the rear cameras. Well, Apple also revealed Dynamic Island and a few other exciting features introduced exclusively for Pro models. But, the major highlight for 2022’s Apple flagship smartphones was the 48MP main wide camera sensor as well as the 3x telephoto zoom lens.
b) How many megapixels do the iPhone 14 Pro and Pro Max camera have?
Previously, the iPhone 13 Pro and 13 Pro Max models used to have a 12-megapixel sensor. However, Apple introduced the iPhone 14 Pro model with 48 megapixels camera sensor. The company says that the camera uses photo technology called pixel binning. It simply joins four pixels together into groups to create a 12-megapixel
c) How to take high-resolution photos with my iPhone 14 Pro?
If you are wondering how to shoot 48MP photos using the iPhone 14 Pro and 14 Pro Max models, we have covered the step-by-step guide above, you can check it out.
Without much a do, let’s jump into the steps to capture high-resolution photos on iPhone 14 Pro models:
- Go to the Settings app on your iPhone
- Then, find and tap on the Camera option
- Now, tap on the Formats option from the top
- Under the Photo Capture section, find Apple ProRAW and toggle the switch ON. This enables the RAW format is enabled on your iPhone.
- A new setting called ProRAW Resolution will appear just below the previous option. Now, you can tap on the 48MP option, and you’re done.
At last, go to the Camera app, and you’ll find the RAW toggle just above the viewfinder which is set to OFF, by default. Next time, when you plan to shoot a 48MP image, just enable the RAW format and press the shutter button.
That’s all for now in this guide, we will see you around. Until then, you can check out some of the
best iPhone camera tips and tricks to get the best shot using the iPhone 14 Pro’s 48MP camera.
In-content image source: 9to5Mac and VadimYuryev