If you’ve ever used a Samsung Galaxy smartphone then you must have faced the “Not registered on network” error. Well, it can happen to anyone, we have faced it in the past, and want you to stay worry-free as this common network-related issue is fixable. Most users reported that they saw a ‘not registered on network’ error when trying to call or send text messages using Samsung Galaxy S20, S21, S22, or S23 series or any device from their A or J series. So if you are wondering, why am I getting not registered on network error on my Samsung device, keep reading.
This error is commonly seen in Samsung and many other smartphones brand due to corrupted network settings, or even SIM/carrier-related issues. In this troubleshooting guide, we will talk about everything about the infamous network error that has been haunting Android users for years now. Here, you will also learn what not registered on network error means, what causes it, and potential solutions to fix the error on Samsung mobile phones.
Before we move any further, let’s focus on what does not registered on network error means.
Disclaimer: Proceed at your own risk, TechieTechTech will not be responsible if anything goes wrong with your device.
What Does “Not Registered on Network” Mean on Samsung Galaxy or any Android smartphones?
If you are wondering why my Samsung phone keeps saying not registered on the network, you need to understand the core of the problem. In most cases, you are likely to see a ‘not registered on network’ error on your device when your SIM card is not connected to any network. If you are facing the issue, you won’t be able to make or receive calls. That’s not all, you can neither text anyone nor receive one if you are experiencing a SIM card not registered on network error. Well, if you are bothered whether the Samsung devices are the only culprit, let me tell you this network error can occur in any Android phone. Therefore, it is best to understand the root cause of the error and try to fix them from your end before you contact your carrier.
Why am I getting a “Not Registered on Network” Error?
If your Samsung Galaxy S22 or S23 phone getting not registered on network error, there could be many reasons behind it. In most cases, this error is caused due to issues related to SIM cards or
service outages at your carrier’s end. So, if you are getting an error message saying ‘not registered on network’ while texting or calling on a Samsung device, the following could be the real reasons behind it:
- Your Samsung Galaxy phone is running on outdated software
- SIM card might be damaged
- Your SIM doesn’t have an active calling or texting plan
- Your device can’t read SIM cards
- Your carrier is facing a service outage
- Network settings on your device might have been corrupted
- SIM card is not properly inserted into your device
- Your device is rooted and causing the issue
- Faulty APN settings
How to Fix the ‘Not Registered on Network’ issue on Samsung Galaxy or any Android smartphone [13 Ways]
Method 1: Check if you have active data, text, or call plan for your number
Almost every carrier offers calling, internet, and text services at a certain price, which in technical terms is known as a ‘plan.’ Users can choose from a monthly plan, half-yearly plan, or even yearly plan to access data, calling or using SMS/MMS services. So, the first thing you should check is whether your SIM has an active plan or not. In the latter case, you might see not registered on network error on Samsung Galaxy because your carrier has stopped all the services for your number. If that’s the case, we recommend connecting with your carrier and recharging your mobile data plan.
On the other hand, if your SIM is running on an active plan but still displaying network registration failed error when you call or text, we urge you to try all the methods listed as under.
Method 2: Disable/Enable All Network Connections (Toggle Airplane Mode ON and OFF)
Are you still confused and wondering why my Samsung S22 Ultra says not registered on network when I call? If yes, this easy method can be helpful for you to fix the no network registered issue on your Android smartphone. We have been able to fix several connectivity issues such as 5G not connecting on Galaxy smartphone, Wi-Fi not working, and several others using this simple trick. Therefore, we recommend you toggle the Airplane mode on your Galaxy Z Fold or Z Flip series to fix the network registration failed error message on Sprint, Verizon, AT&T, T-mobile, and other carrier networks across the world. You can even use this trick to fix sudden signal drops issues or no signal problem on Samsung Galaxy devices.
Here’s how to toggle Airplane mode ON and OFF on Samsung Galaxy and any other Android smartphones:
Step 1: First, use swipe down gesture to open the Notification panel,
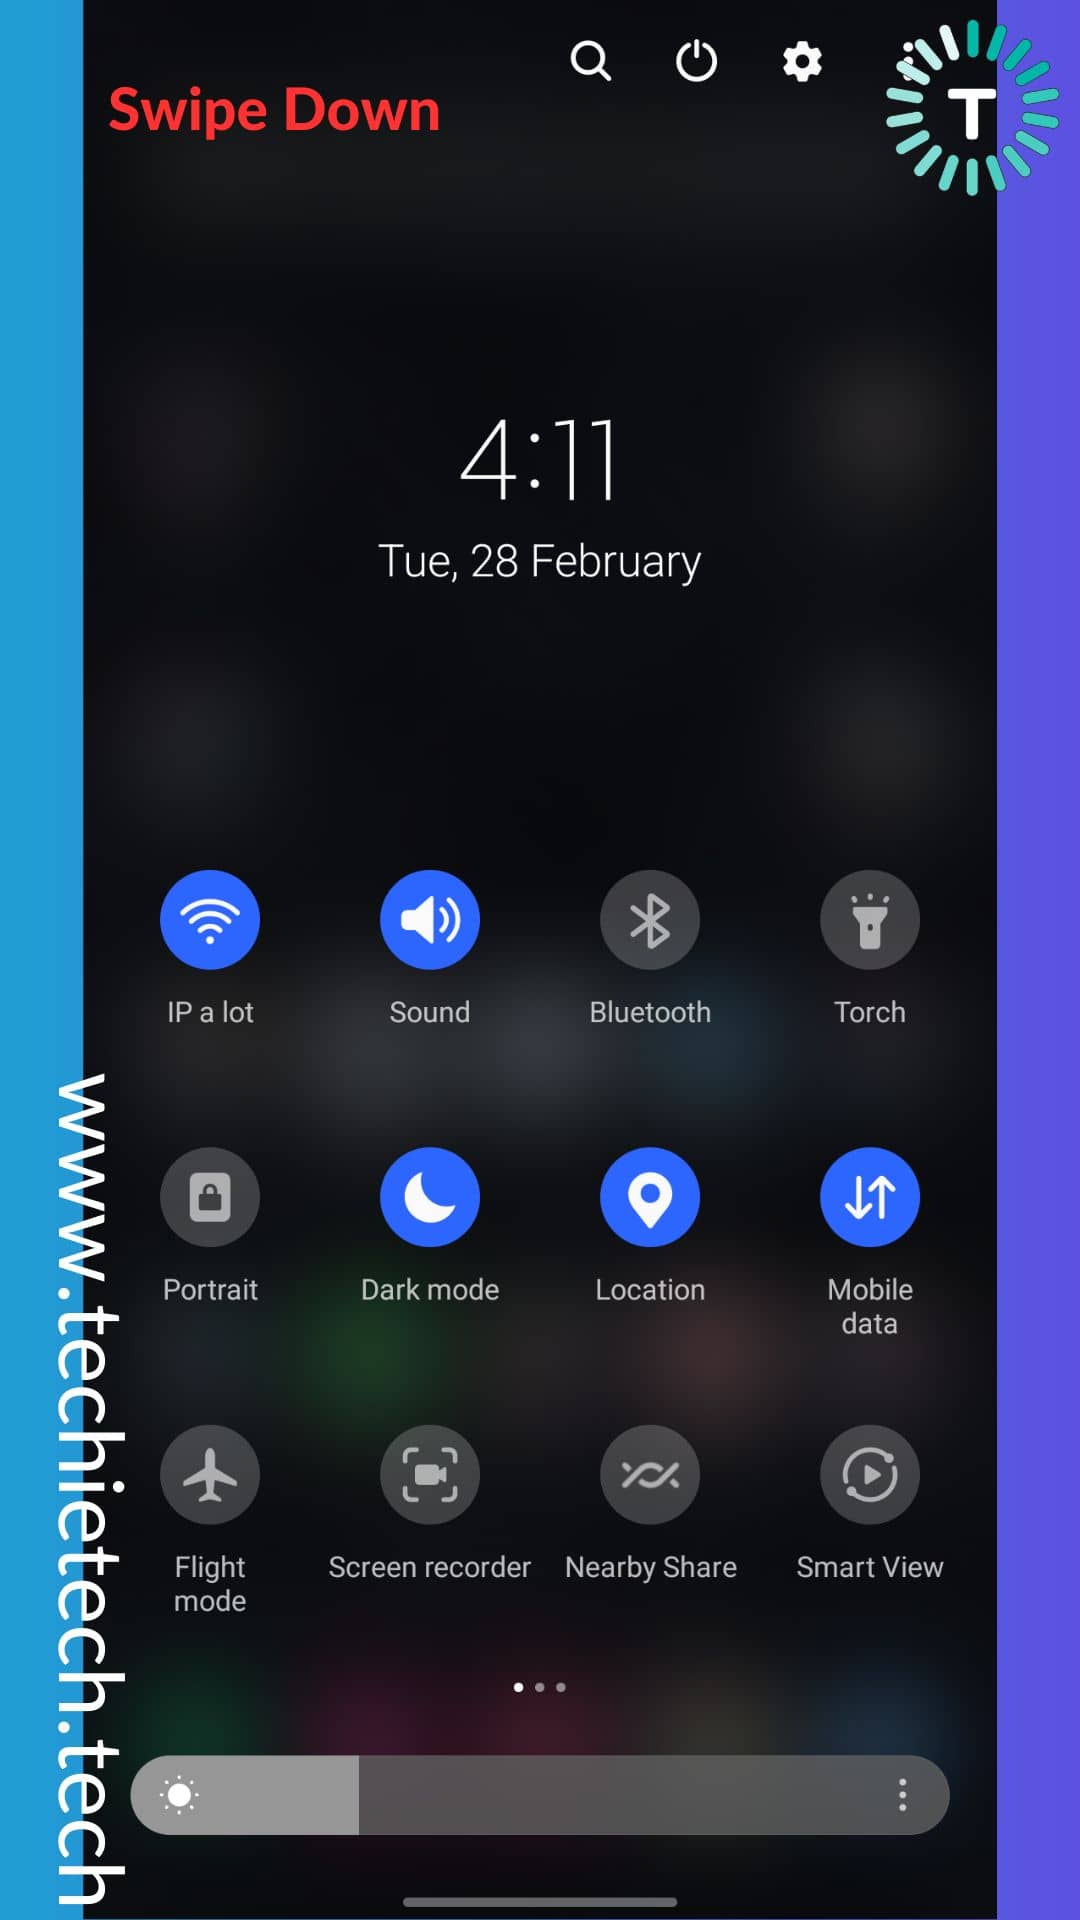
Step 2: Then, locate the Airplane icon and tap to enable it, as soon as you tap that option, all network connections will be disabled on your Samsung phone,
![]()
Step 3: Wait for at least 30 seconds and tap on the same ‘Airplane’ icon again to turn it OFF.
![]()
Doing this forces your device to quickly reset all the network connections (including cellular network, Wi-Fi, and Bluetooth) without you needing to power off your device. In most cases, toggling Airplane mode to fix phones not registered on network error on Samsung and other Android phones.
Still no luck fixing the SIM registration failed error on T-Mobile? Well, keep on trying the other troubleshooting methods given below.
Method 3: Restart your Samsung Galaxy smartphone
Before you try any methods listed here, we suggest you restart your Samsung Galaxy phone to see if it fixes the not registered network error on Verizon or T-Mobile. Well, it may sound obvious and lots of times we forget to try the basic stuff when any error kicks in. Normally, a quick reboot can resolve minor bugs and glitches that might be causing not registered network errors on Samsung smartphones. Not only this simple trick fixes Network issues but is super useful when it comes to mitigating battery drain or overheating issues on the premium Samsung Galaxy series.
If you have recently switched to Samsung from Apple or any other smartphone brand, make sure to follow the instructions given below to restart your device:
Method 1: Turn your device off, and wait for 15-20 seconds, then turn it ON again.
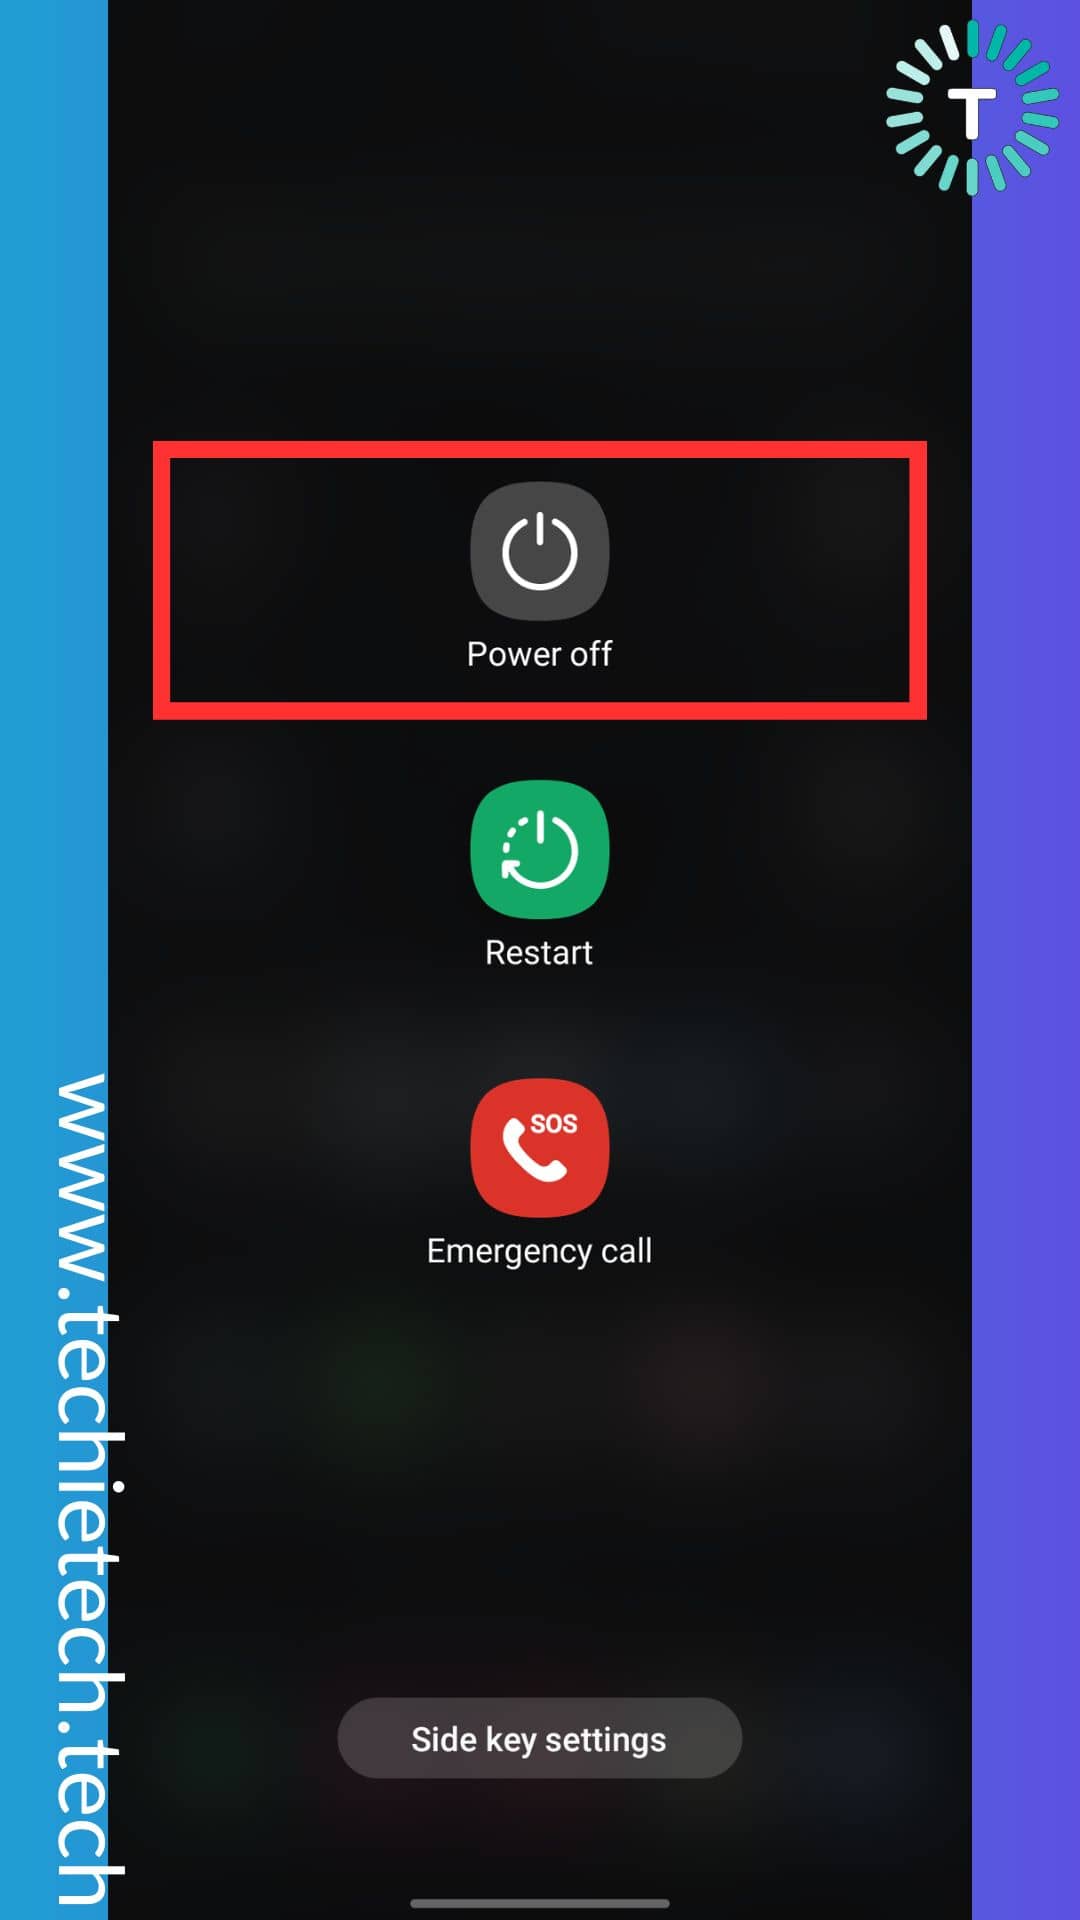 Method 2: Press and hold the power button until the power menu appears > Then, tap on Restart.
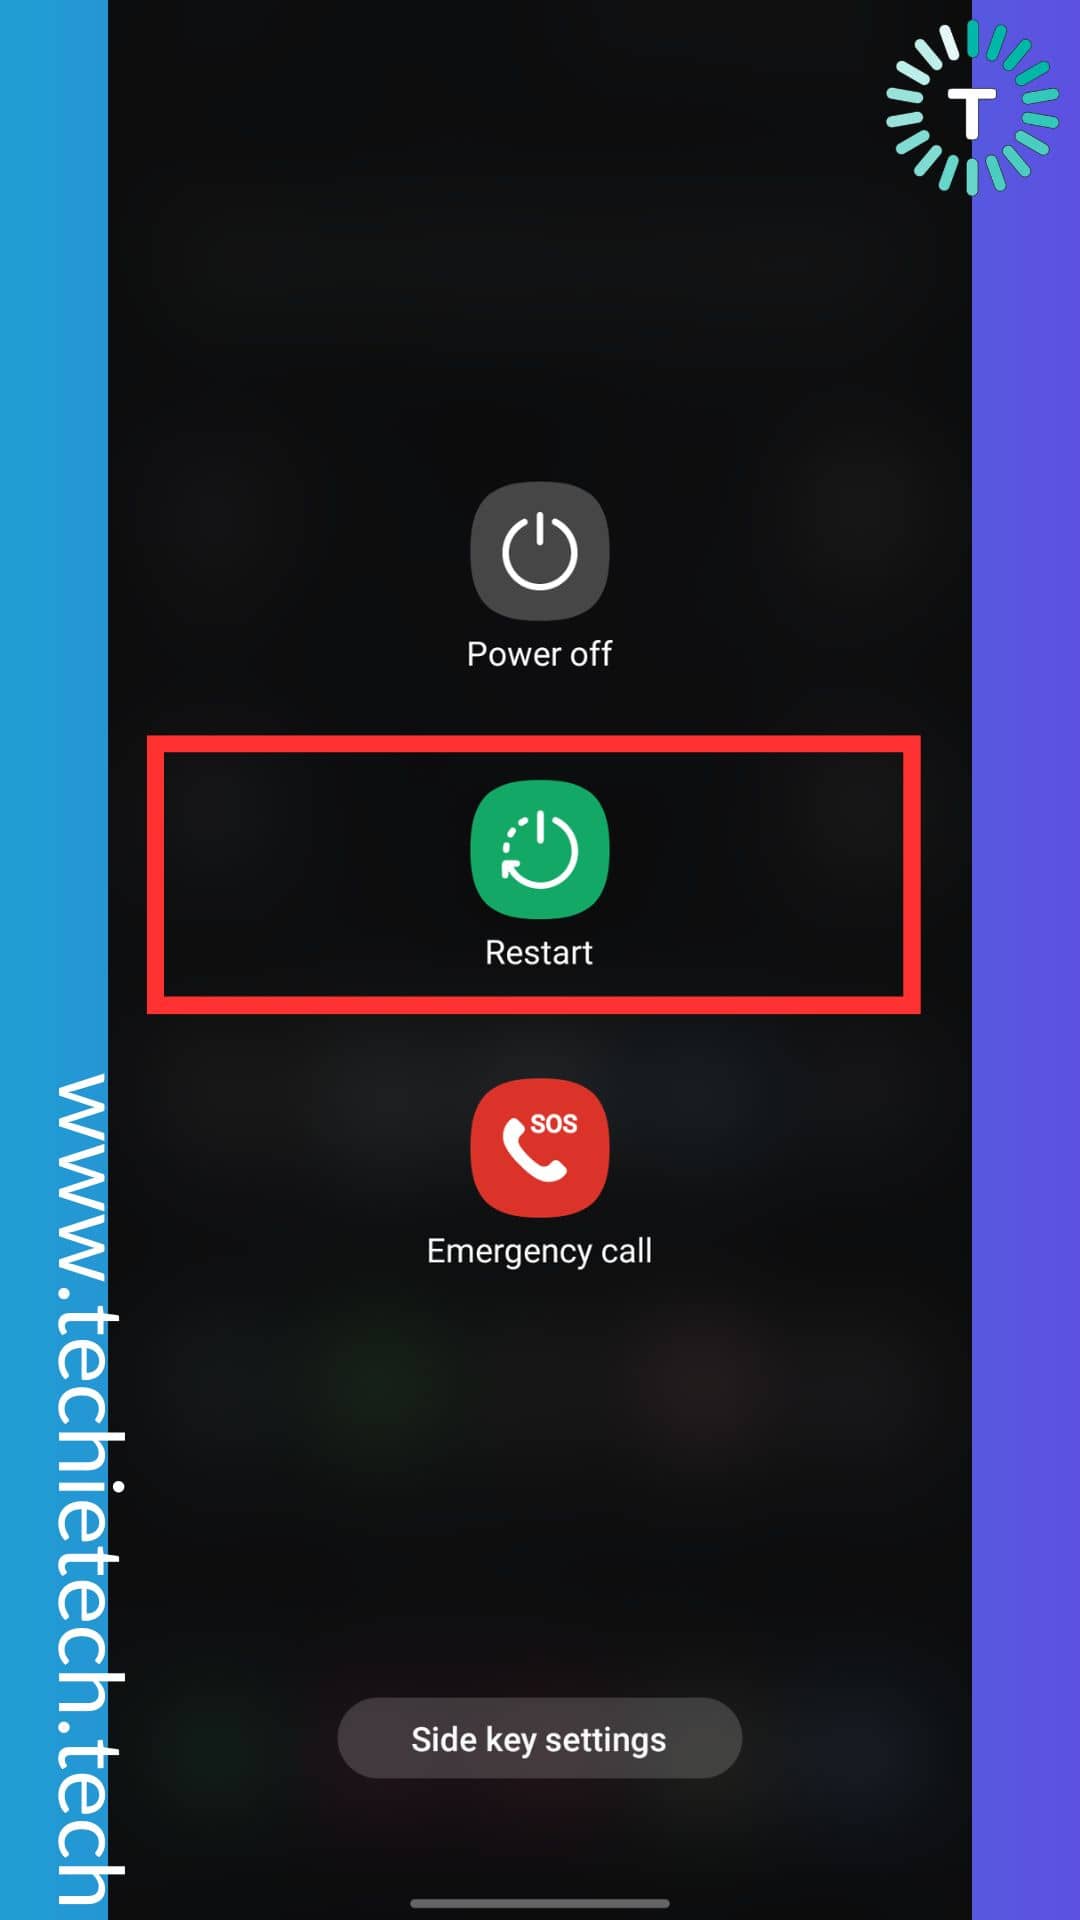
Once you’ve successfully restarted your device using any of the aforementioned methods, try to check whether the not registered-on network error on AT&T is fixed or not. If you are still struggling to fix the Network error on your Samsung smartphone, make sure to try the following methods one by one.
Method 4: Reinsert your SIM Card or use a different SIM
If you haven’t tried reinserting your SIM yet, please do. Sometimes, your Samsung phone says not registered on network when it is not reading your SIM card properly. Therefore, toggling options from the SIM card settings won’t fix the error. Another instance could be that your SIM card is dirty, damaged or corrupted which is why you are seeing not registered on network error on the Samsung Galaxy S23 Ultra. Therefore, we recommend inspecting it by removing the SIM card from your phone.
You can verify whether the SIM card is at fault or not by following the necessary steps given below:
Method 1: Reinsert the SIM card after cleaning
Step 1: Pull out SIM try using an ejector tool and take out your SIM card
Step 2: Clean the SIM card thoroughly using a cotton cloth, and look out for any kind of rusting in the chip (if you didn’t see any rusting, move ahead to step 3)
Step 3: Reinsert the SIM card into your Samsung phone and see if the not registered on network error is fixed or not.
If you are still wondering why am I seeing not registered on network error on T-Mobile, you can try the following instruction to check if your SIM card is fine.
Method 2: Use a different SIM card
Step 1: Pull out the SIM card tray with the help of the ejector tool, and take out your current SIM card
Step 2: Borrow an active SIM card from any of your family members for testing, and insert it into your phone.
If your phone gets signals and you can text or call using another active SIM card, your SIM card has an issue. In such a case, we recommend replacing it by visiting the nearest carrier store.
On contrary, if your Samsung Galaxy S22 series still getting not registered on network error, continue following the different troubleshooting methods we have listed below.
Method 5: Update your Samsung Galaxy phone
Once you have thoroughly checked the SIM card, it’s now time to check if your device is updated to the latest software version or not. Software updates are handy when it comes to fixing bugs or glitches that could be triggering not registered on network errors on Samsung smartphones. To remind you, software updates come with security patches that fix any vulnerability and improve the overall smartphone user experience.
If you are experiencing not network registered issue on Samsung Galaxy S21, S22, or even the latest S23, make sure to update your device following the steps given below:
Step 1: Go to Settings and tap on Software Updates,
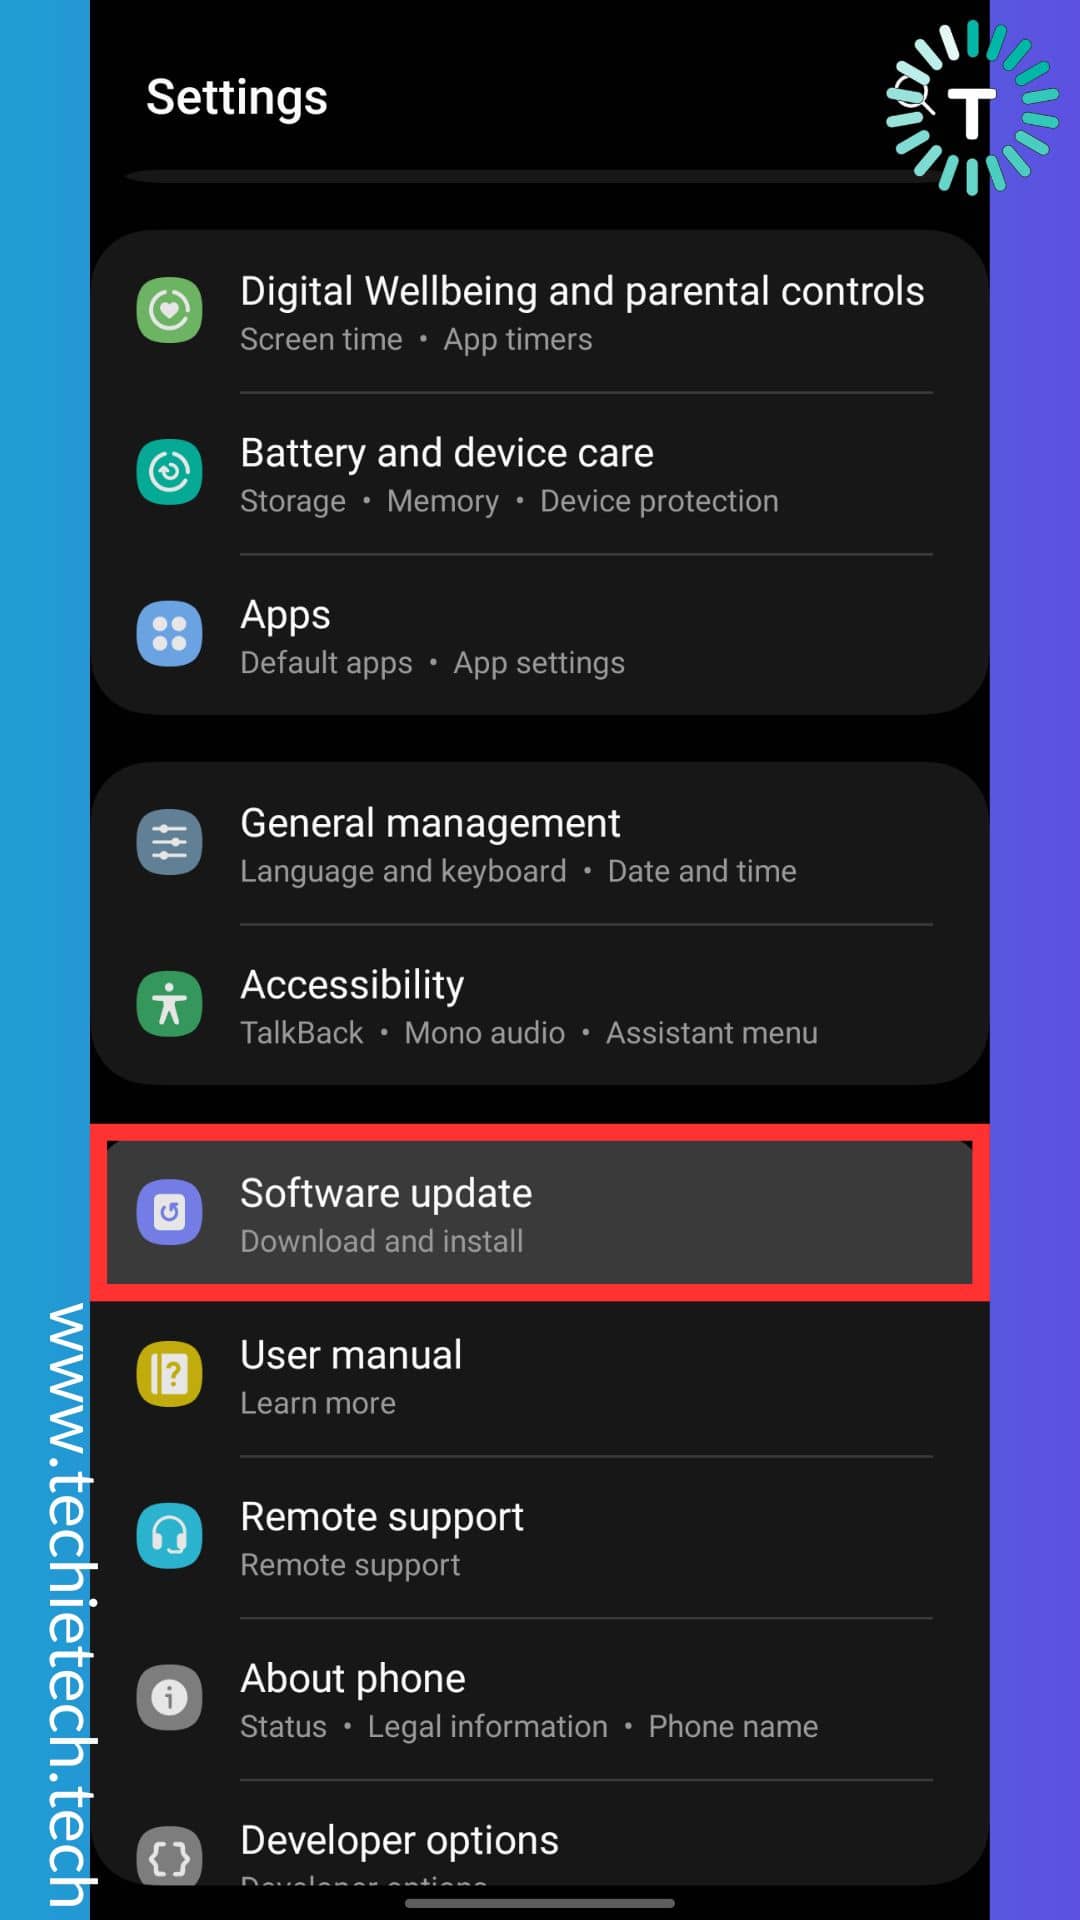 Step 2: Tap on ‘Download and Install,’
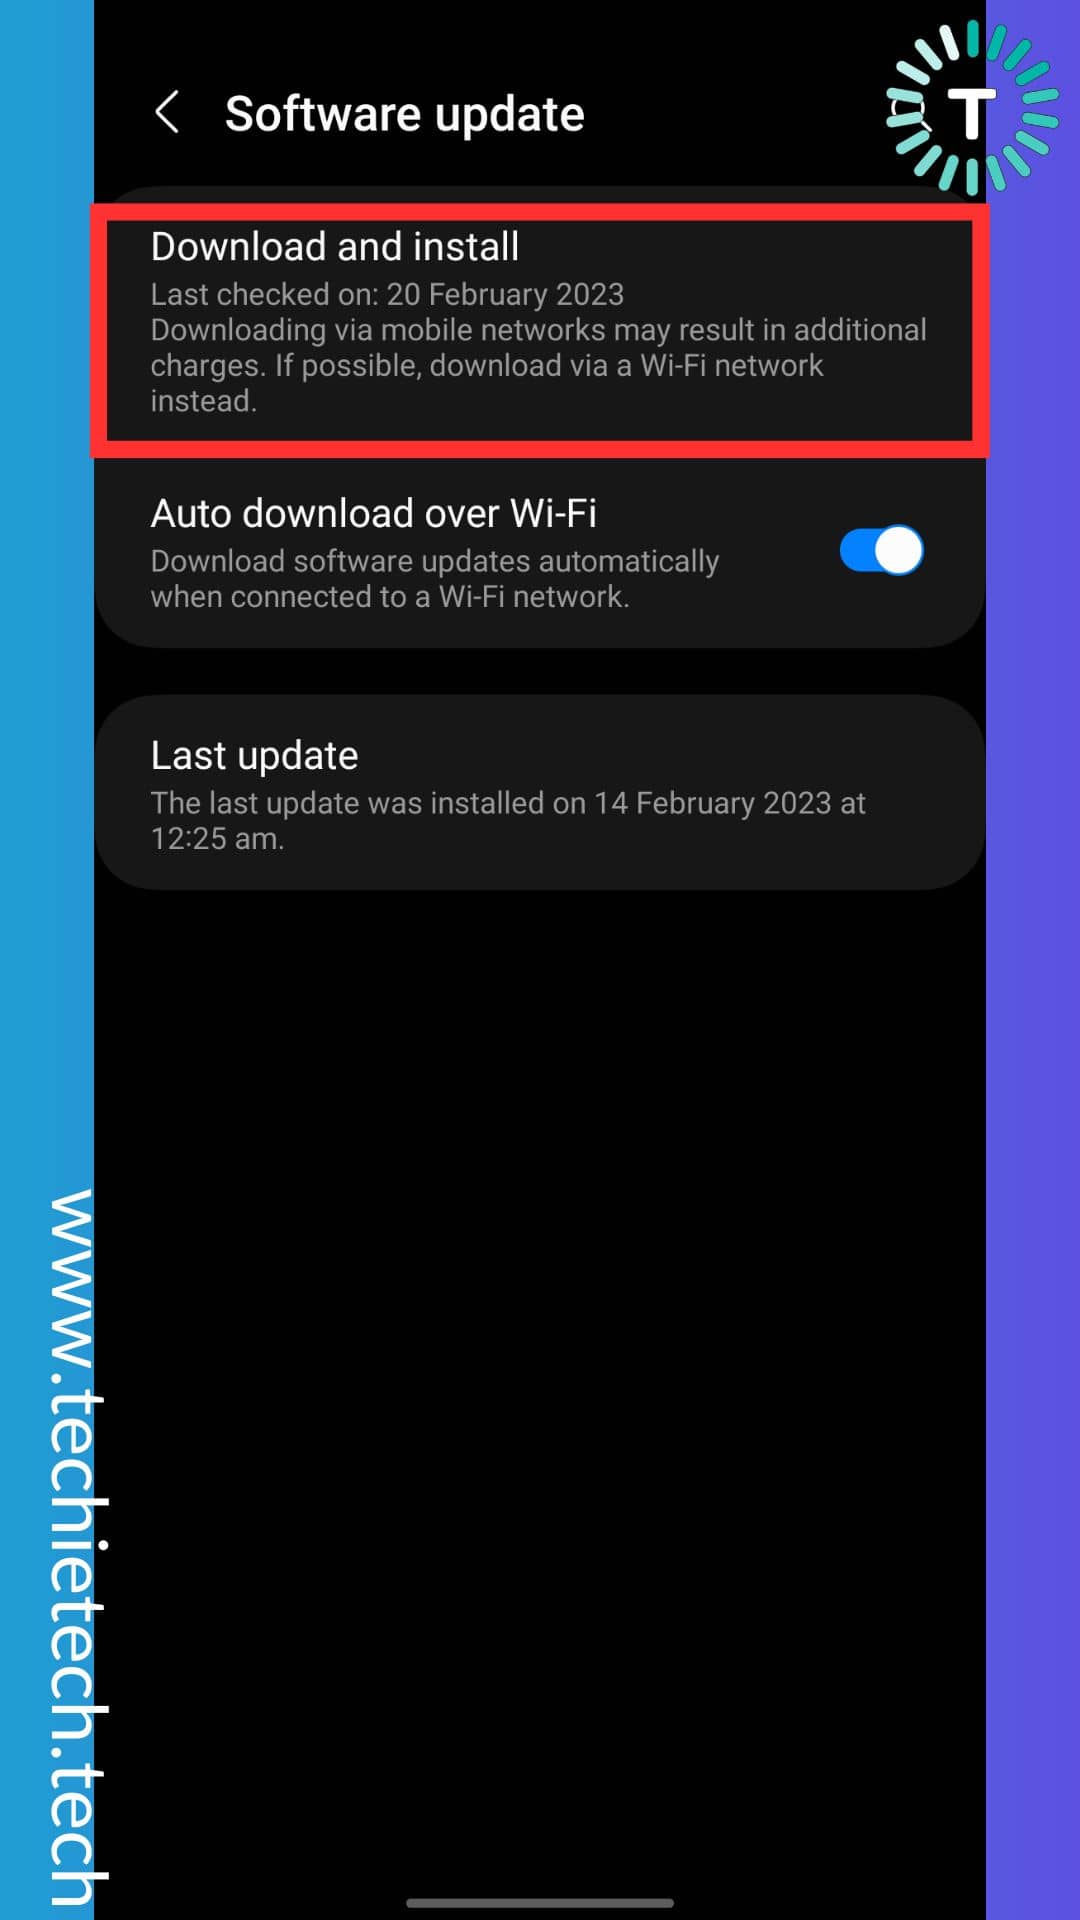
Step 3: Now your device will check for any available software updates, if there’ any update available you’ll be asked to ‘Download and install’ it,
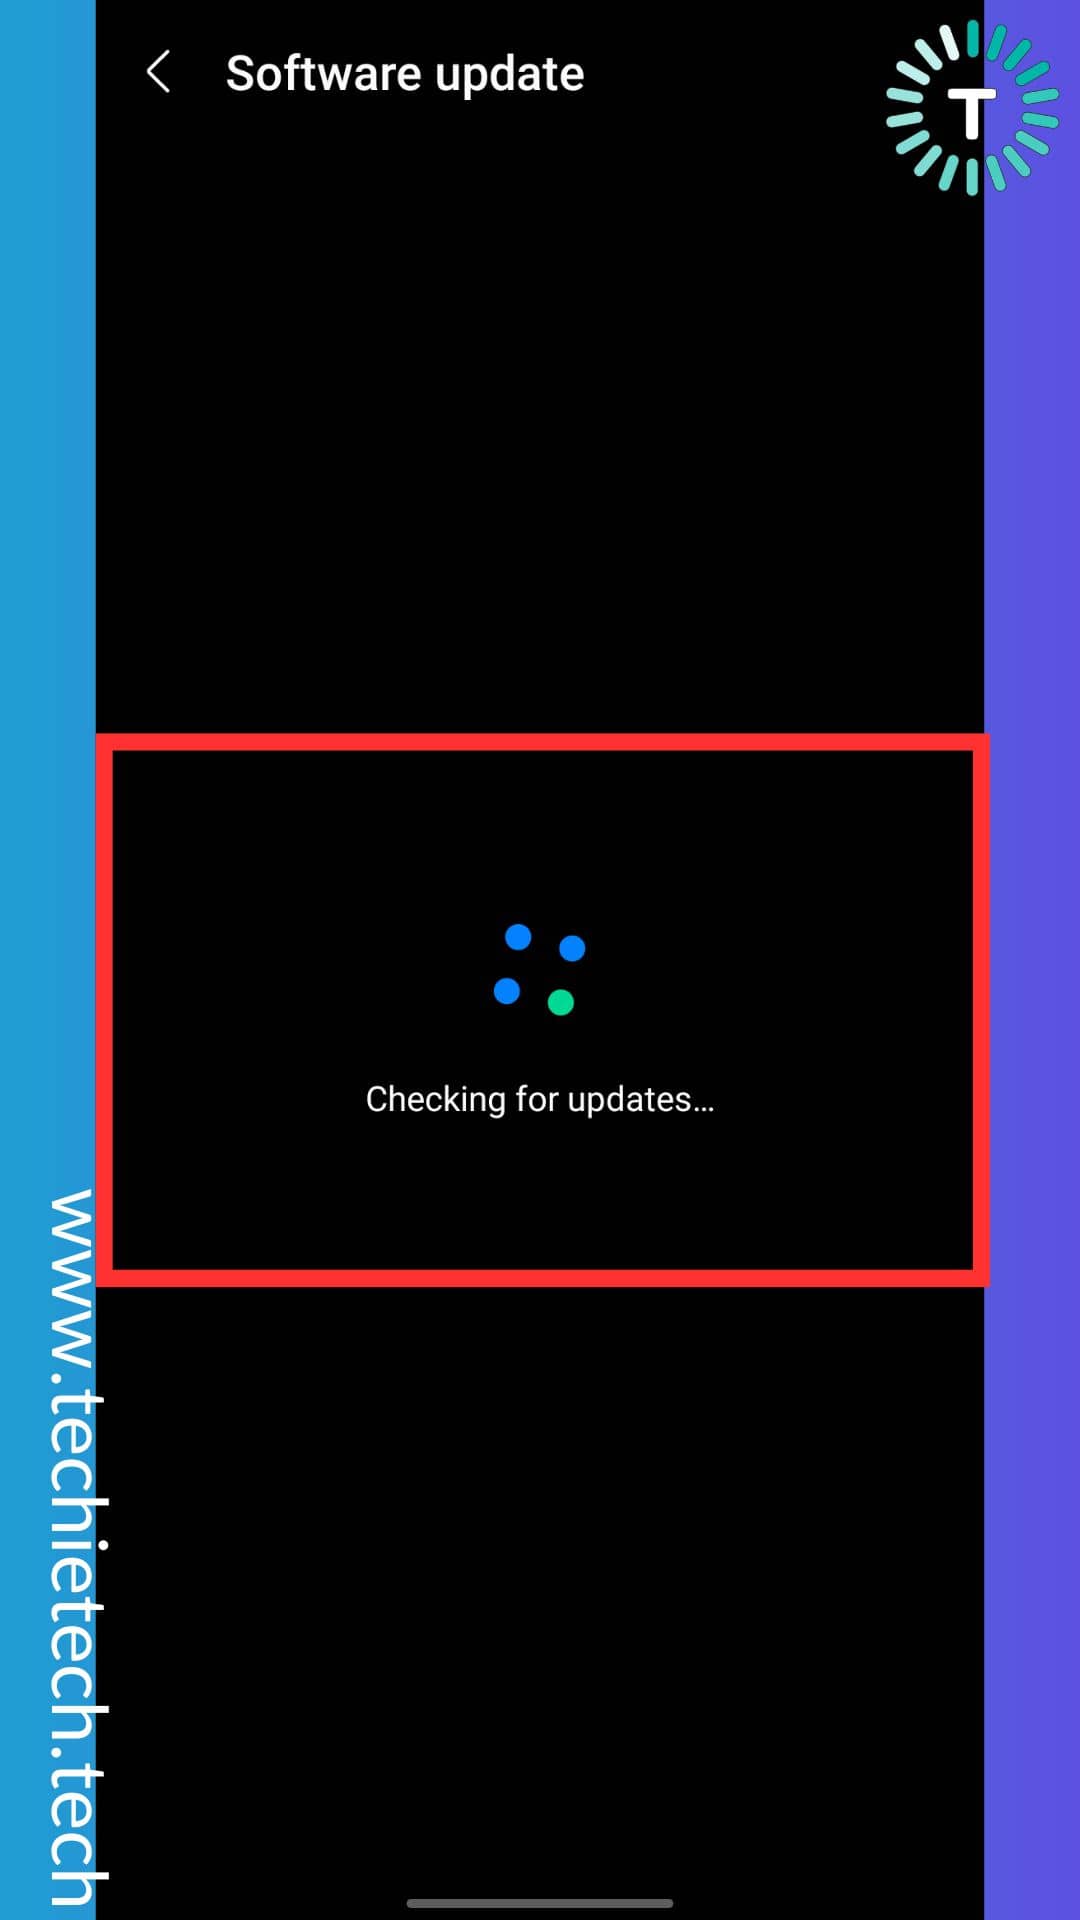
Step 4: If not, you’ll see ‘Your software is up to date.’

That’s all you have to do to update your Samsung Galaxy smartphone. Now check if the SIM card not registered not the network error is resolved or not. If you are still frustrated, don’t forget to try out the methods listed below.
Method 6: Manually Choose your Network
Are you still wondering why my Samsung phone suddenly says not registered on network? If yes, you need to understand that sometimes your device might not be able to detect or connect to your carrier network automatically. It is possible that some corrupted network settings are preventing your device from automatically connecting to your carrier’s network. In that case, the best thing you can do is manually choose your network to fix not registered on the network error on Verizon, T-Mobile, etc.
Here’s how to manually choose your network on Samsung Galaxy smartphones:
Step 1: Go to Settings, and tap on Network and Internet or Connections,
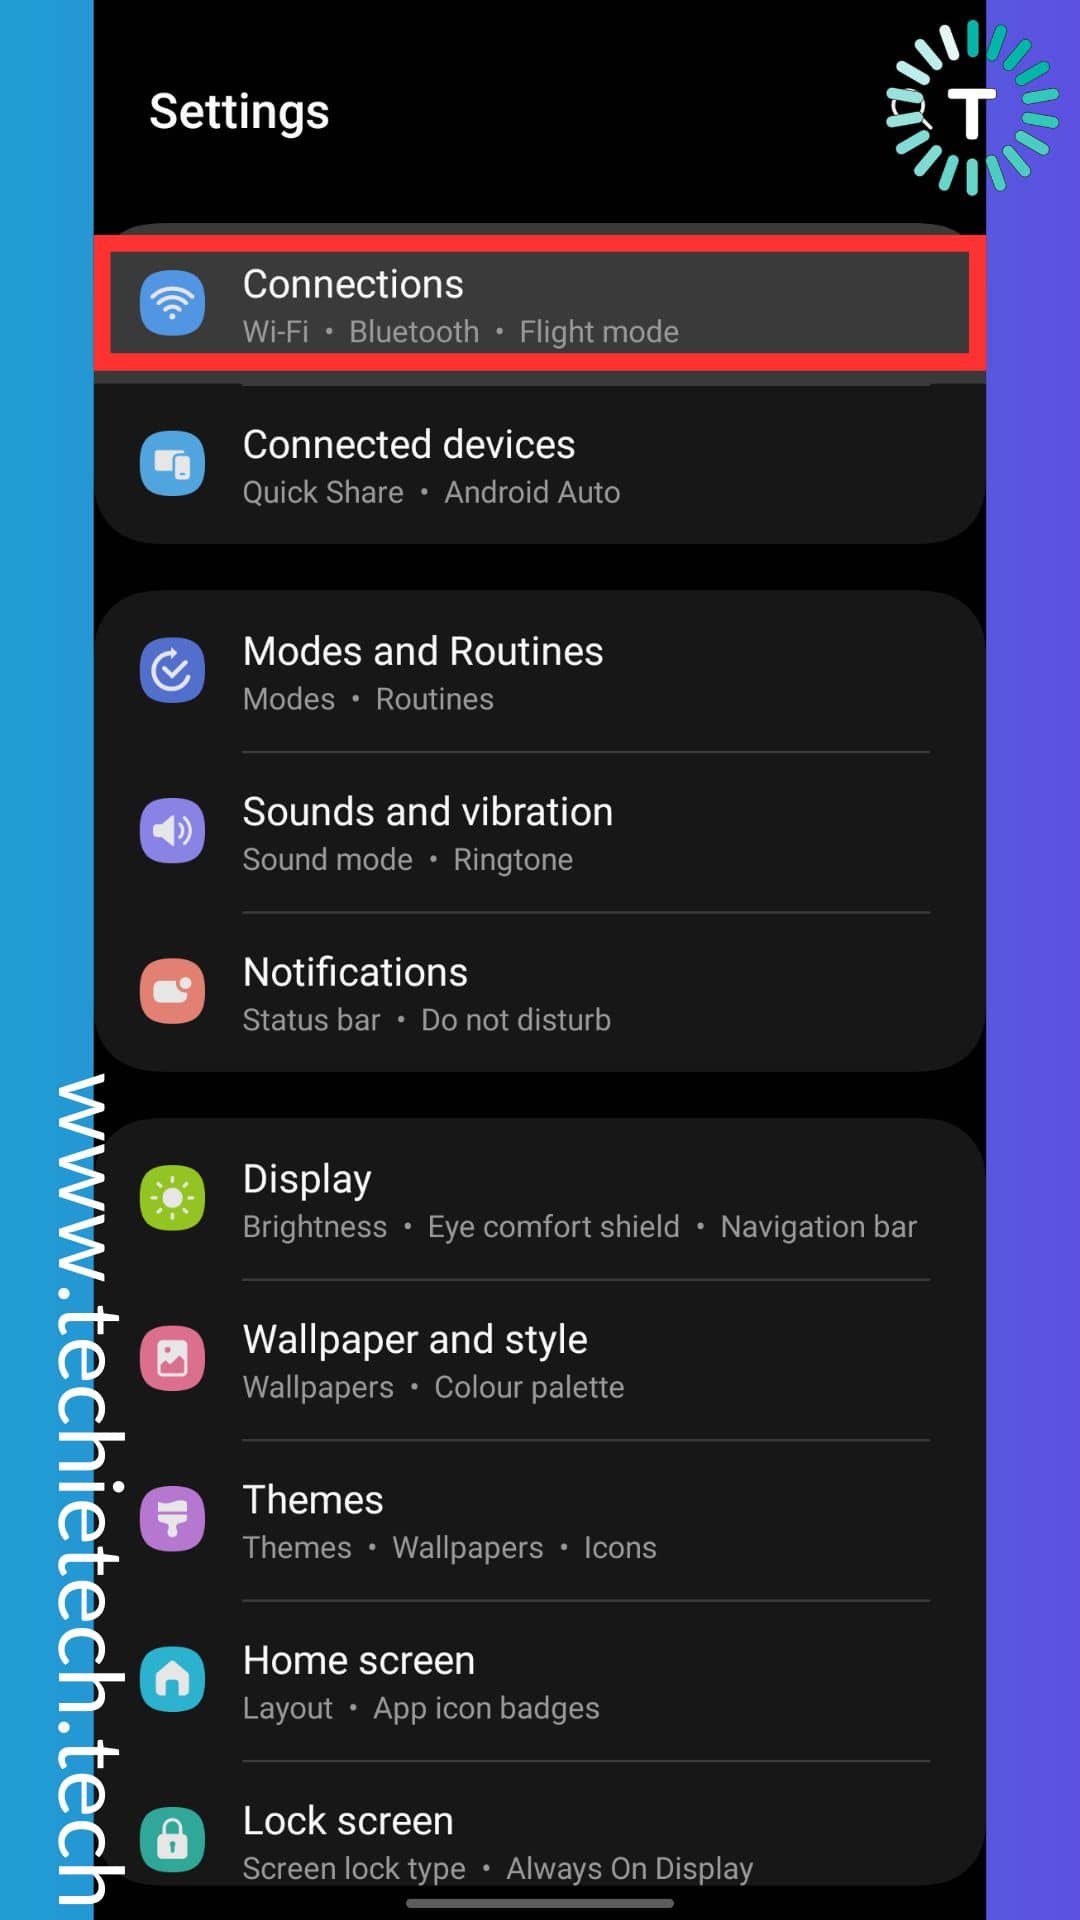
Step 2: Now, tap Mobile Networks,

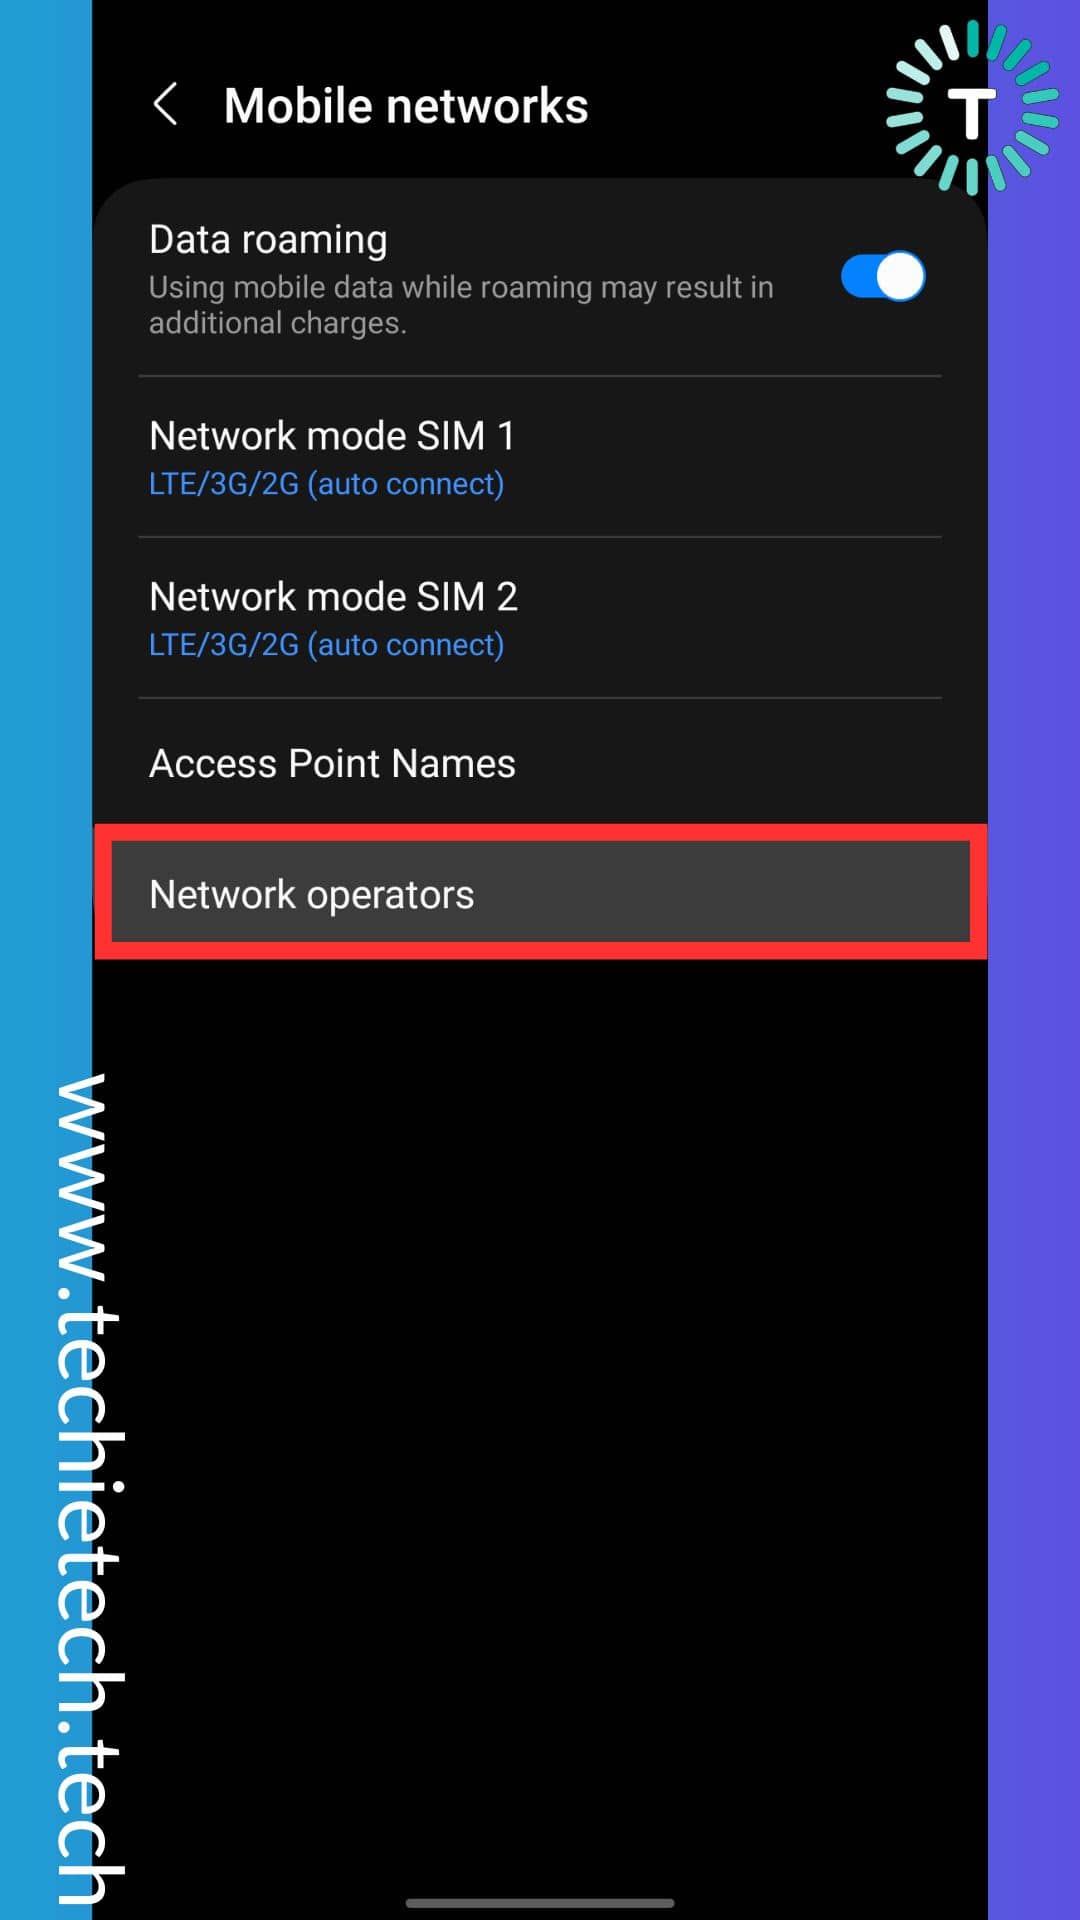
Step 3: Then, tap on Network operators,
Step 4: On the next screen, toggle OFF ‘Select network automatically,’
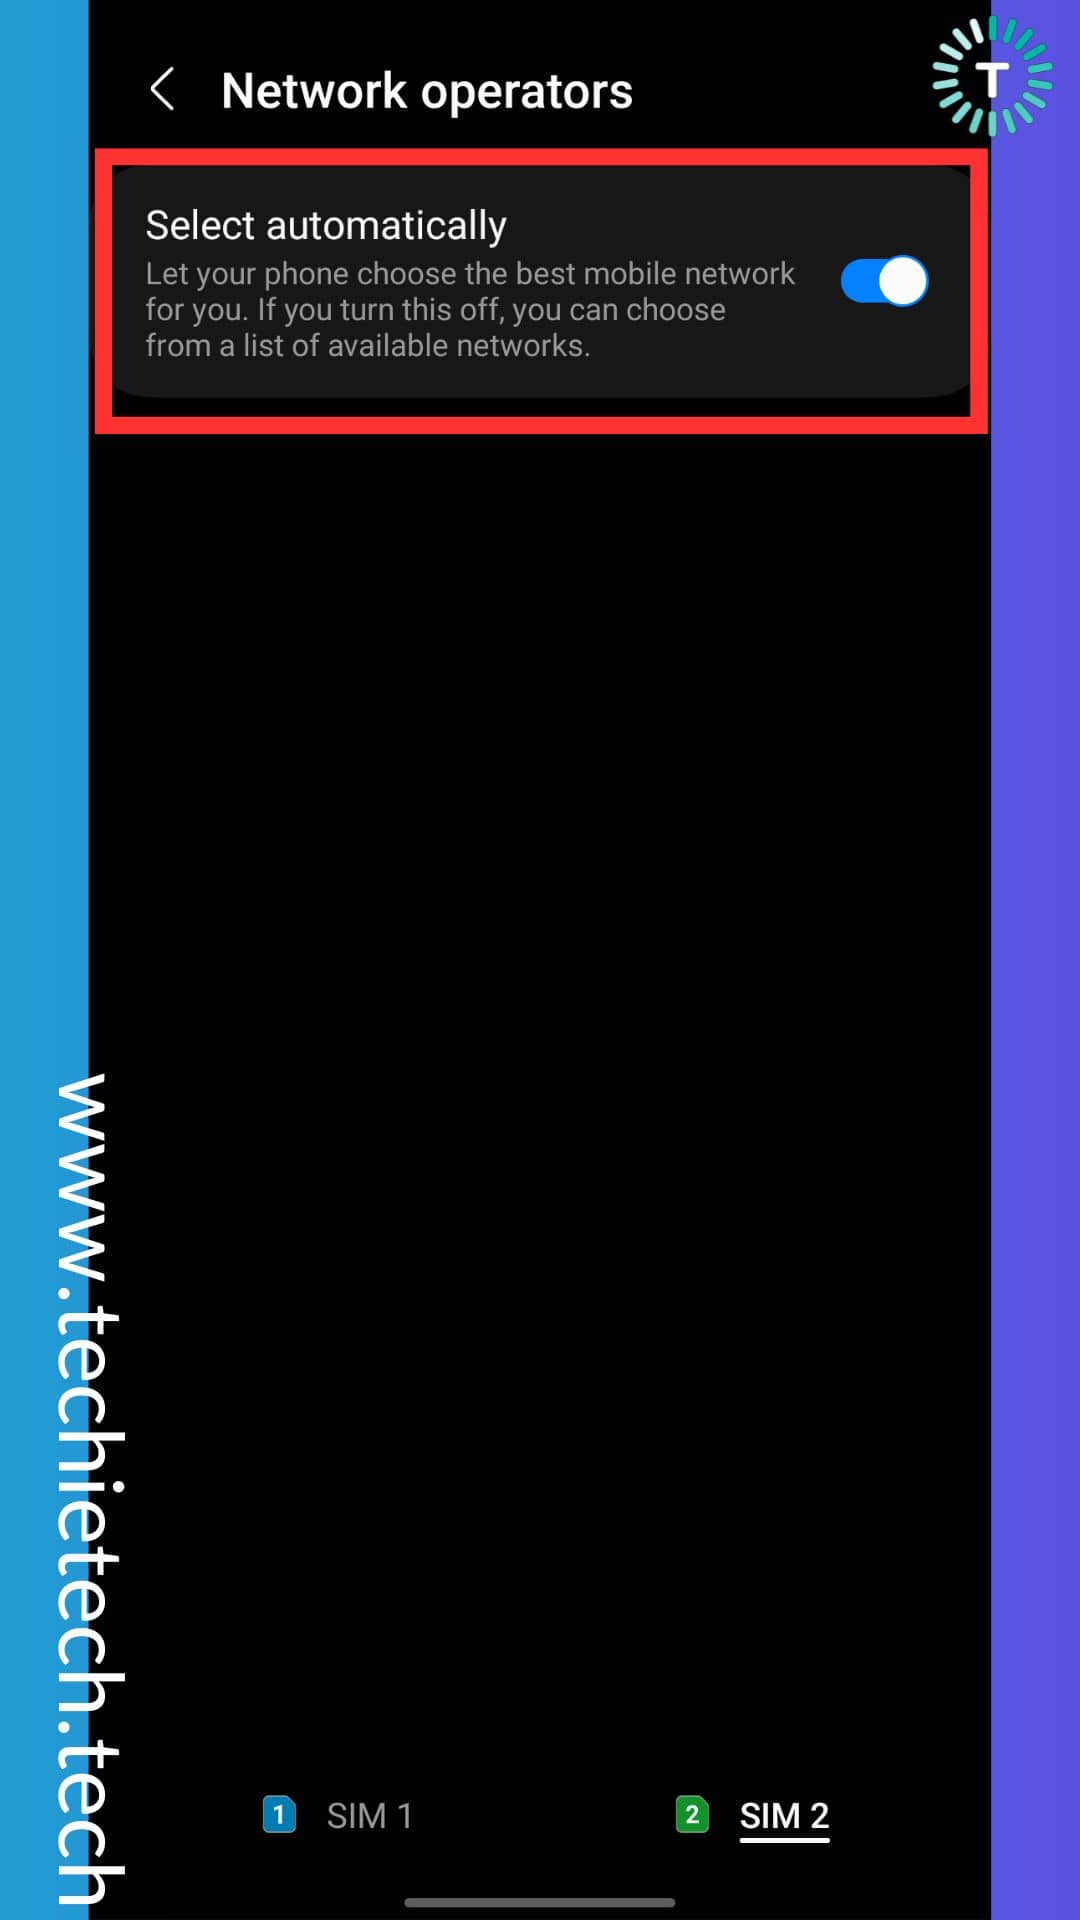
Step 5: Now, your device will search for all available networks in your area,
Step 6: Lastly, select your carrier’s network and you’re done.
Once you’ve done this, make sure to restart your device as we suggested in Method 1 and check whether the not registered on Network error on the Samsung Galaxy device is fixed. If you are still facing the network registration error on Sprint and AT&T, we suggest changing the network mode and checking if it makes any difference.
Method 7: Change the network mode
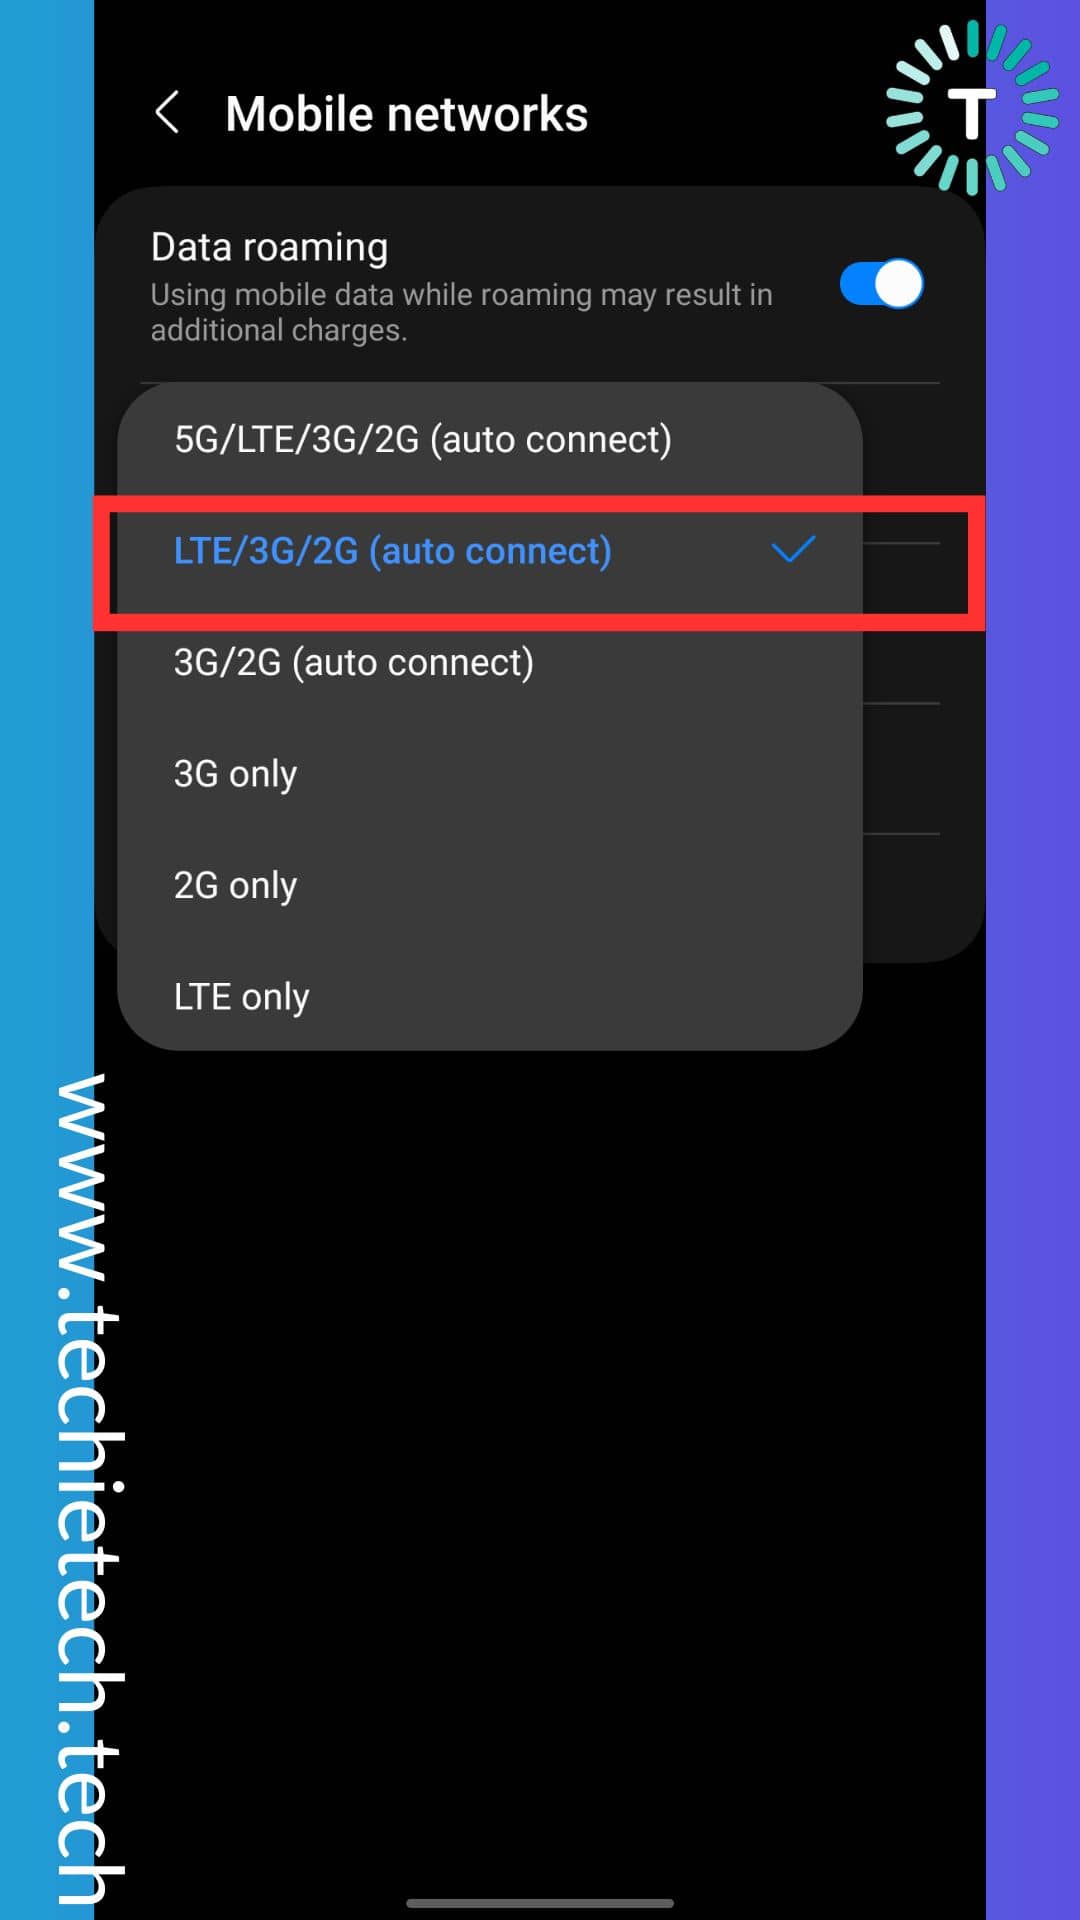
If you are in an area where 5G or even 4G coverage is poor, you might be unable to fix the ‘not registered on network’ error on Samsung S23 Plus. To fix this, you need to switch your network mode to LTE/3G/2G (auto-connect).
If you don’t know, below are the steps to change network mode on your Samsung Galaxy devices, and rectify not registered on network error, please have a look.
Step 1: Go to Settings and tap on Connections,
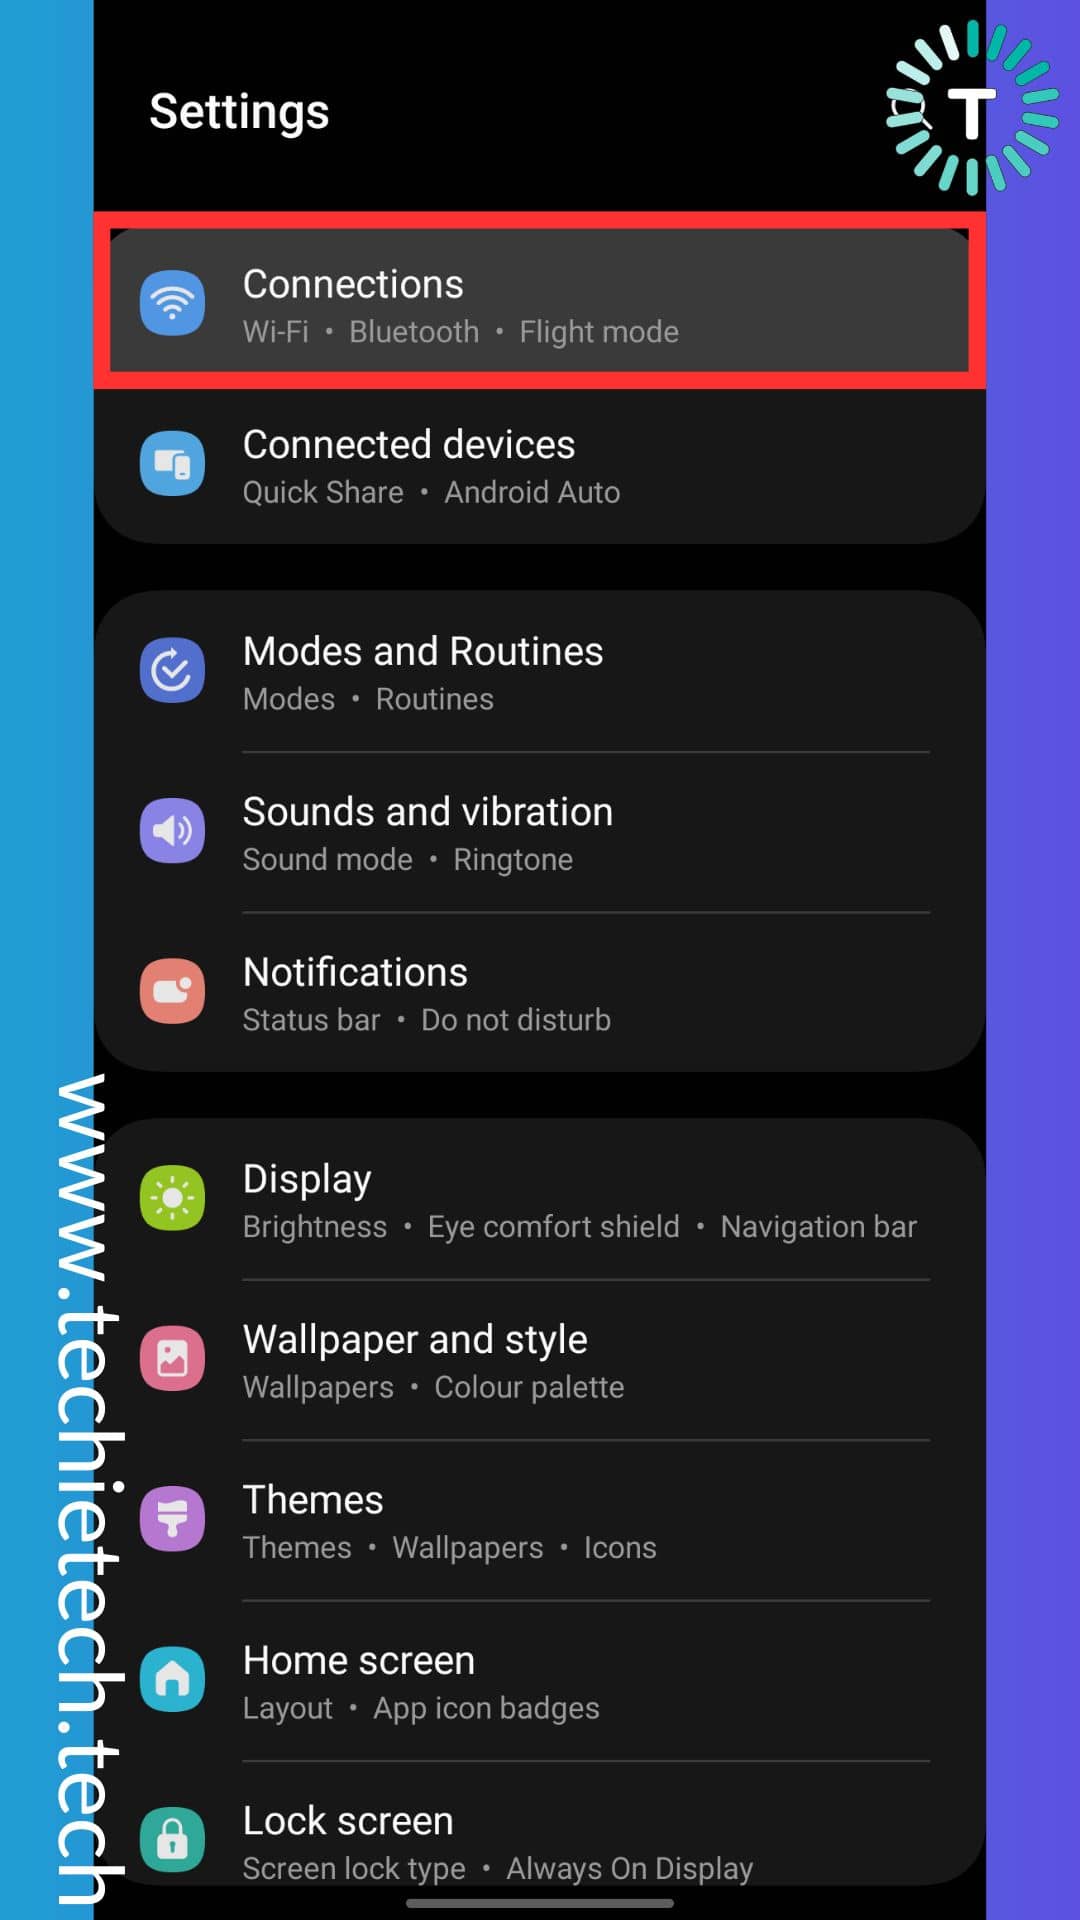
Step 2: Tap on Mobile Networks,

Step 3: Tap on Network Mode,
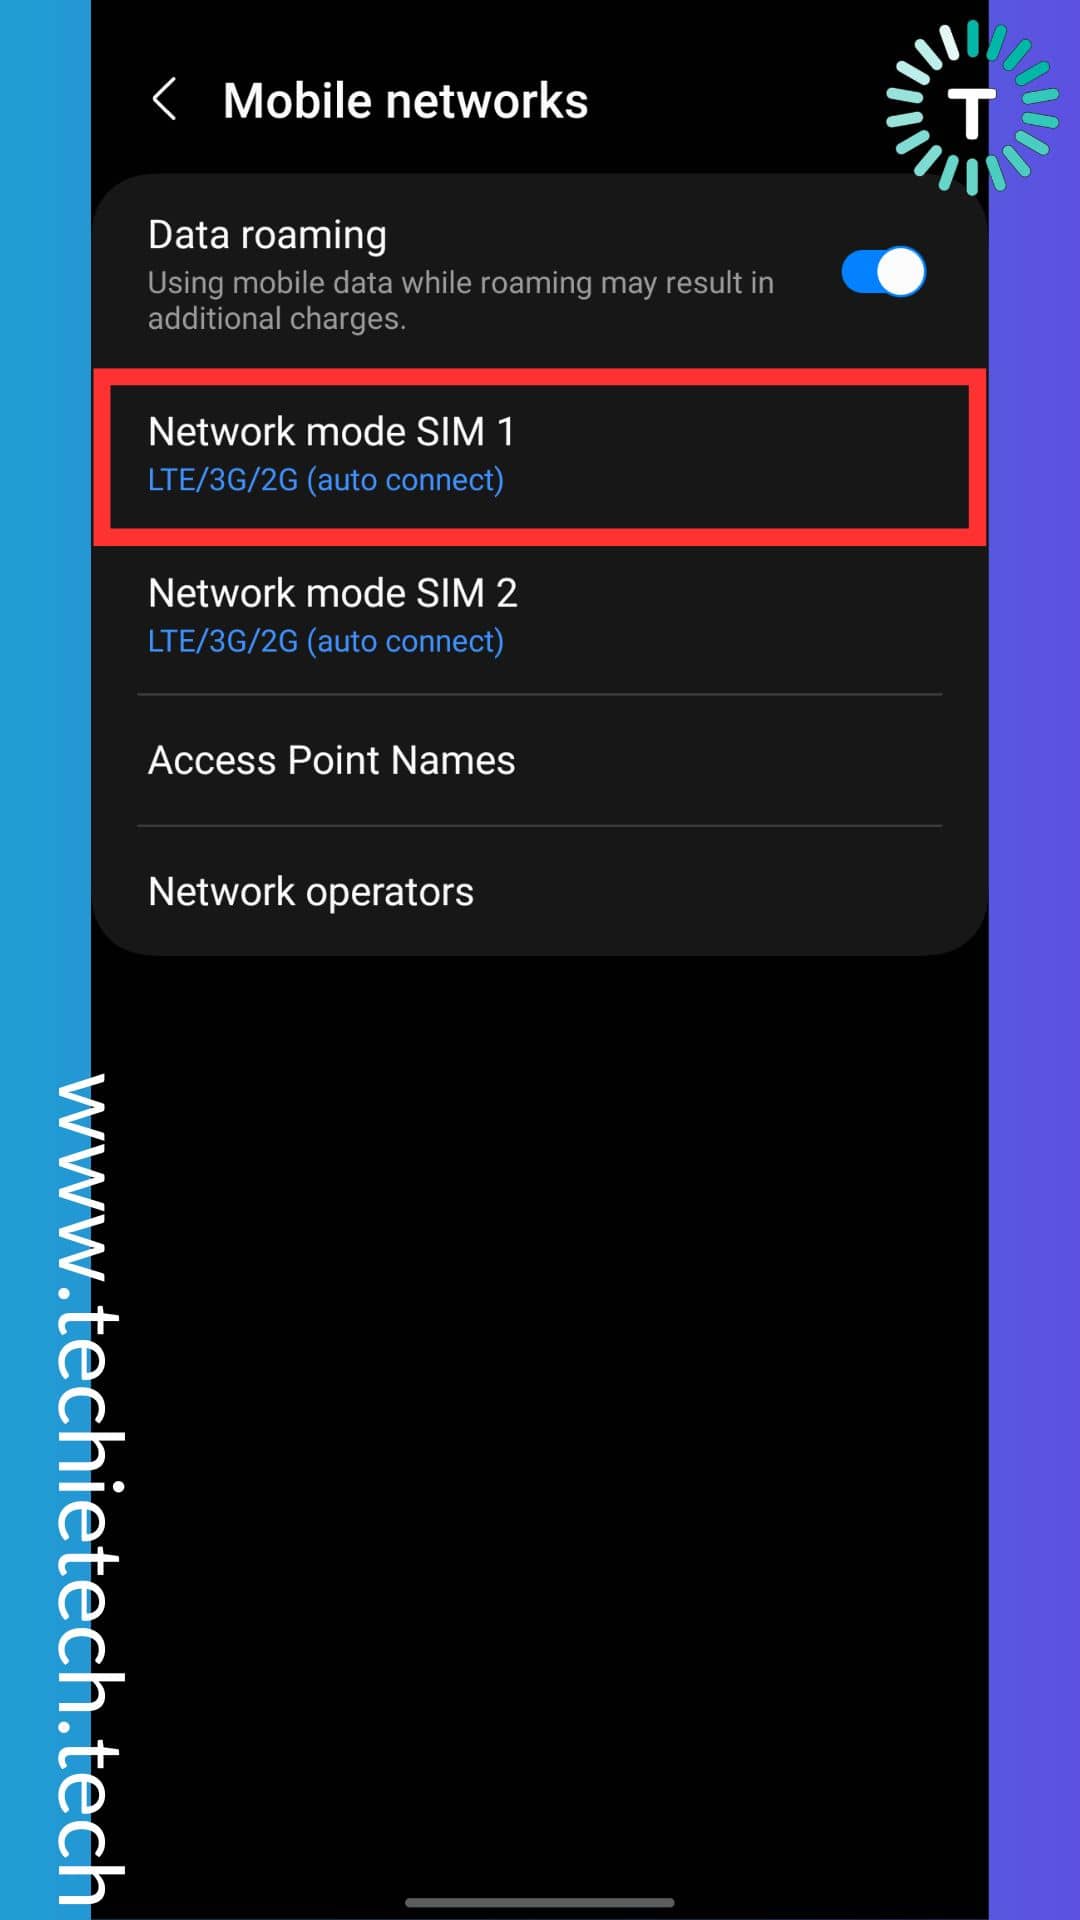
Step 4: Now tap on LTE/3G/2G (auto connect) to change the Network Mode.
Once you have executed the steps successfully, make sure to check whether your Samsung phone is still displaying a SIM card not registered on network error. If you were able to fix the issue, good for you.
For those who are still confused about why Verizon showing not registered on network, we suggest you to try disabling all network connections on your Samsung device. We have explained the process in Method #7, keep reading.
Method 8: Reset the Network Settings
If the above methods were unable to fix the network registration error on your Samsung S20, resetting the network settings can be useful for you. Before, you proceed, let me tell you executing this method will erase all the current network settings from your device and restore to default. Meaning, all the saved Wi-Fi passwords, custom APNs, and
connected Bluetooth devices will be deleted after you reset all the network settings. Since it is one of the effective ways to fix the issue where your Samsung S22 or S23 is showing a network registration failed error message, we recommend trying it.
Here’s how to reset the network settings on Samsung and other Android smartphones:
Step 1: First, go to Settings and tap on General management,
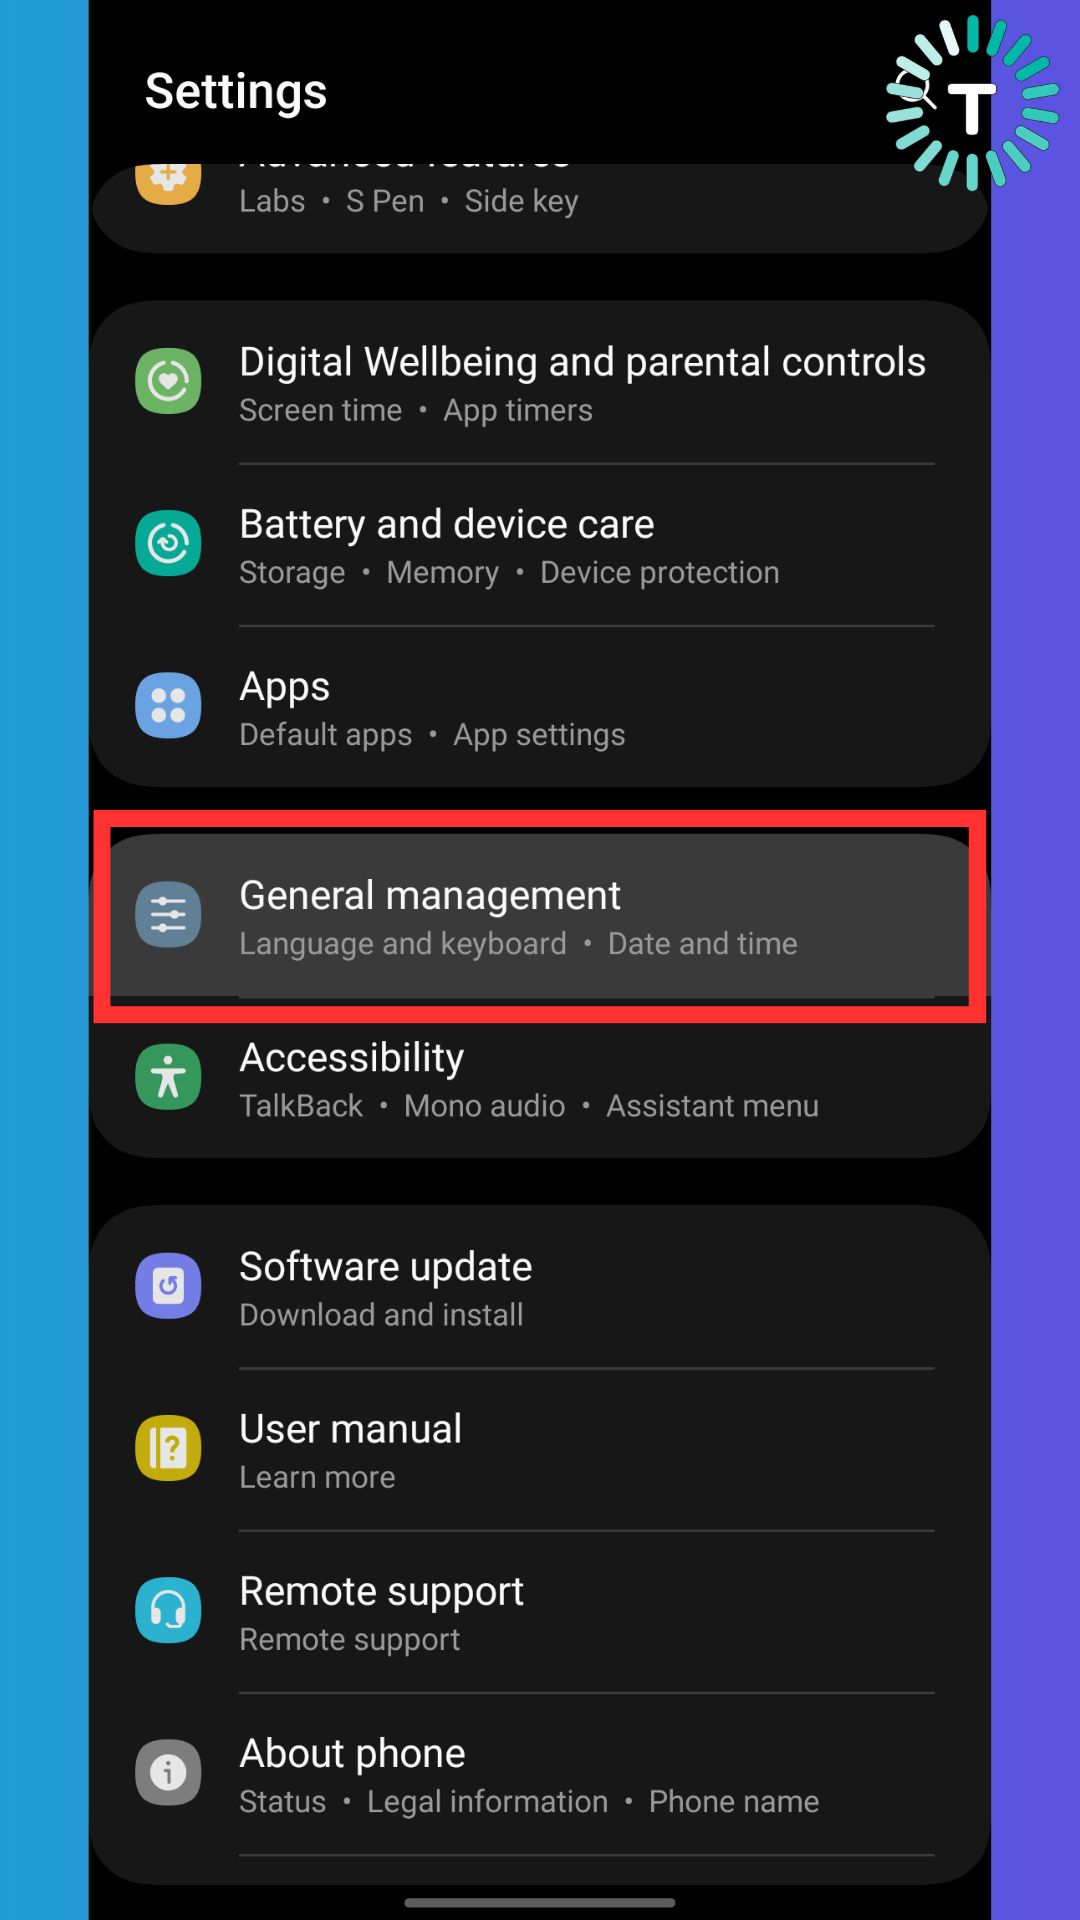
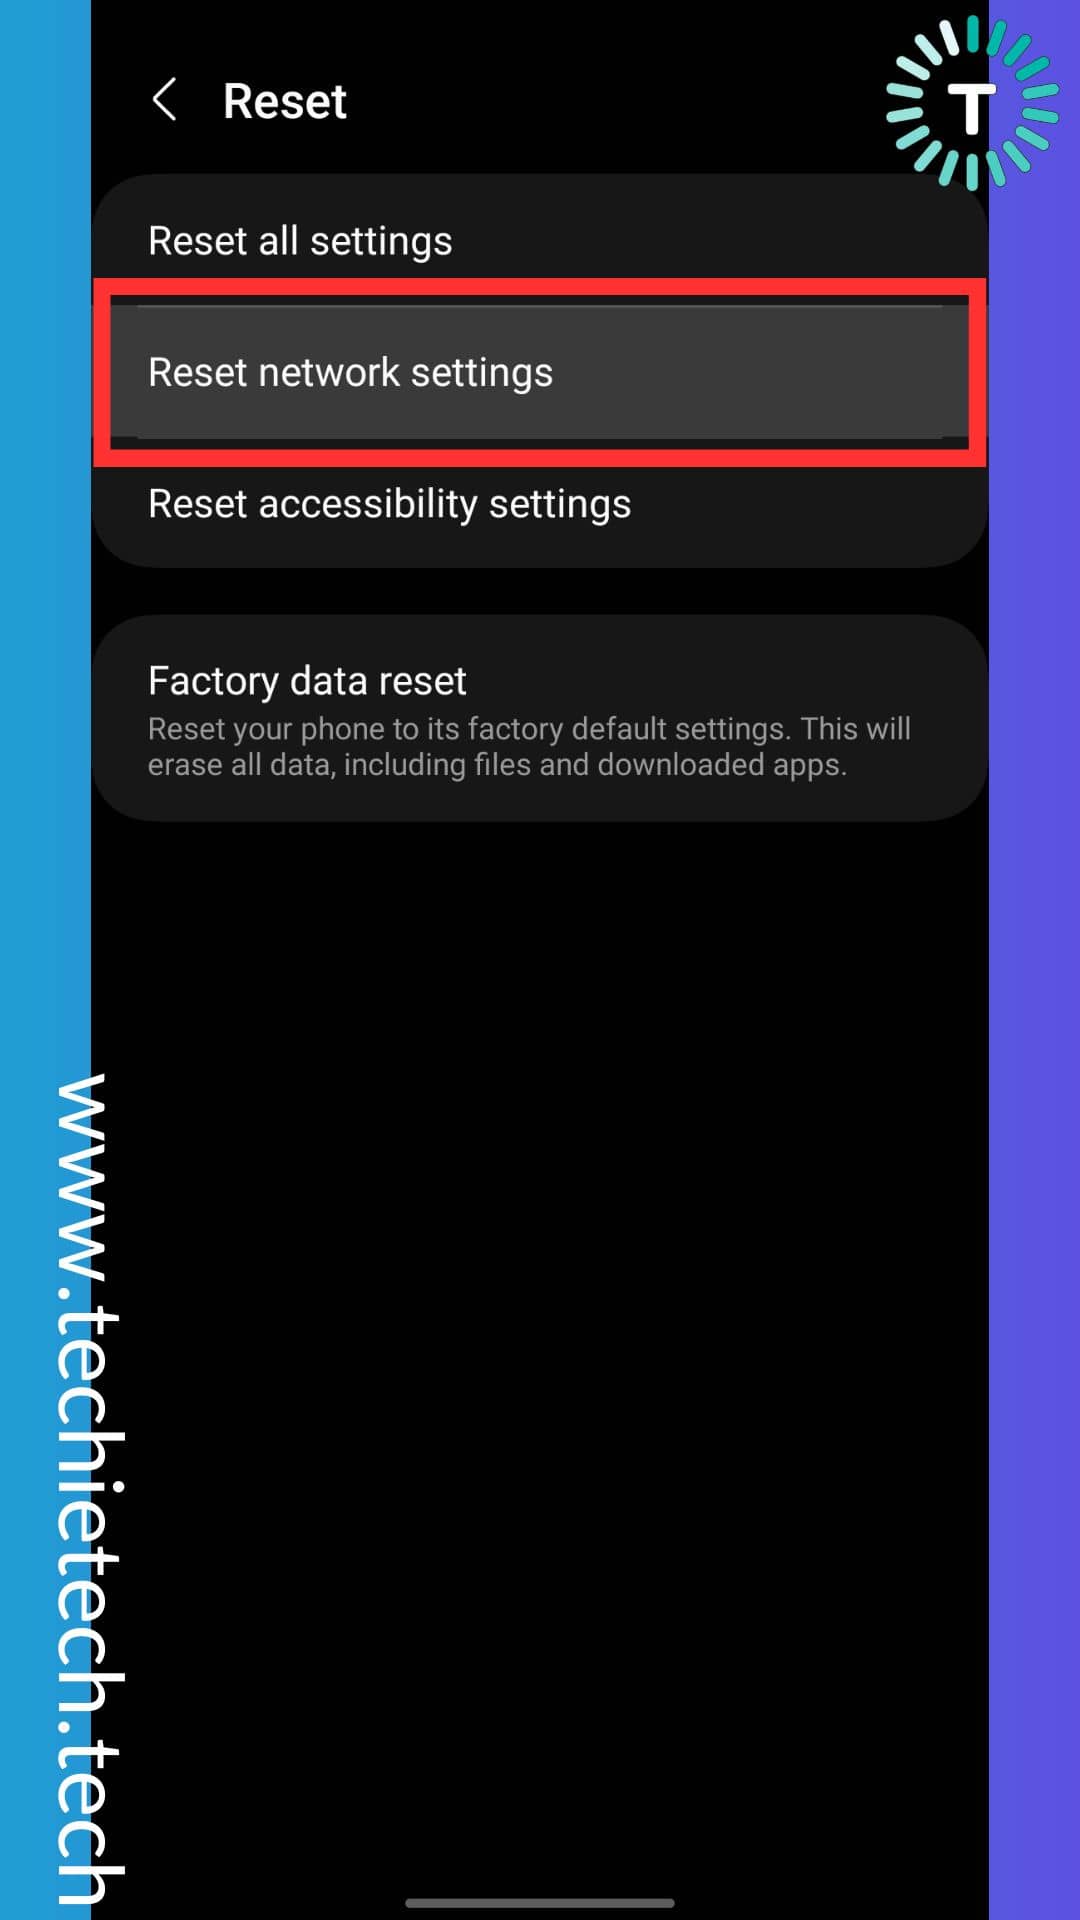
Step 2: Now, scroll and locate Reset, and tap on it,
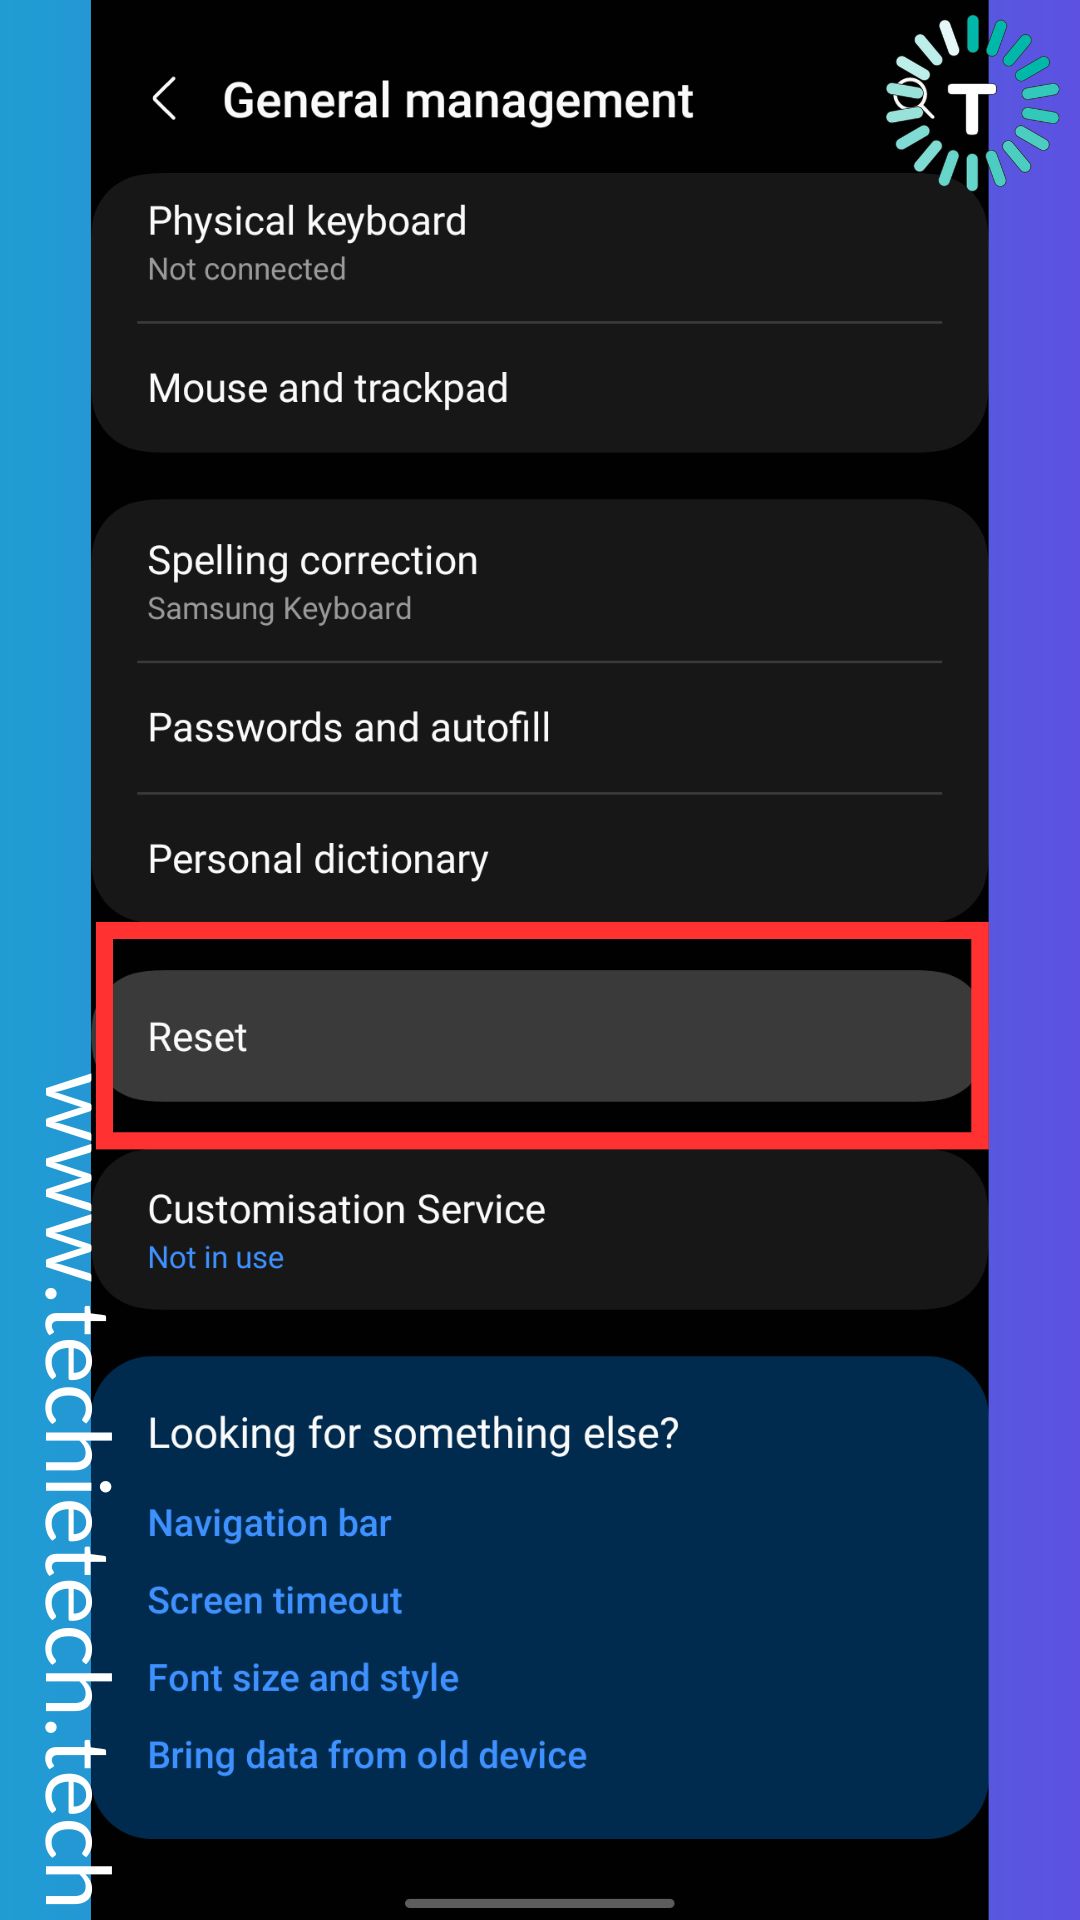
Step 3: Next, tap to select Reset network settings,
Step 4: On the next screen, for SIM 1, tap on ‘Reset settings,’

Step 5: Next, tap to change SIM,
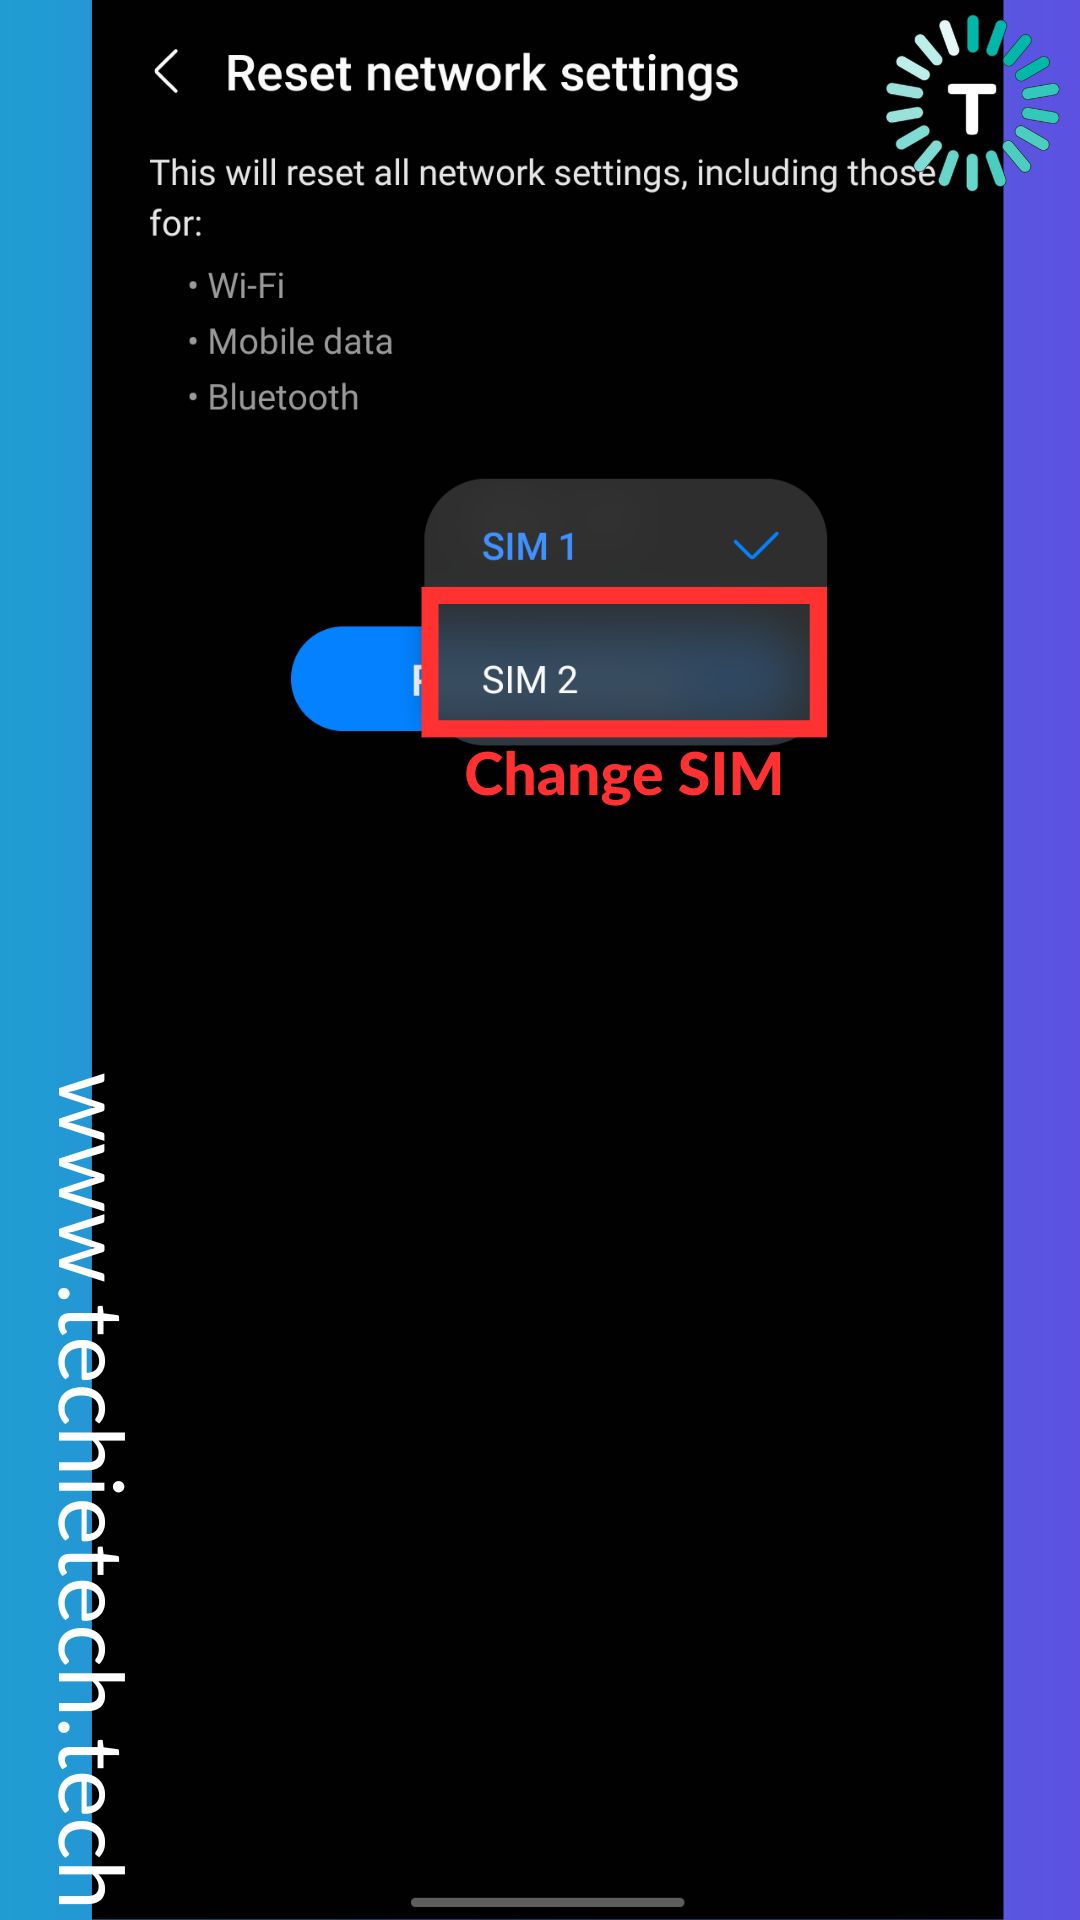
Step 6: For SIM 2, again tap on ‘Reset settings,’
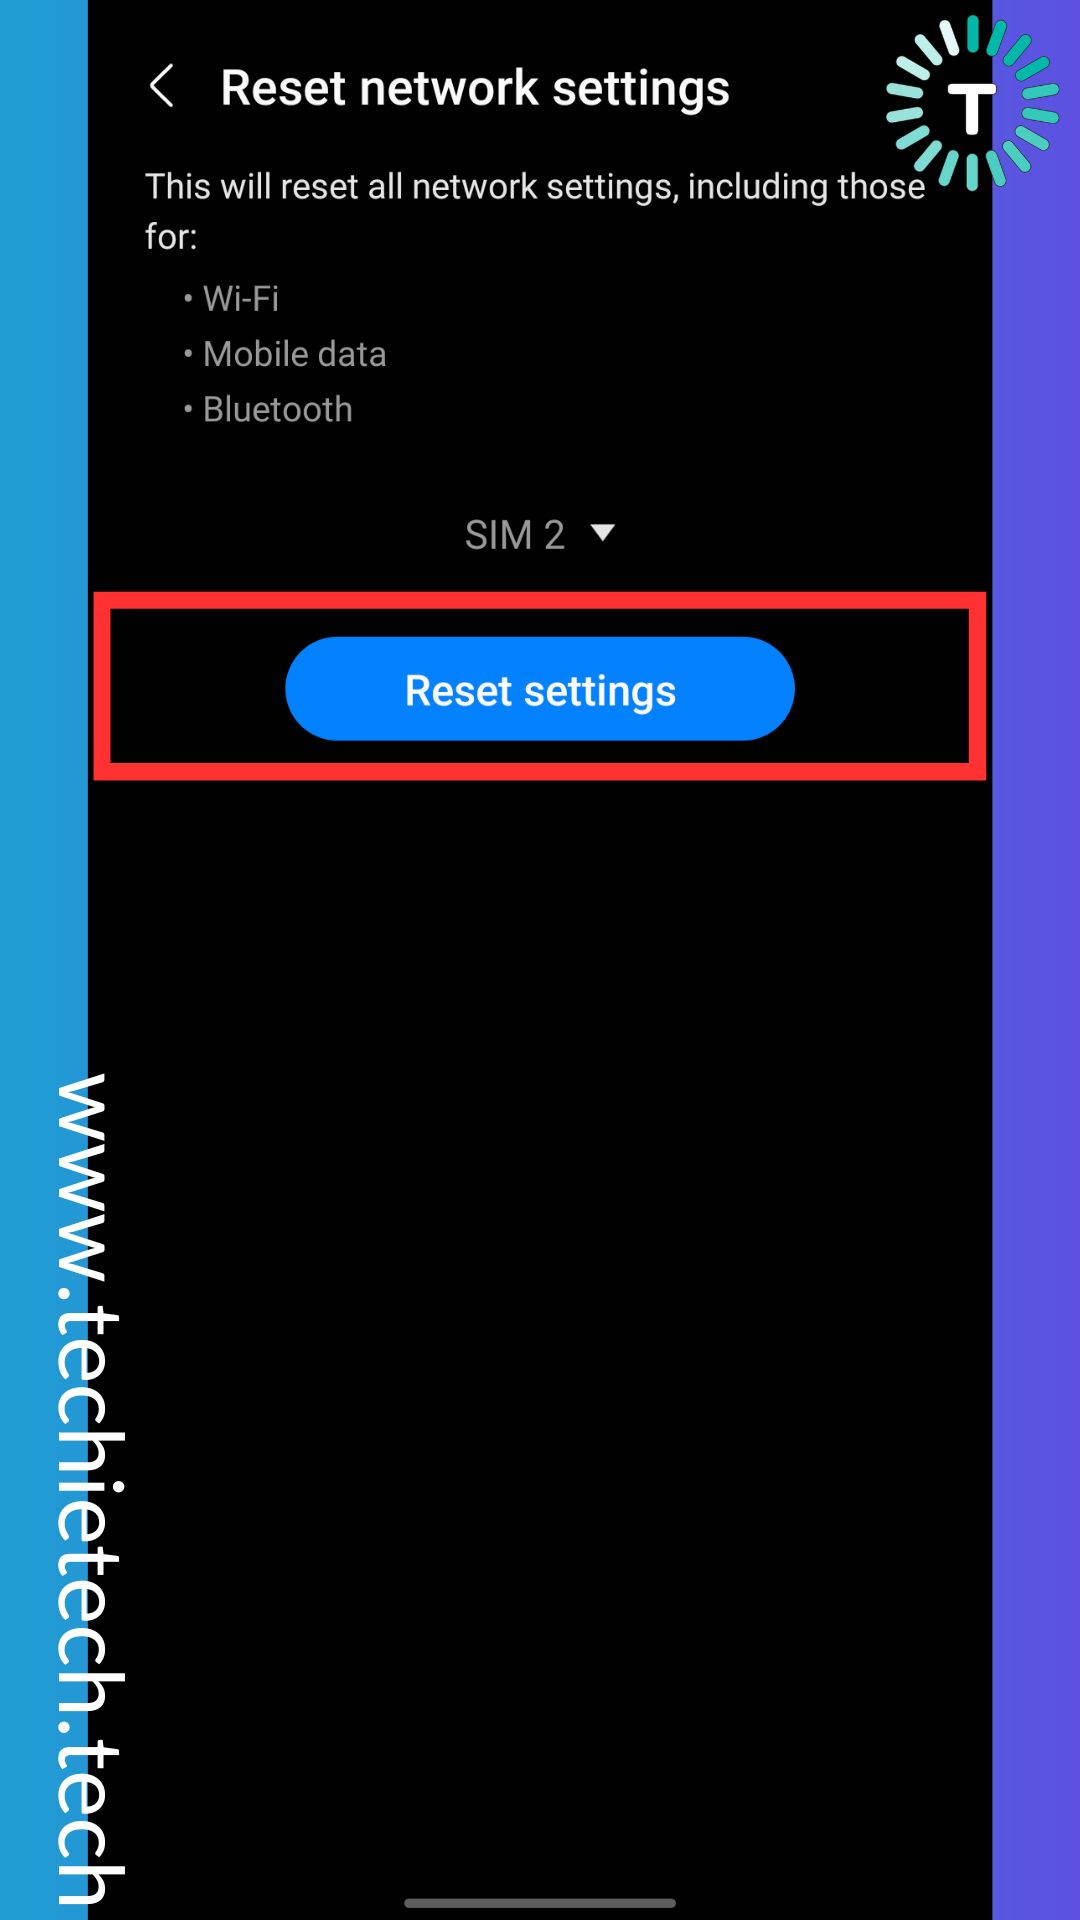
Step 7: Lastly, confirm the Reset network settings options by tapping.
Once you are done doing this and see a signal bar on the top, don’t forget to try sending a text or try to call and check if see if the SIM card registration failed error on Samsung A53 5G and other flagship series.
Method 9: Reset/Update Your APN Settings
The Access Point Name aka APN is a setting your Android device requires to set up a connection to the gateway between your carrier’s cellular network. FYI, some regional carriers require you to manually enter your APN to set up cellular services on your device. So, if you haven’t done that yet, it is one of the possible reasons why you are getting not registered on network error on Samsung smartphones. You can access APN settings and manually edit them based on your carrier by following the necessary instructions given below.
Here’s how to reset/update APN settings on Samsung and other Android phones:
Step 1: First of all, head to Settings, and tap on Connections or Network & Internet (for some Samsung Galaxy devices),

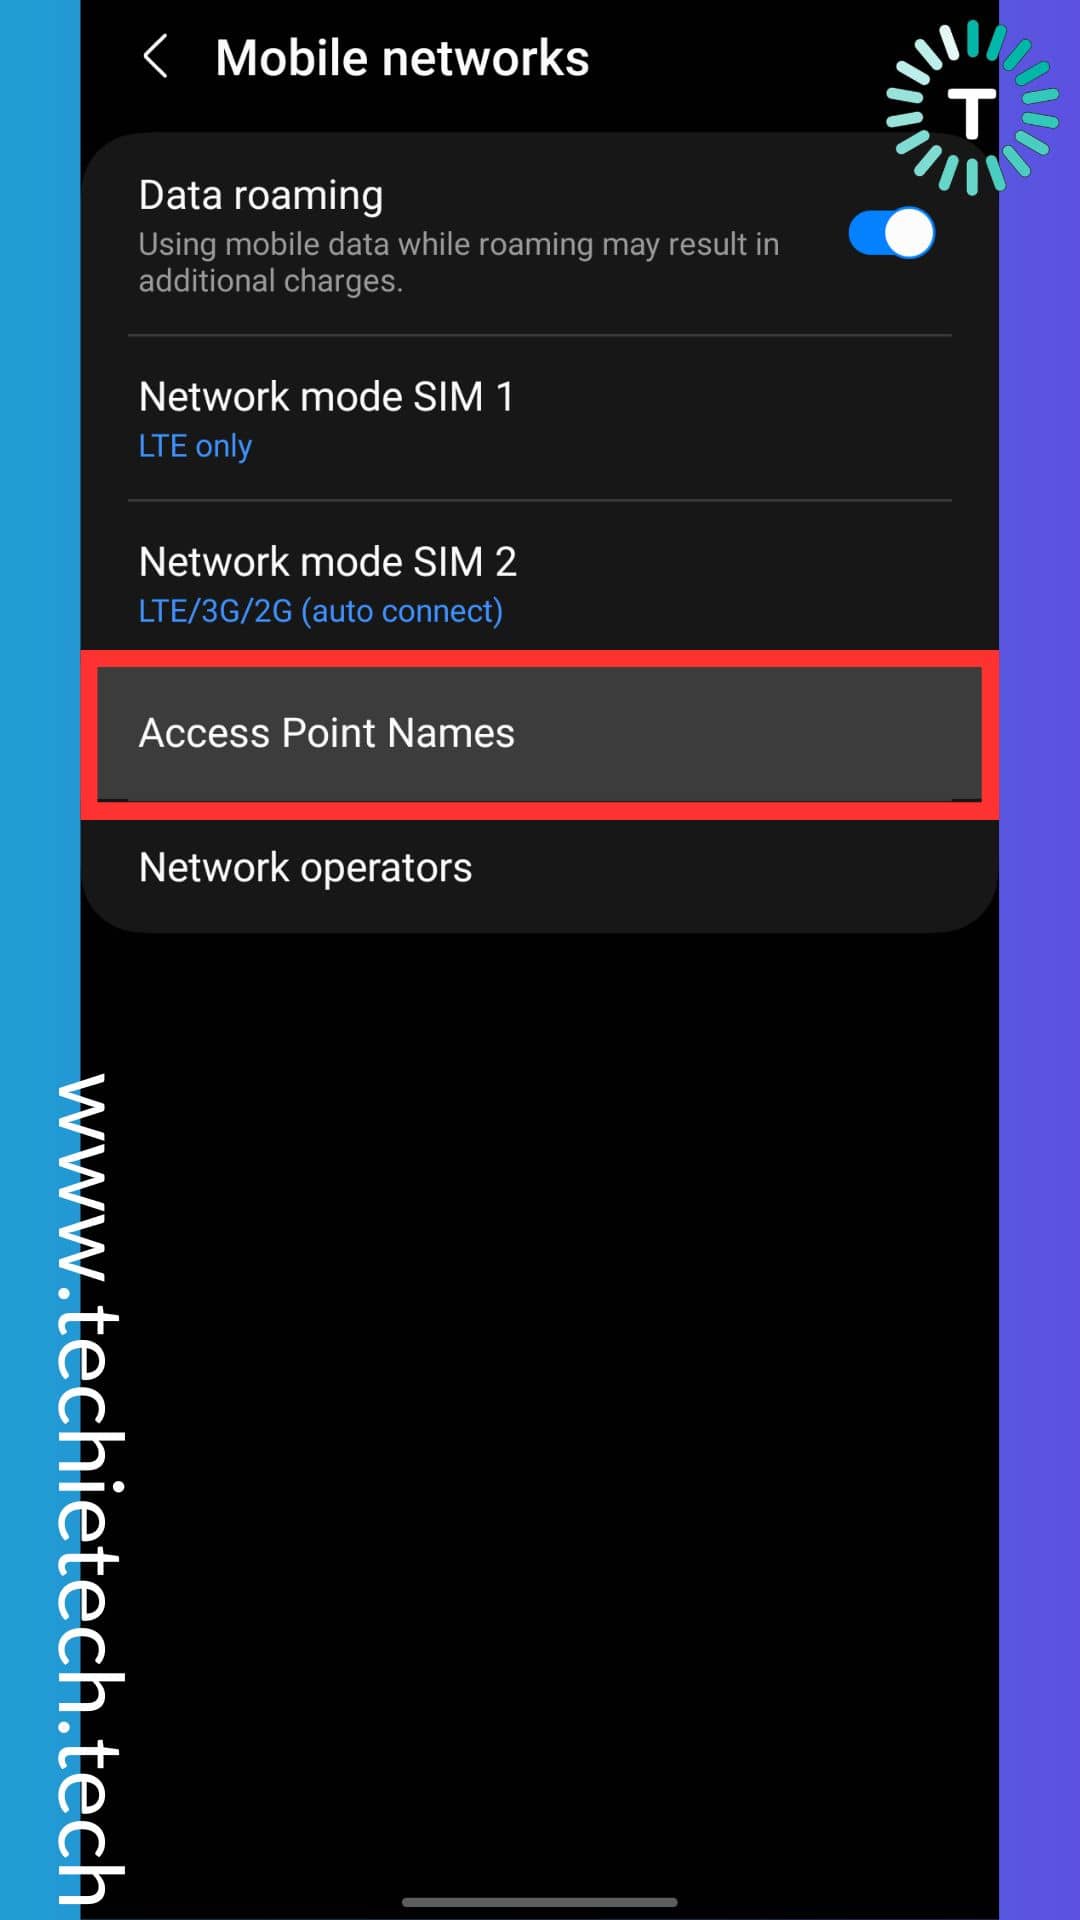
Step 2: Then, tap Mobile Networks,

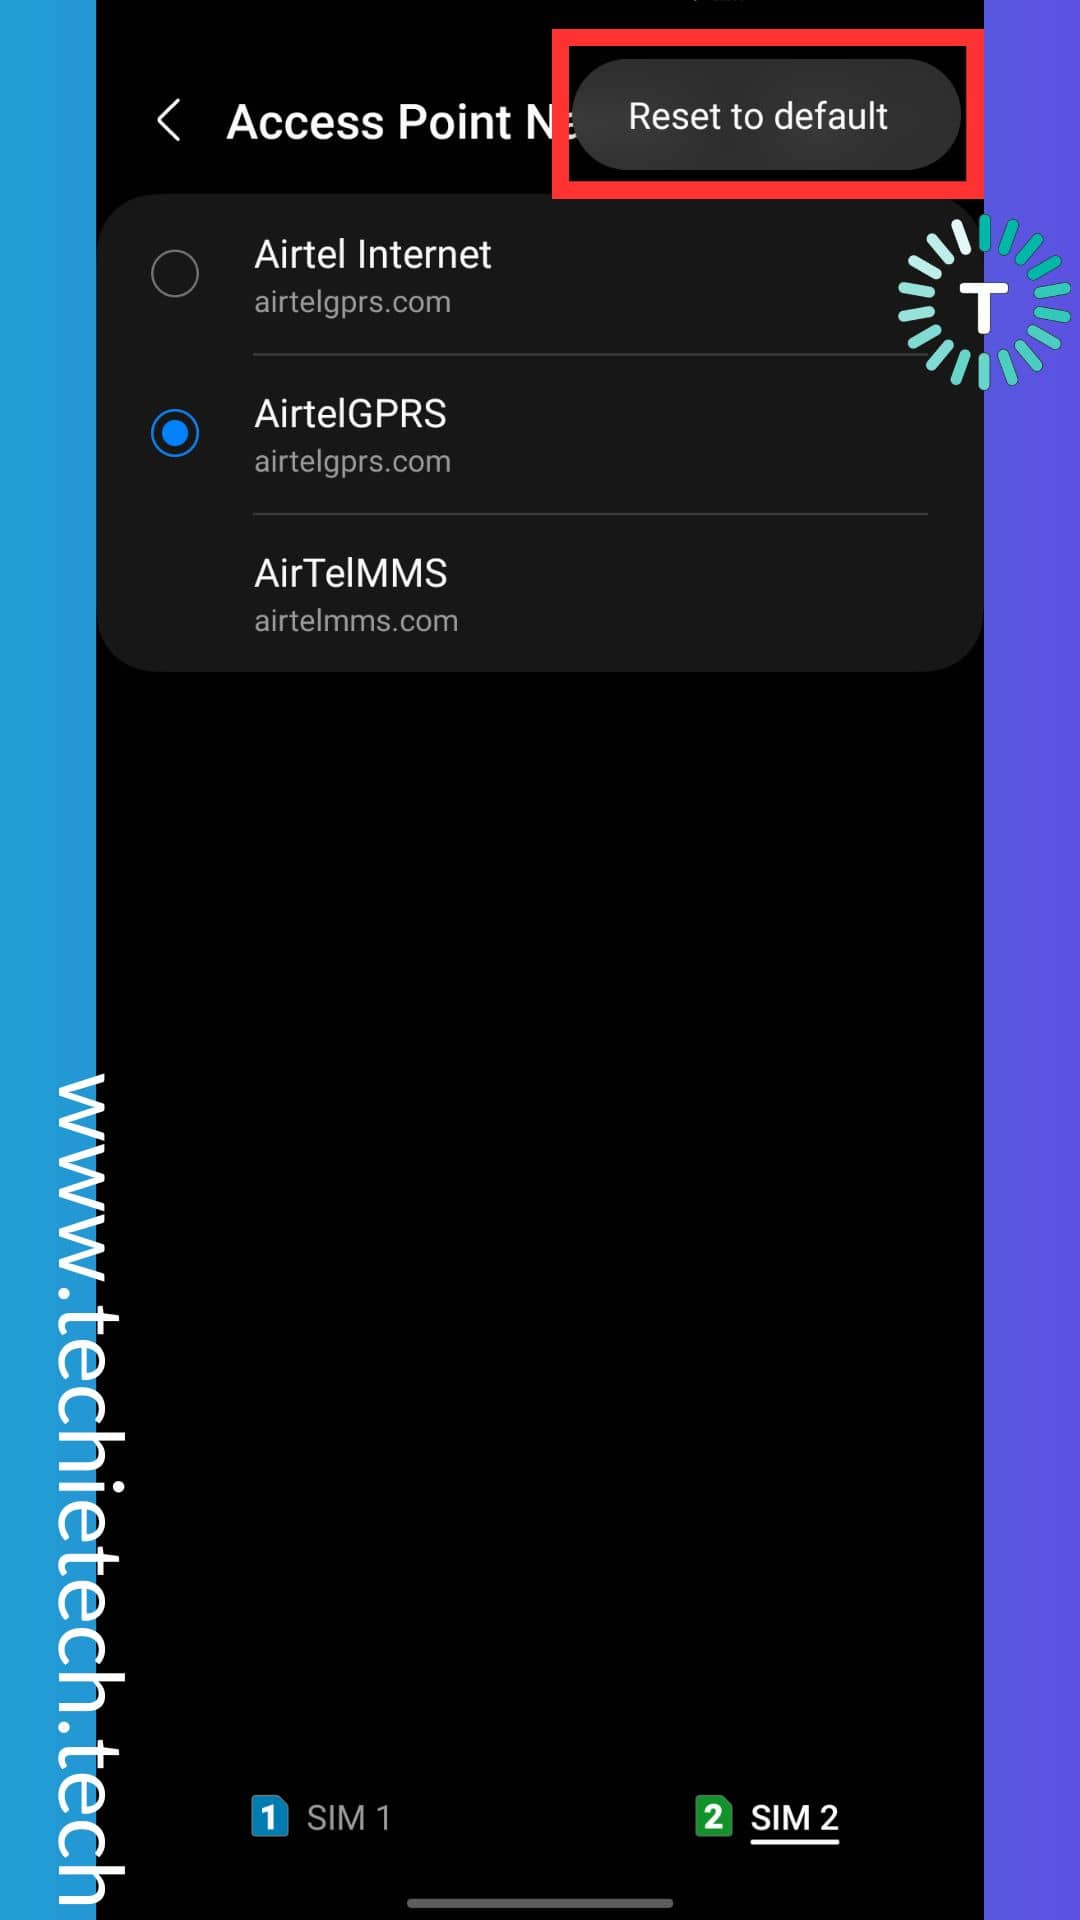
Step 3: Now, tap on Access Point Names,
Step 4: Next, tap on 3 dots just above the APN setting for SIM 1,
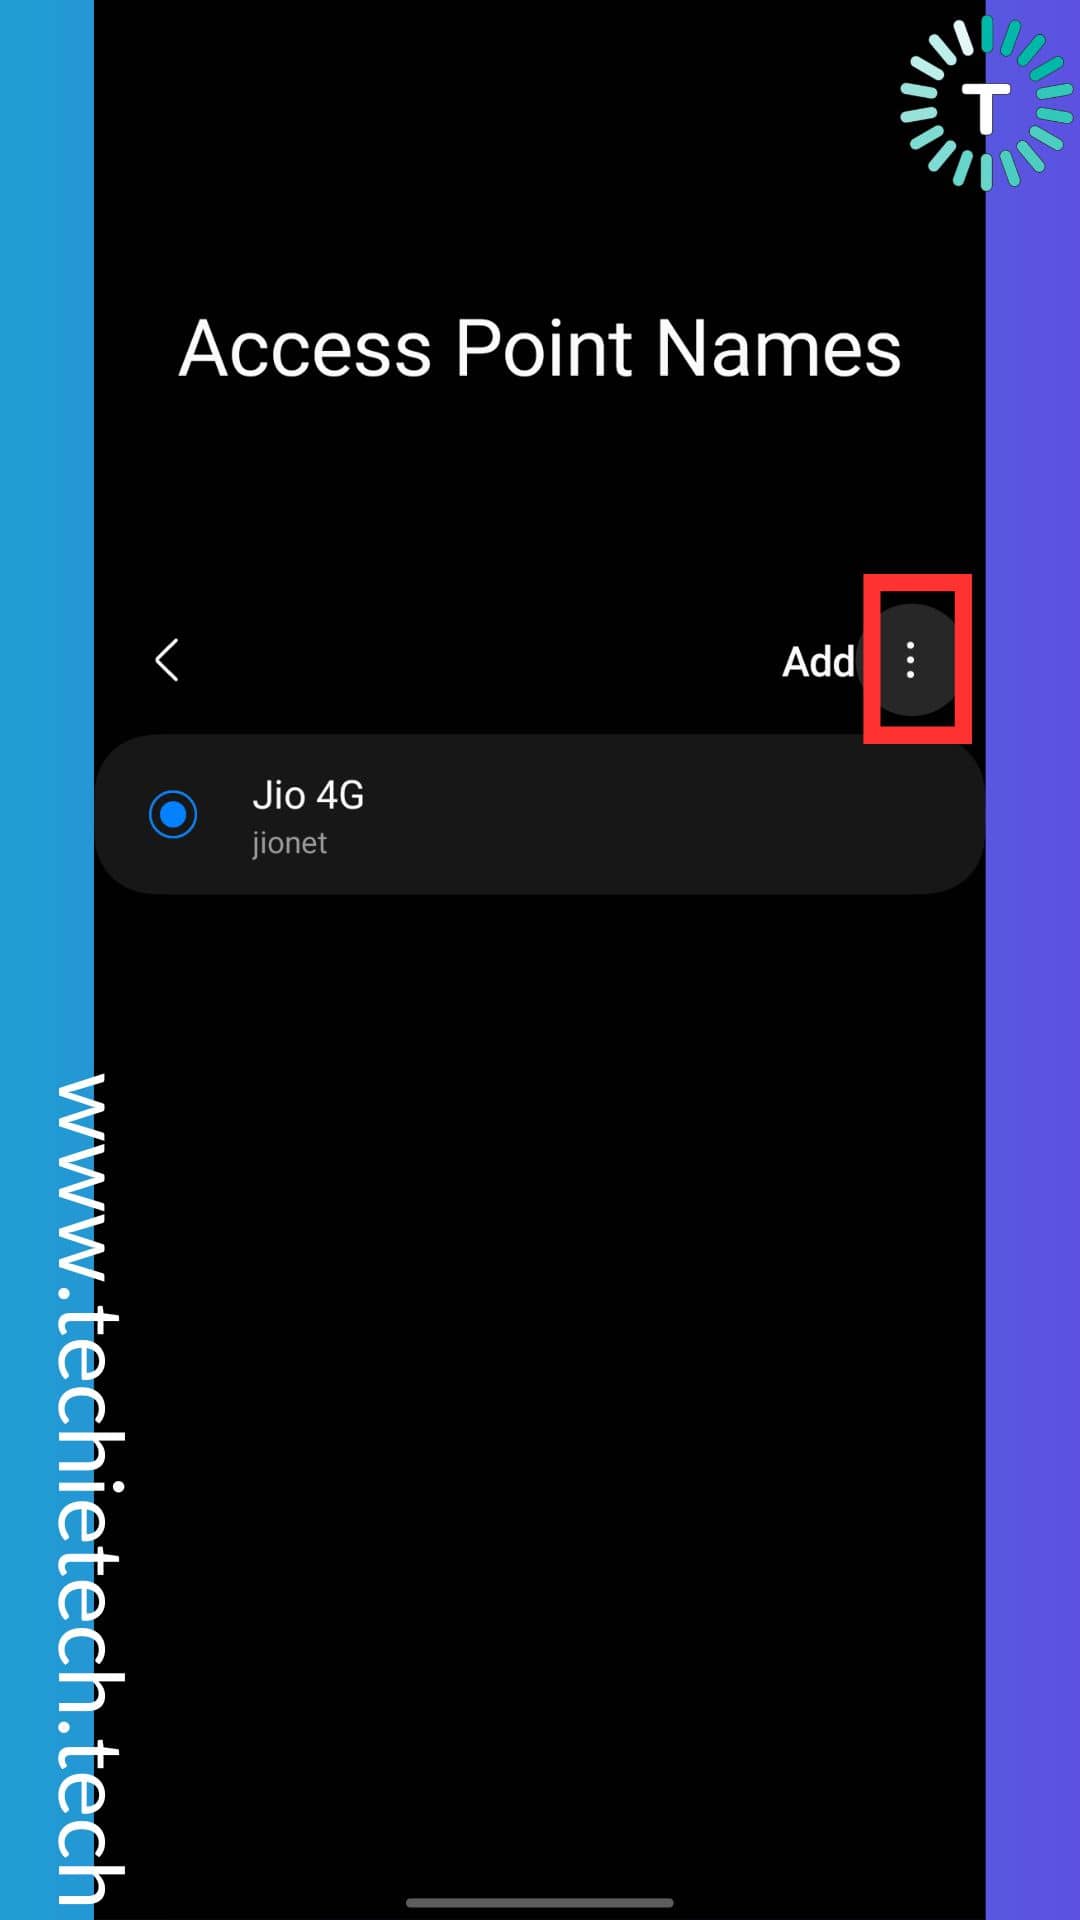
Step 5: On the top right and tap ‘Reset to default,’
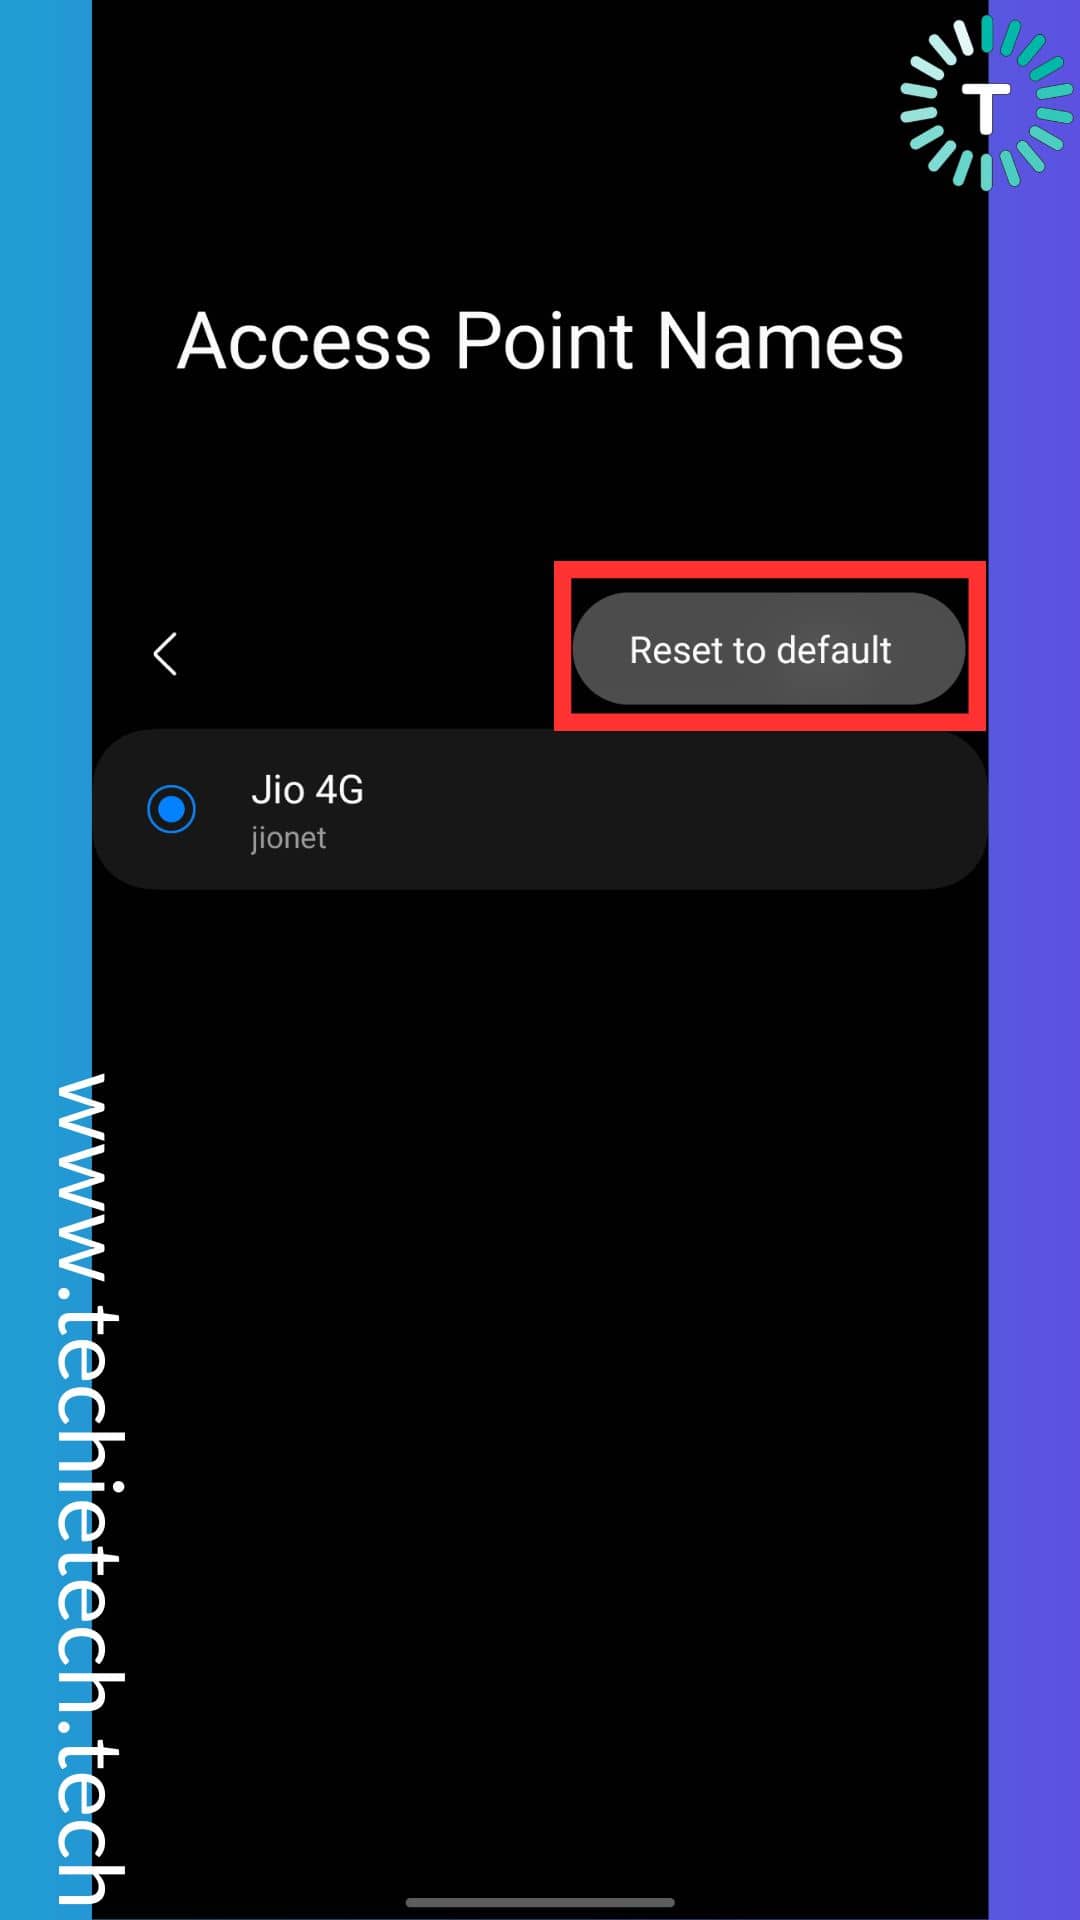
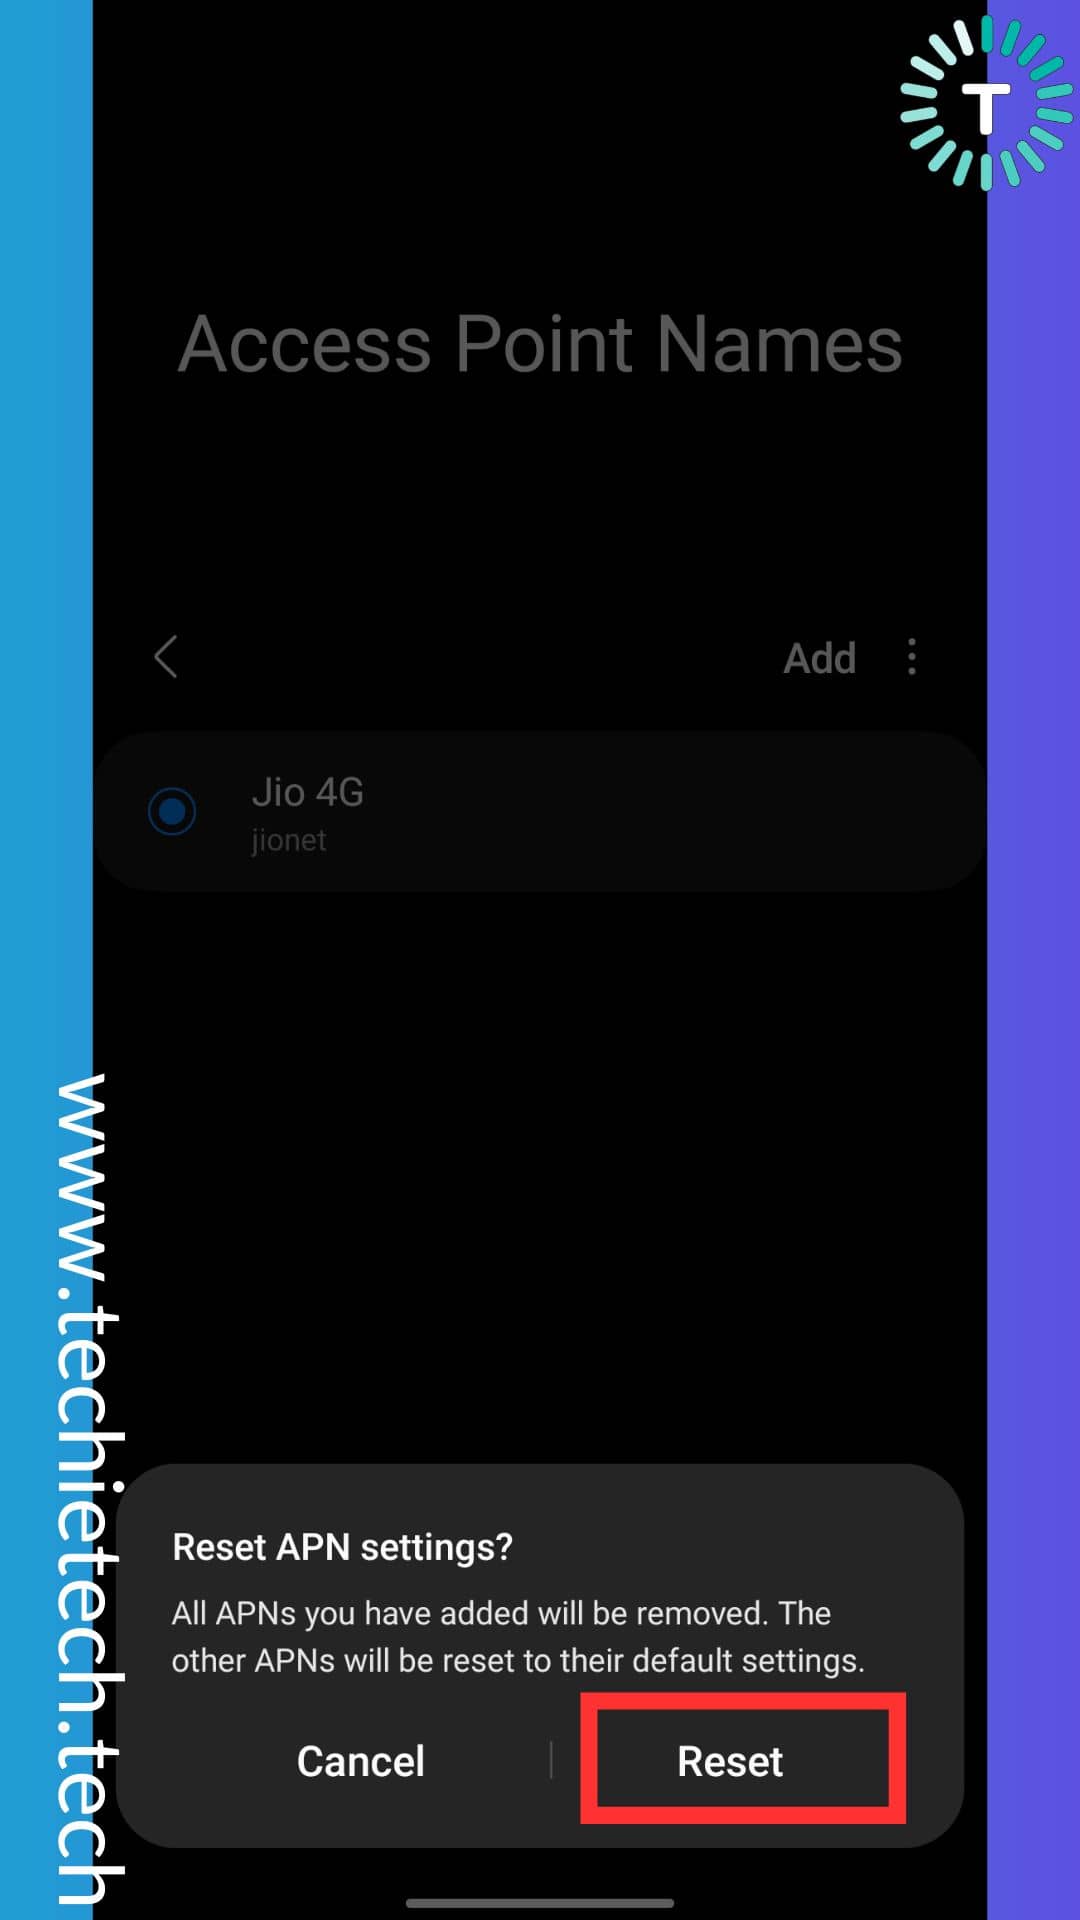
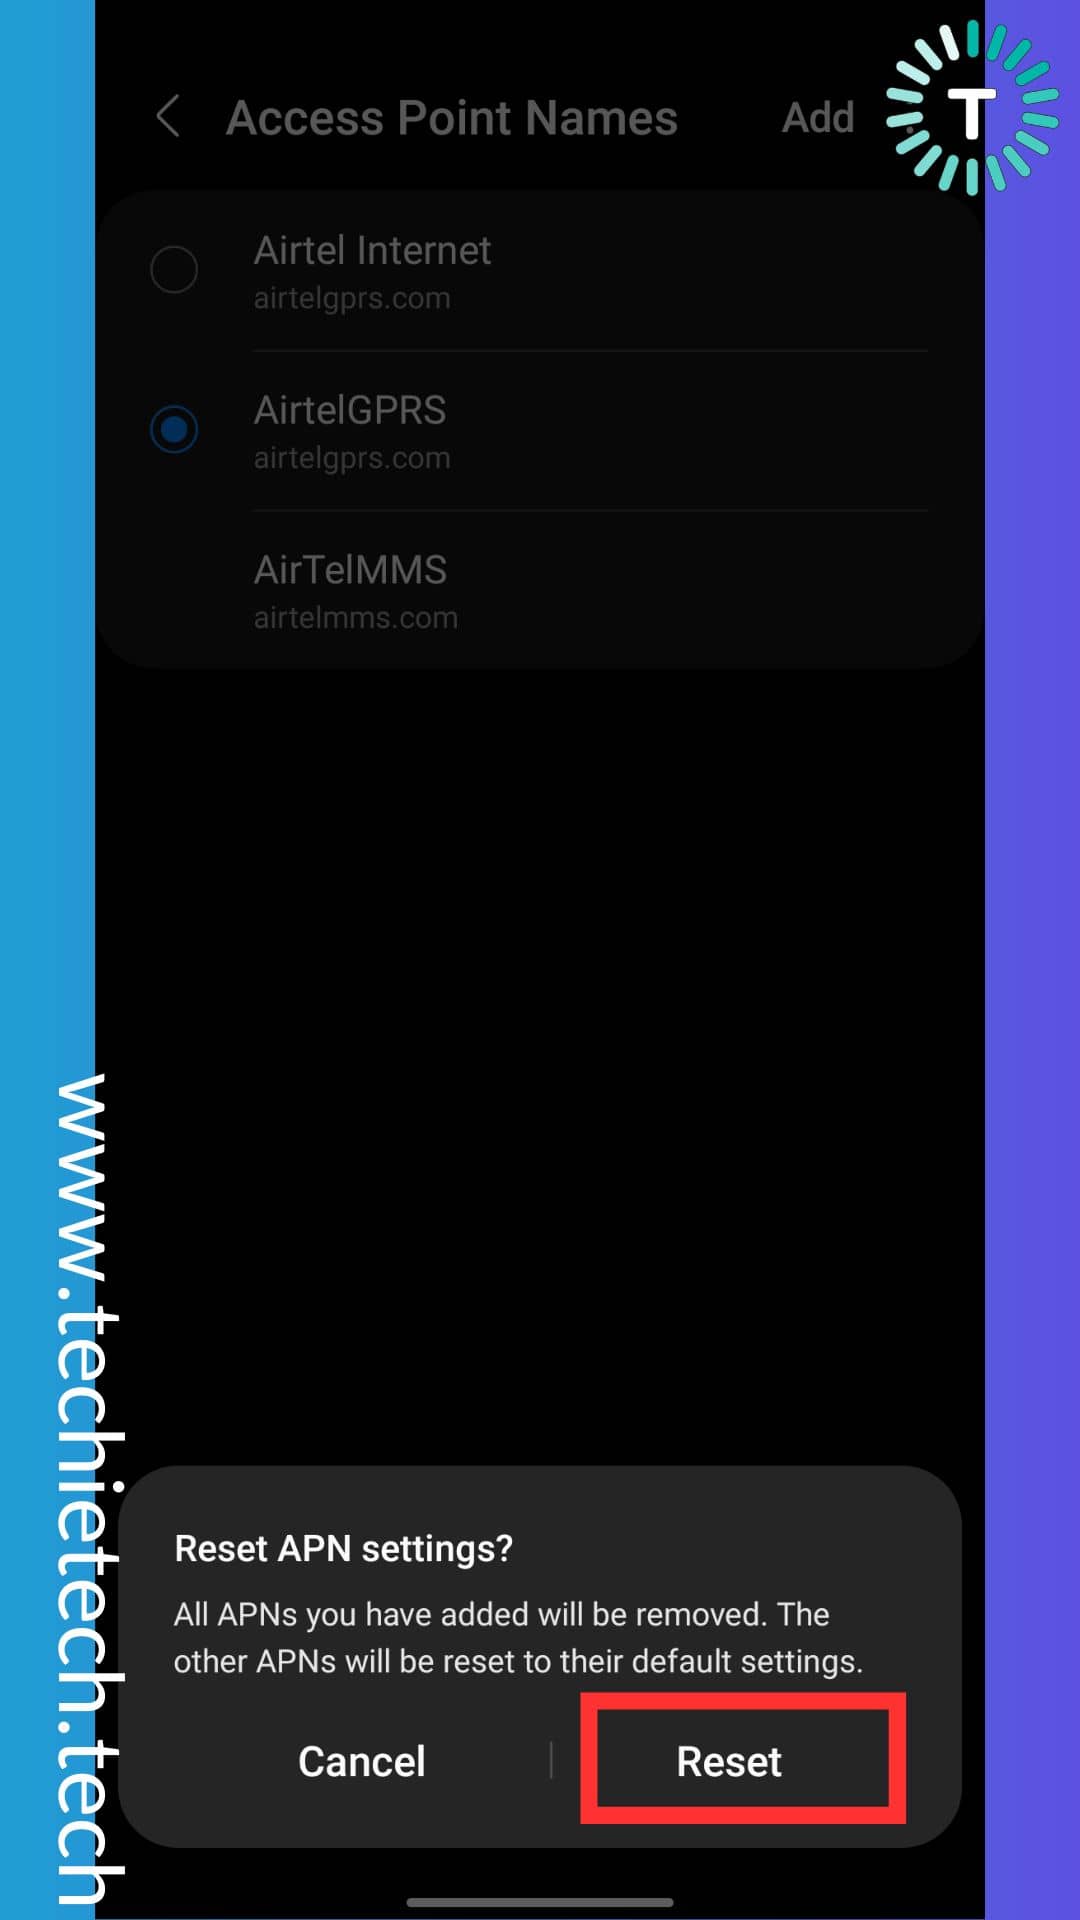
Step 6: Then, confirm the selection by tapping ‘Reset,’
Step 7: To reset APN settings for SIM 2, tap on three dots on the top right of the screen,
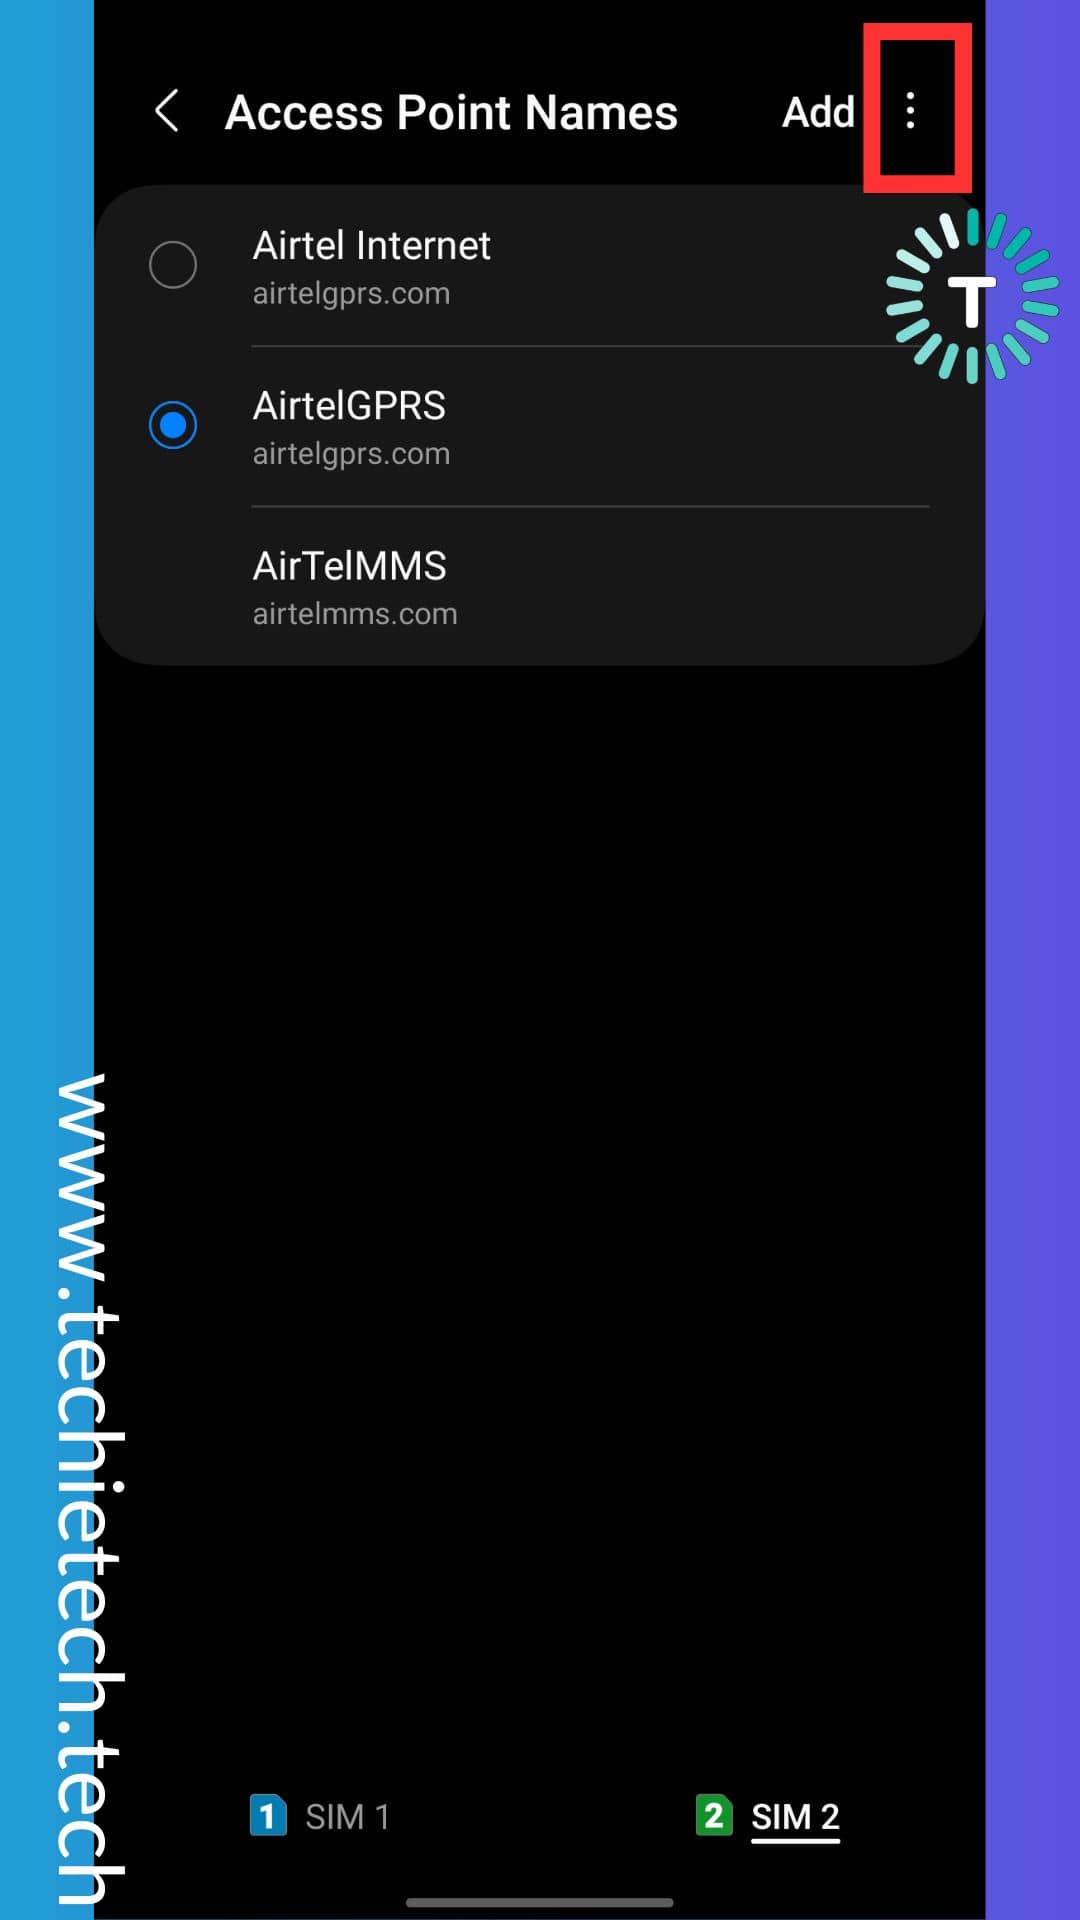 Step 8: Now, tap on ‘Reset to default,’
Step 9: Then, confirm the selection by tapping ‘Reset,’
Step 10: To add/edit APN, tap on ‘Add (+)’ icon to enter the new APN settings.
To remind you, every carrier has different APN settings, so you have to choose them accordingly. Once you have reached Step 7, you can add/edit a new APN for different carriers.
If you don’t know APN settings for popular US carriers including AT&T, Verizon, T-Mobile, and Sprint, we have mentioned them below. Have a look and try it out yourself.
For T-Mobile, enter the following details:
- Name: T-Mobile
- APN: Fast.t-mobile.com (for LTE devices) or epc.tmobile.com (for non-LTE devices)
- MMS protocol: WAP 2.0
- MCC: 310
- MNC: 260
- Proxy: <Not set>
- Port: <Not set>
- Username: <Not set>
- Password: <Not set>
- Server: <Not set>
- MMSC: http://mms.msg.eng.t-mobile.com/mms/wapenc
- MMS proxy: <Not set>
- MMS port: <Not set>
- Turn APN on/off: Grayed out unless there are multiple APNs
- Bearer: Unspecified
- Authentication Type: <Not set>
- APN Type: default,supl,mms OR Internet+MMS
- Default Android provides a text field to enter: default,supl,mms.
- Samsung provides an Internet+MMS radio button to select.
- APN Protocol: IPv4/IPv6
- APN roaming protocol: IPv4/IPv6 or IPv4 only when roaming internationally
For Verizon, make sure to enter the followings:
- Name : Verizon
- APN : vzwinternet (or) internet
- Proxy : <Not set>
- Port : <Not set>
- Server : <Not set>
- MMSC : http://mms.vtext.com/servlets/mms
- MMS Proxy : <Not set>
- MMS Port : 80
- MCC : 310
- MNC : 012
- Username : <Not set>
- Password : <Not set>
- Authentication Type : <Not set>
- APN type : default,supl,mms (or – for some phones) Interne + mms
- APN protocol: Ipv4
- APN roaming protocol: Ipv4
- Enable/disable APN: APN Enabled
- Bearer: Unspecified
- MVNO type : None
- MVNO Value : <Not set>
For Sprint, enter the following details:
- Name: Sprint
- APN: cinet.spcs
- Username: None (leave blank)
- Password: None (leave blank)
- Proxy: None (leave blank)
- Port: None (leave blank)
- Server: None (leave blank)
- Authentication type: (none)
- APN type: (default,supl)
- APN protocol: (IPv4)
- MMSC: None (leave blank)
- MMS Proxy: 68.28.31.7
- MMS Port: None (leave blank)
- MCC: 234
- MNC: 15
- Bearer: (Unspecified)
For AT&T, enter as mentioned below:
- Name: NXTGENPHONE
- APN: NXTGENPHONE
- Proxy: not set
- Port: not set
- MMSC: http://mmsc.mobile.att.net
- MMS proxy: proxy.mobile.att.net
- MMS port: 80
- MCC: 310
- MNC: 410
- Username: not set
- Password: not set
- Server: not set
- Authentication type: None
- APN type: default,mms,supl,hipri
- APN Protocol: IPv4/IPv6
- Bearer: Unspecified
Once you have updated the new APN, restart your Galaxy smartphone and check if you are still getting network registration failed or not registered on network error while sending a text or making a call.
In most cases, adding a new APN or editing the existing one solves the SIM registration failed error on Verizon, Sprint, T-Mobile, and AT&T. If you are still getting network registration error messages, you can continue trying the next methods.
Method 10: Access Service Mode (Run Ping Test)
Another useful method to resolve registration failed issues on Samsung Note 10/20 series is by running the Ping Test from the Service Mode of the device. Remember, you can’t run Ping Test from device settings, and requires you to dial the USSD code for the same. These are Android security codes that allows accessing smartphones’ features, especially the security features which can’t be accessed via device settings. If you are not familiar with this, follow the instructions given below to successfully run a Ping Test to fix an Android phone not registered on network error.
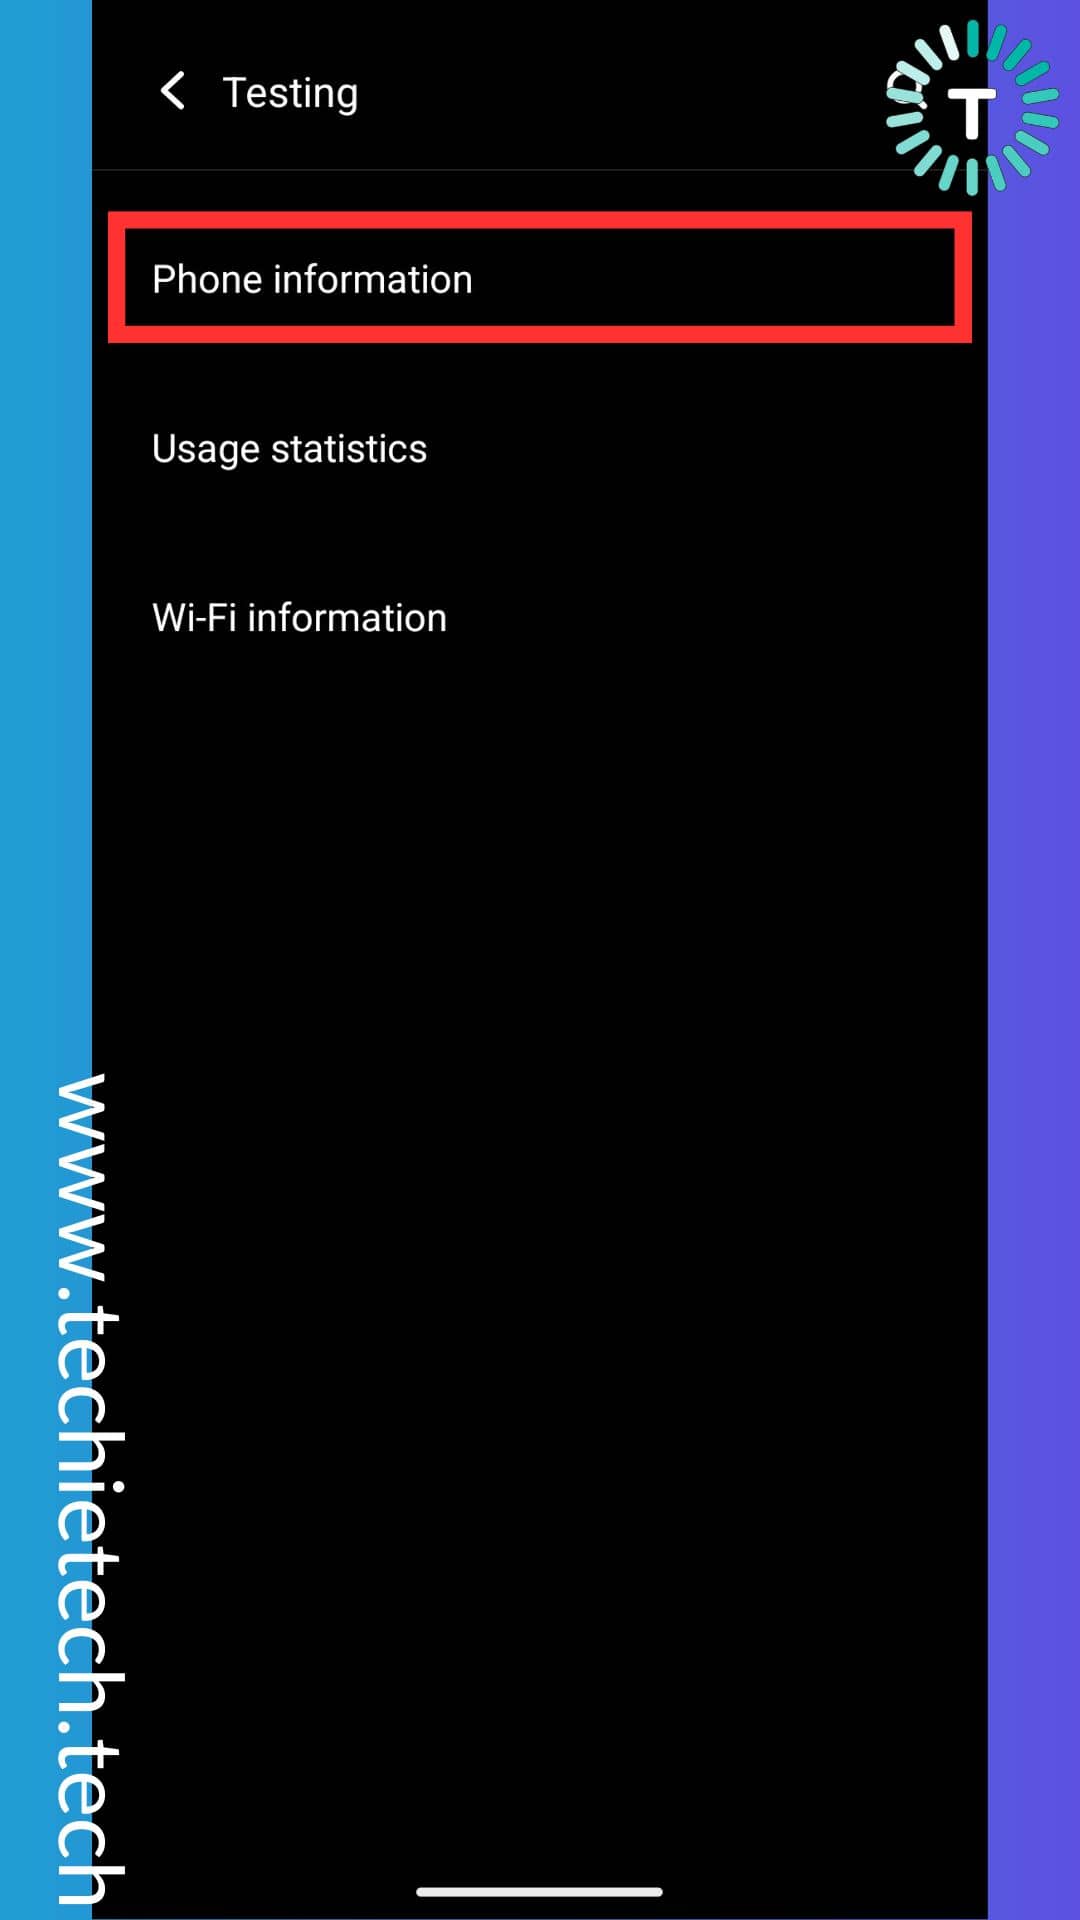
Step 1: At first, open the phone dialer and dial *#*#4636#*#*, and tap on Device information or Phone information in the next screen,
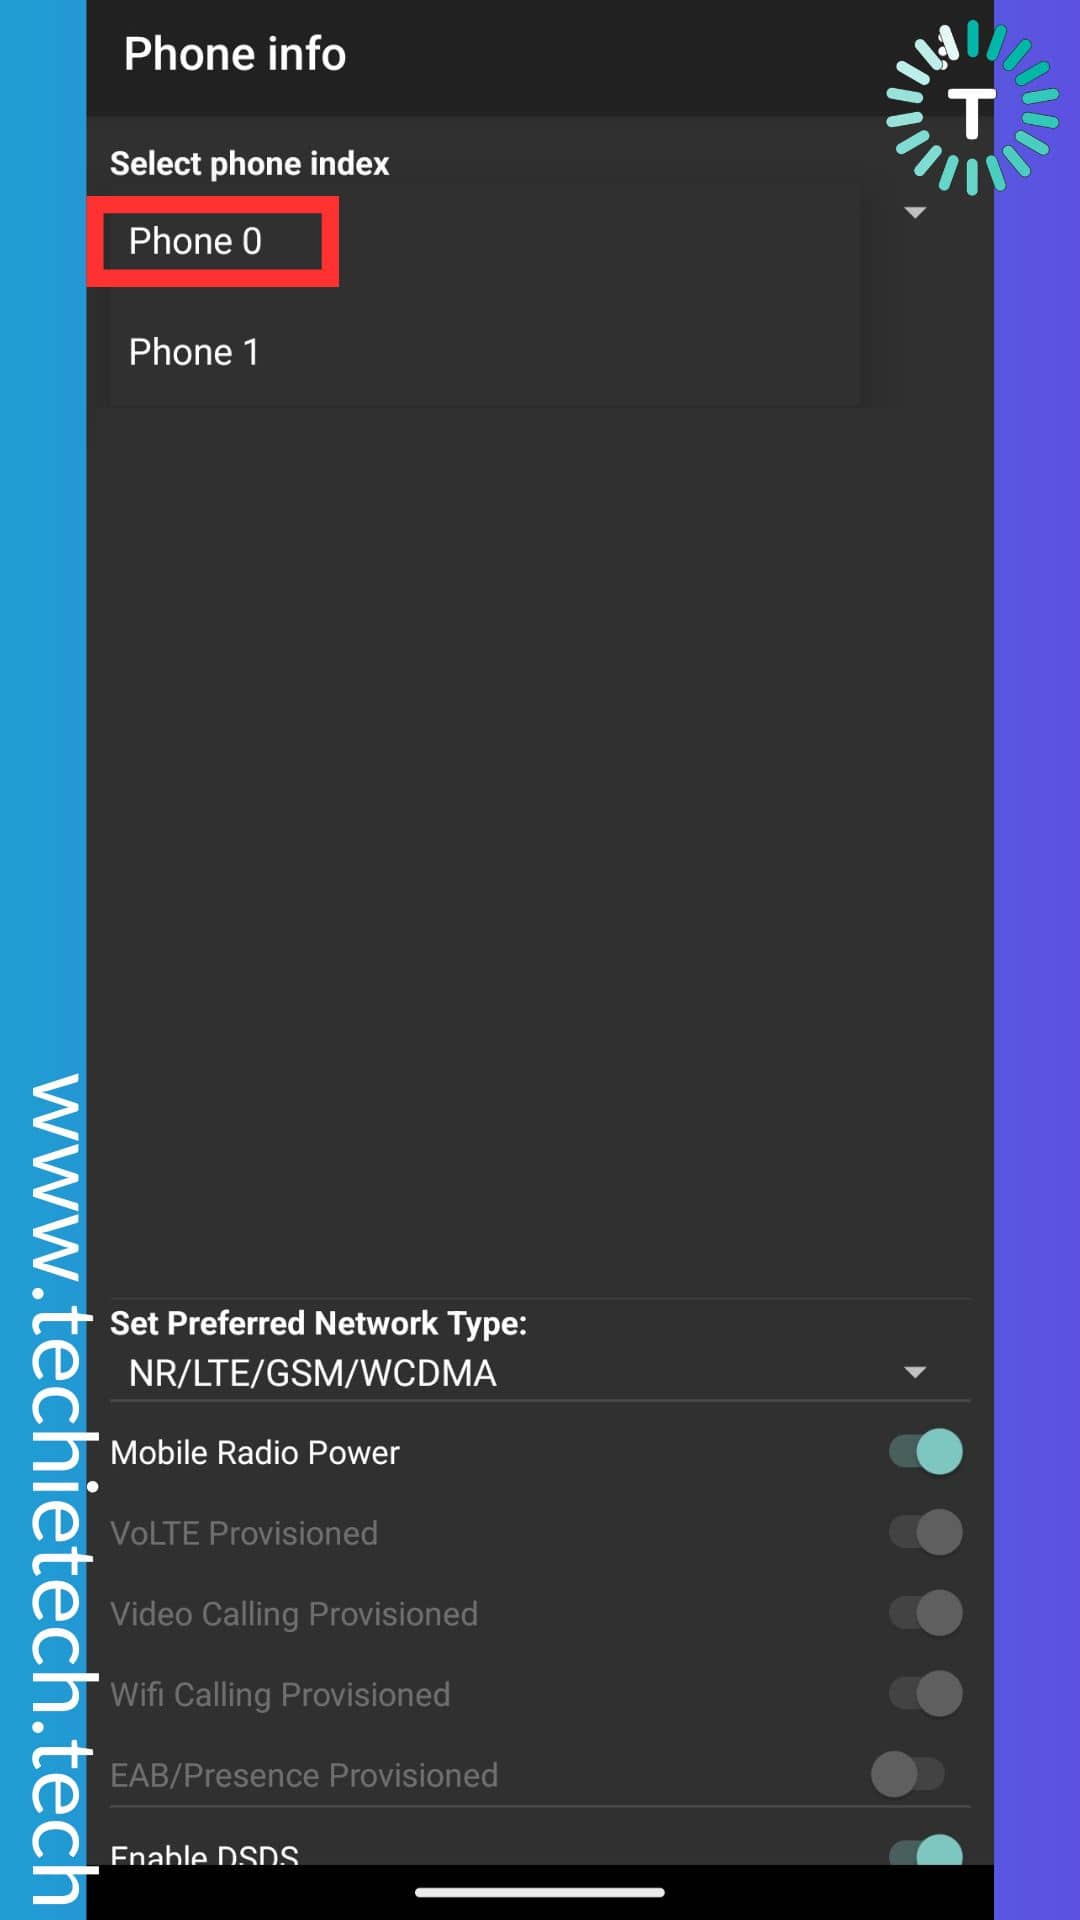
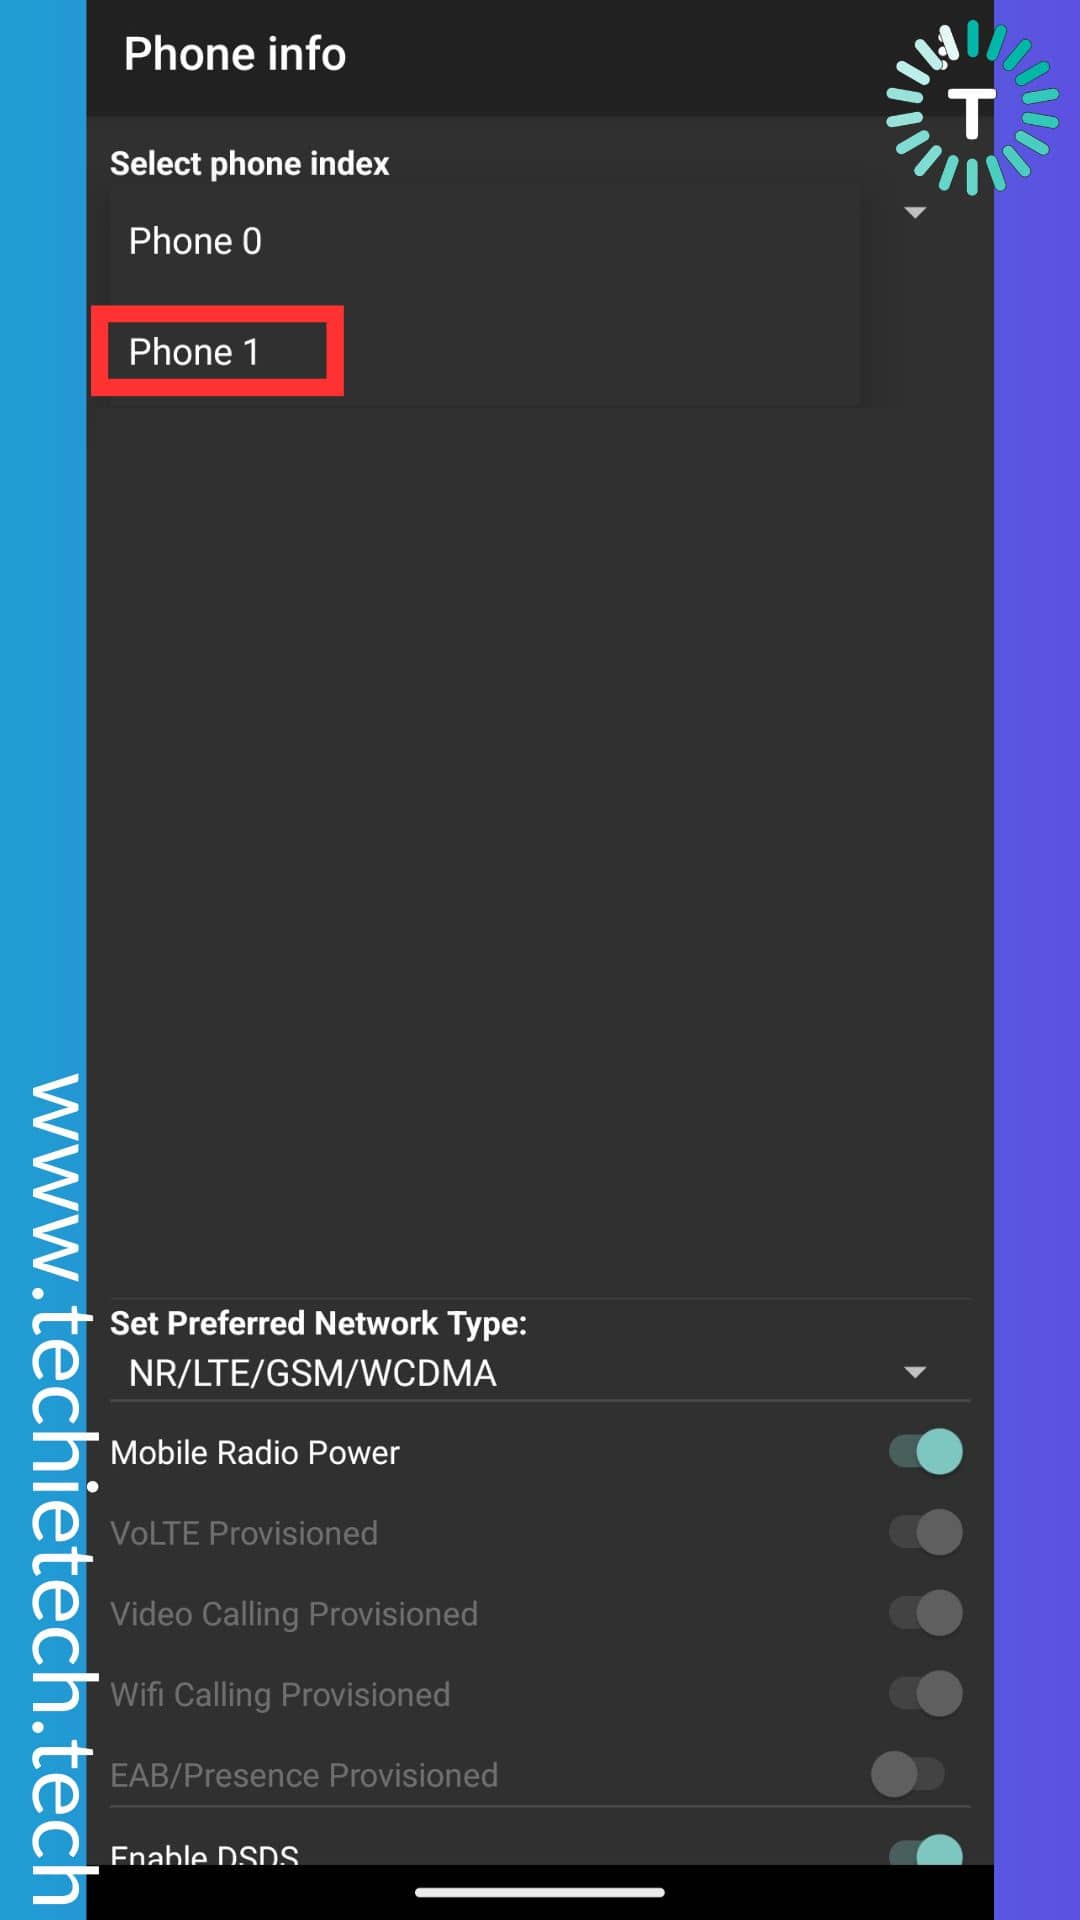
 Step 2: Select phone index, select Phone 0 which represents SIM 1,
Step 3: Then, scroll down and tap on the RUN PING TEST,
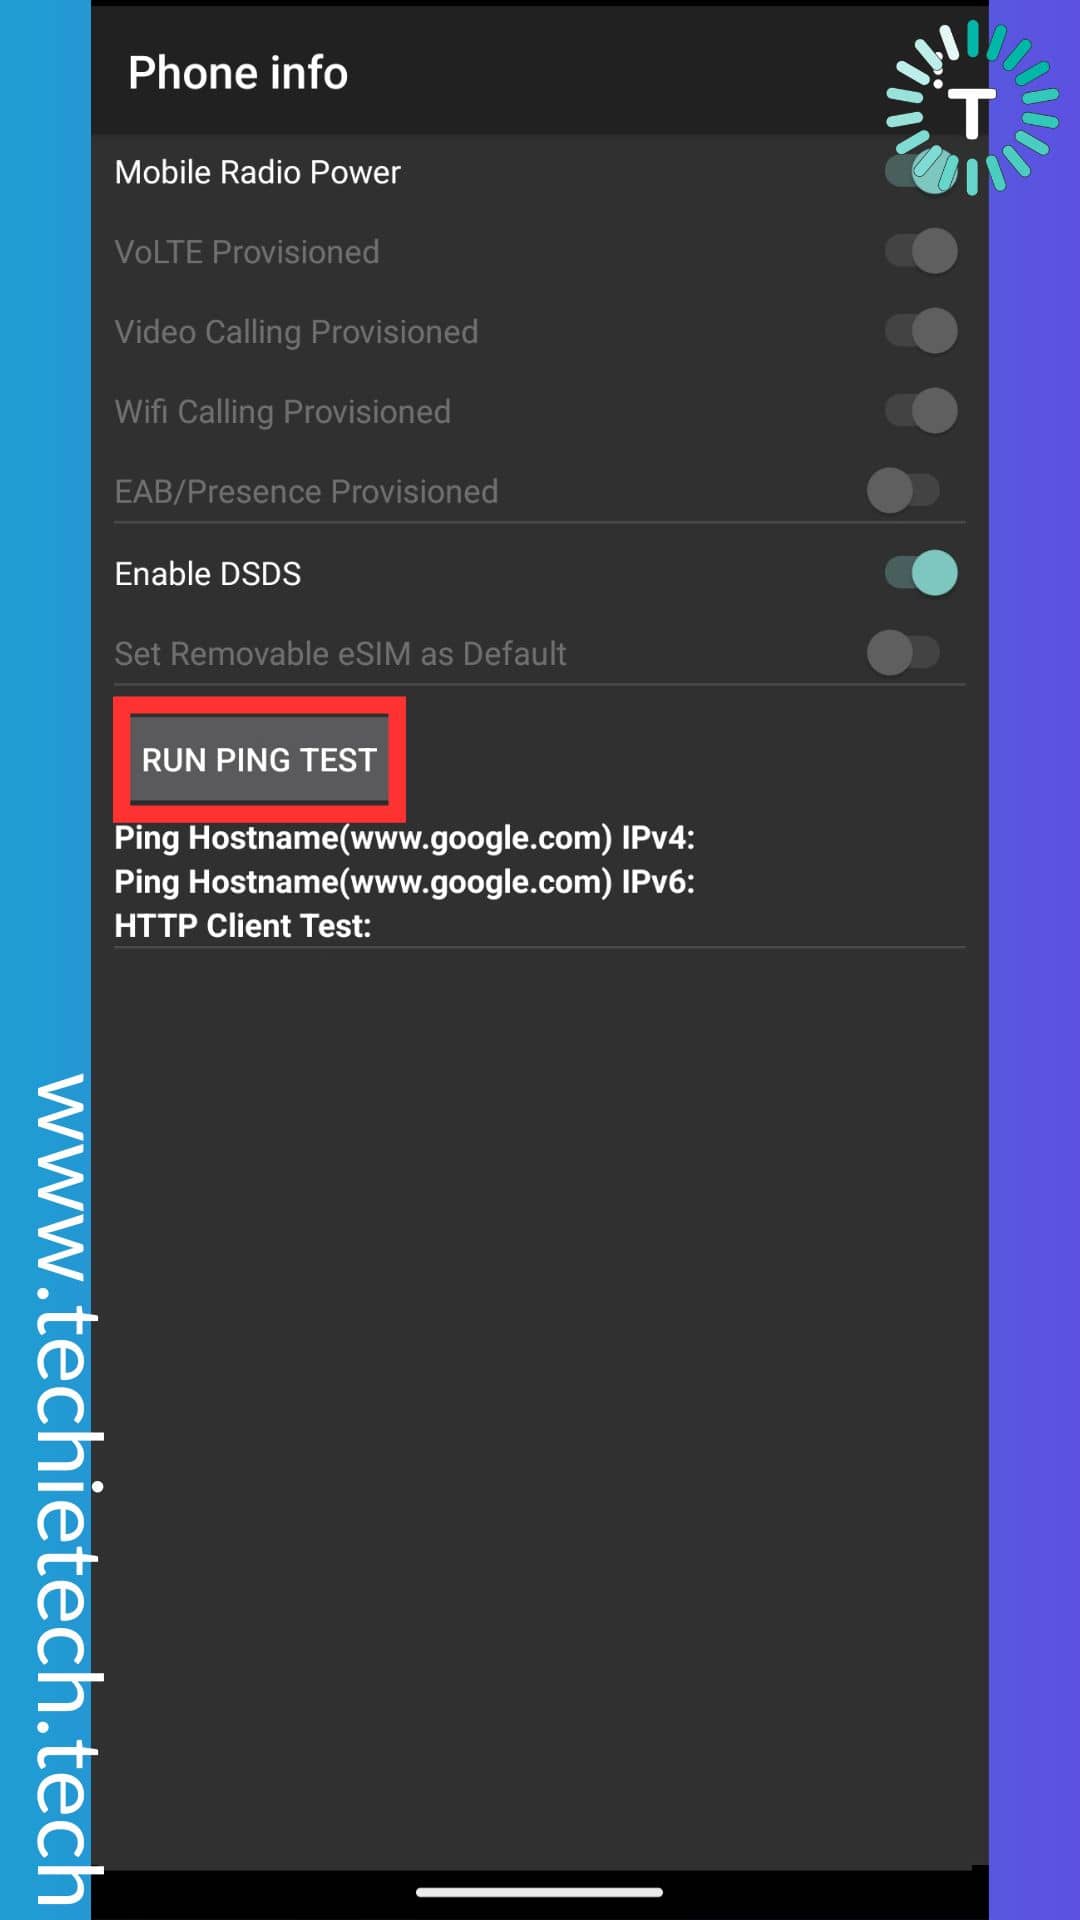
Step 4: Now, check if you can see ‘Pass’ beside the options placed under RUN PING TEST button,

Step 5: For SIM 2, select Phone 1 that represents SIM 2 from under the Select Phone Index option,
Step 6: Then, tap on the RUN PIN TEST,

Step 7: Lastly, check if you can see ‘Pass’ beside options placed under RUN PING TEST button,
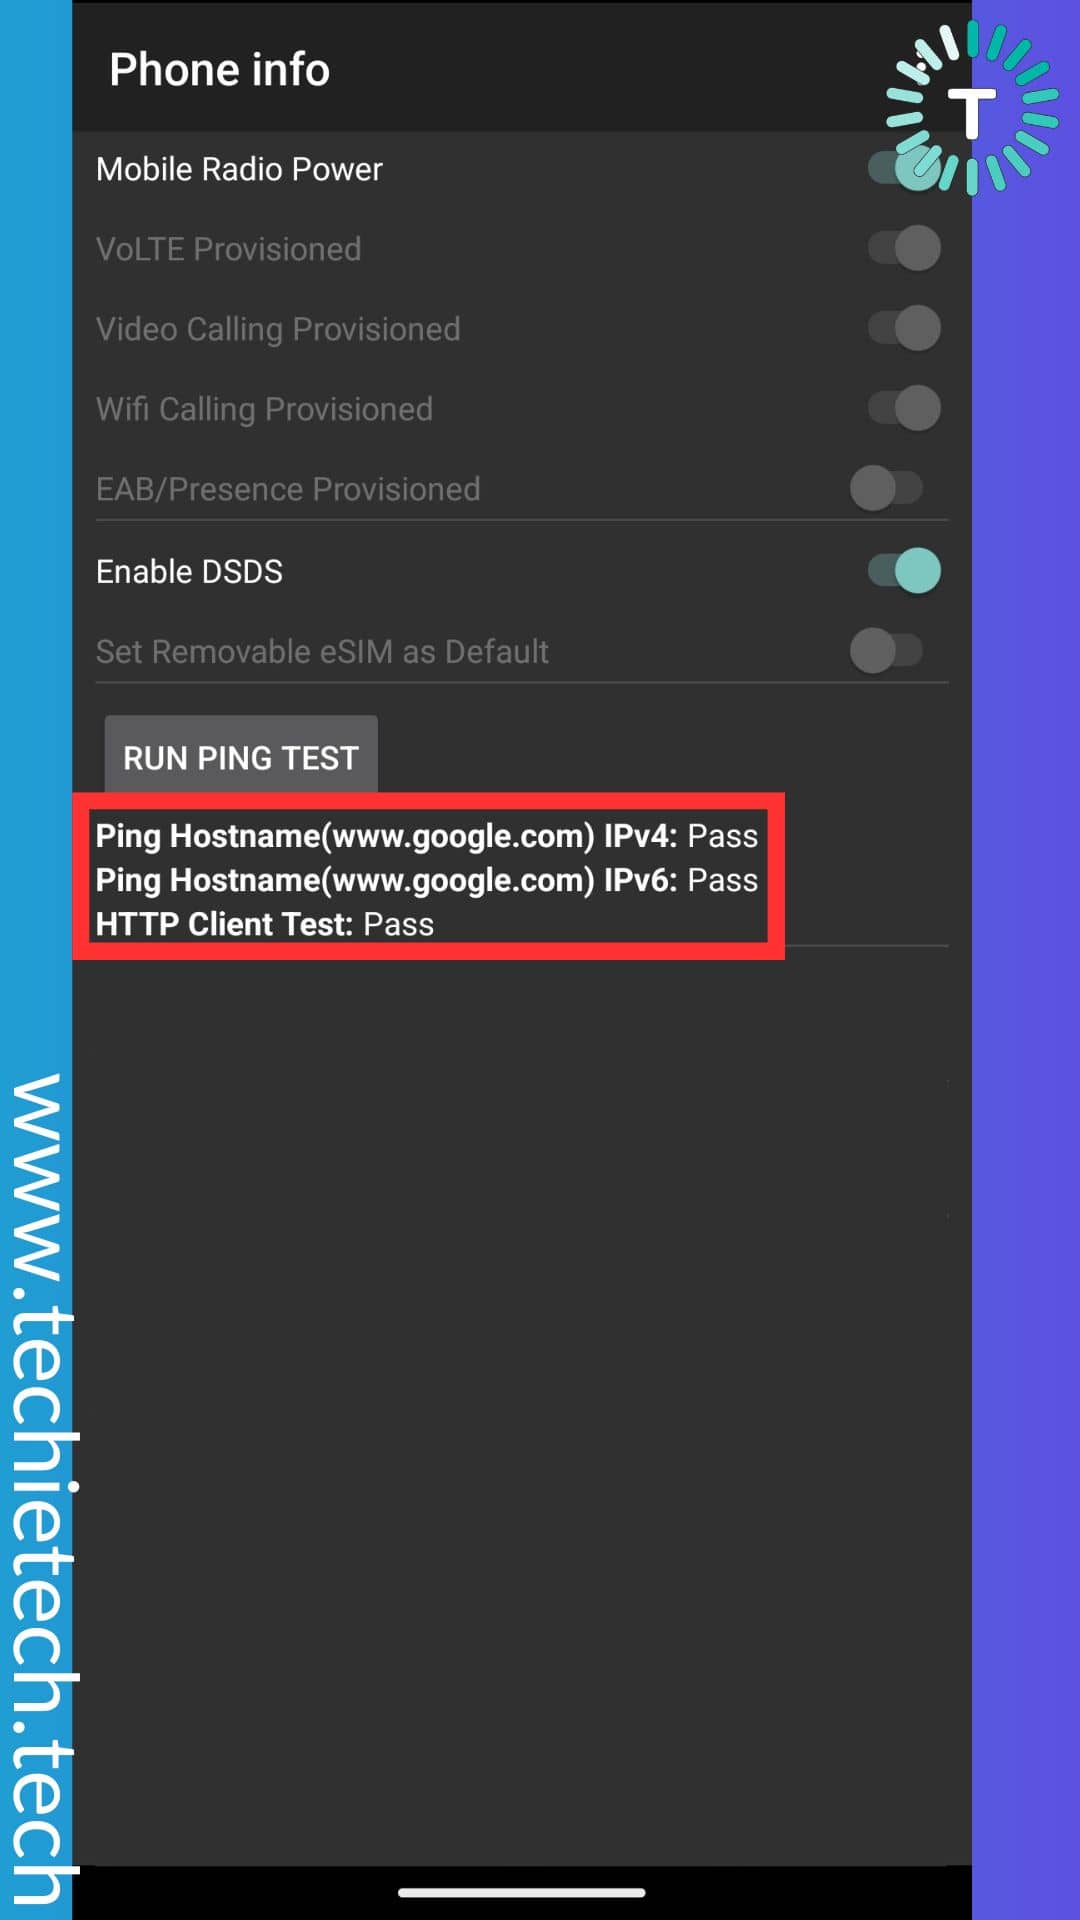
After you’ve successfully completed the PING TEST, go back and restart your device.
Now, check if the Verizon and T-Mobile network registration failed error is resolved or not. If it fixed the issue, congrats! If it didn’t, we recommend fixing the corrupted ESN (Electronic Serial Number) by reading the next method.
Method 11: Fix Corrupt ESN
If you are unable to fix Samsung Note 20 saying not registered on network, you should look to fix the corrupt ESN (Electronic Serial Number). It is possible that ESN was blacklisted by the carrier (when you reported your device being stolen) or has been dislodged or nullified. It is quite complicated to explain how and why it often happens but fixing it is relatively more straightforward.
For the uninitiated, below are step-wise instructions on how to fix corrupt ESN to resolve not registered on network errors on AT&T or Sprint:
Step 1: First, open the dialer and dial (*#06#) to see the ESN. If it shows ‘Null,’ this means your ESN may be corrupted,
Step 2: Secondly, dial (*#197328640#) or (*#*#197328640#*#*) to launch the Command mode,
Step 3: Now, select the ‘Common’ option,
Step 4: Next, select the first option, i.e. Field Test Mode (FTM). If it is ON, make sure to turn it OFF,
Step 5: Then, return to the key input and choose option 2 to turn OFF FTM. Doing this will restore your IMEI number,
Step 6: Now, remove the SIM card from your Samsung device and wait for at least 2 minutes to re-insert the SIM card,
Step 7: Once the device is rebooted, type (*#197328640#) on the dialer again,
Step 8:Then, head to and choose the Debug screen > phone control > Nas control > RRC > RRC revision,
Step 9: Continue by selecting Option 5 and you’re done.
Step 10: Finally, restart your phone and check if you’re able to view the ESN of your device.
If you are able to view the IMEI number after rebooting your device, the corrupted ESN is fixed. Now make sure to double-check whether the ‘not registered network’ error on your Android smartphone has been resolved or not.
If you are among those whose Android phone is displaying not registered on network message after the device is rooted, below are step-by-step instructions you can follow to resolve the issue.
Step 1: If your Samsung Galaxy phone is showing not registered on network error when you’re using a Custom ROM, switch back to the Stock ROM by unrooting your device.
Step 2: Once you’ve switched to the Stock ROM, make sure to update your device to the latest software version. Since you are getting a not registered on network error on your Android smartphone, we recommend using Wi-Fi to update your device (follow Method #4 for the same).
Step 3: If you are unable to execute the OTA update, we suggest downloading the latest firmware .tar file from the web and flashing it on your device using ODIN.
Note: For downloading the firmware of Samsung devices, please visit here.
Method 12: Contact Your Carrier
If none of the above methods helped to fix the Galaxy S23 not registered on network error, contacting your network carrier could come in handy for you. It could be possible that your carrier might have updated their system or settings which could be triggering the not registered on network issue on Verizon or T-mobile. So, you need to ask why am I getting SIM card not registered on the network error on the Samsung phone and if is there any way to fix that. We are pretty sure, your carrier will be able to help you fix the not registered on network issue.
Pro Tip: Always try to contact your carrier via call or live chat, you might get a delayed response if you contact them via email.
Method 13: Perform a factory reset
If nothing helped to fix the SIM card not registered on the network issue, performing a factory data reset could be the last resort from the users’ point of view. To remind you, factory reset restores your device to the default setting by removing all the personal data ever stored on your Samsung Galaxy smartphone. This includes all downloaded apps, your contacts, media files including photos or videos, system and app data, and even your email accounts. Therefore, it is strongly advised to back up your Samsung device before you proceed.
For the uninitiated, we have listed step-by-step instructions below to factory reset your Samsung Galaxy phone:
Step 1: Go to Settings and tap on General Management > Step 2: Tap on Reset

Step 3: Now, tap on Factory Data Reset > Step 4: Then, tap Reset
Step 5: When prompted, enter your PIN or Password,
Step 6: Lastly, Tap Delete All/Erase All Data.
In most cases, performing a factory reset resolves almost every network-related issue. We hope this helped fix SIM not registered on network error on your Samsung device.
If you are among some unlucky users who are still wondering how to fix the not registered network error on Samsung Galaxy, we suggest visiting Samsung Care. It could be possible that there is some hardware issue on your Galaxy smartphone that is causing the real issue and is only fixable by certified technicians.
That’s all for now in this guide on how to fix not registered on network error on Samsung and Android smartphones. If you are experiencing issues on your Galaxy S23 series phone, please read our dedicated guide to fix common issues on all three models.