![How to Setup Passkeys for Gmail [on Web, Android, and iPhone]](https://media.techietech.tech/2023/05/How-to-Setup-Passkeys-for-Gmail-on-Web-Android-and-iPhone.jpg)
Google recently announced that it has rolled out Passkeys for Google Account users globally. So, if you are just like me who always forgets passwords and is wondering how to set up passkeys on Gmail web, Android, and iPhone, you’ve landed on the right place. But, before we move on to the steps on how to enable passkeys on Gmail on Android, Windows, and iPhone, let’s discuss more passkeys and how it is more secure than passwords.
Even though passkeys and passwords sound similar, their working mechanism is quite different. Unlike passwords, which can be compromised, passkeys offer you a relatively secure login experience. The only people who wouldn’t love Passkeys are bad actors like hackers. Why? For your reference if a company server gets compromised (hacked), hackers can get all the passwords and steal all the data. But that’s not the case with passkeys. Since the core motive behind the introduction of passkey is to offer users with passwordless login experience, there are ‘NO PASSWORDS.’ It uses your FaceID or fingerprints in real time as a password. In short, no one can break into your account, it’s that simple. Leaving behind all the passwords remembering game, passkeys allow a simplified login experience using biometrics (fingerprint or face) or your device PIN.
Now that you know that passkeys are better and safer login methods than passwords, why don’t you start using them? In this tutorial, we will help you know how to create and set up passkeys for your
Gmail account on the web, Android, and iPhone. So, without much ado, let’s jump right into the steps.
Disclaimer: Proceed at your own risk, TechieTechTech will not be responsible if anything goes wrong with your device.
How to setup Passkeys for your Gmail account [on Web, Android, and iPhone]
How to setup Passkeys for Gmail accounts on the web (browser)
As you know passkeys are now live for Google Account users you can easily enable them to securely log in to your Gmail account on the web. For the uninitiated, we have listed step-by-step instructions below to turn on passkeys for your Gmail Account on the web, keep reading.
Disclaimer: Your PC must be running on Windows 10 to be able to create a passkey.
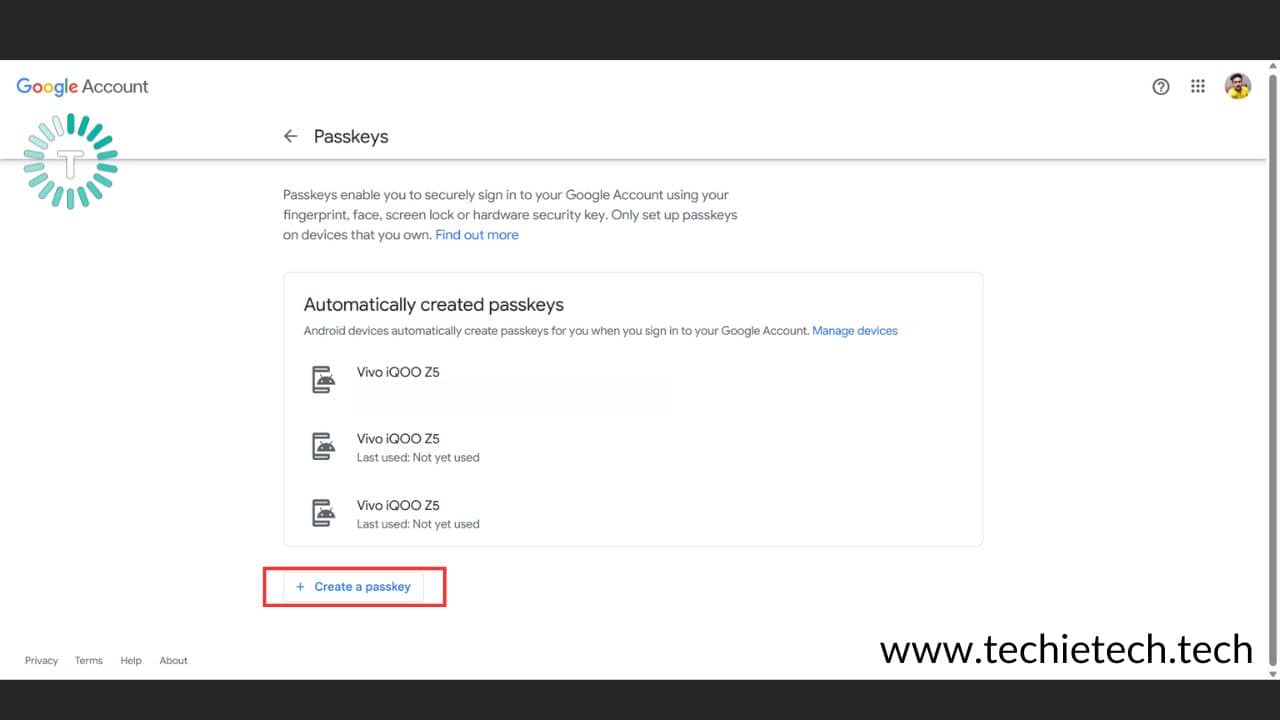
Here’s how to enable Passkeys for your Gmail account on the web:
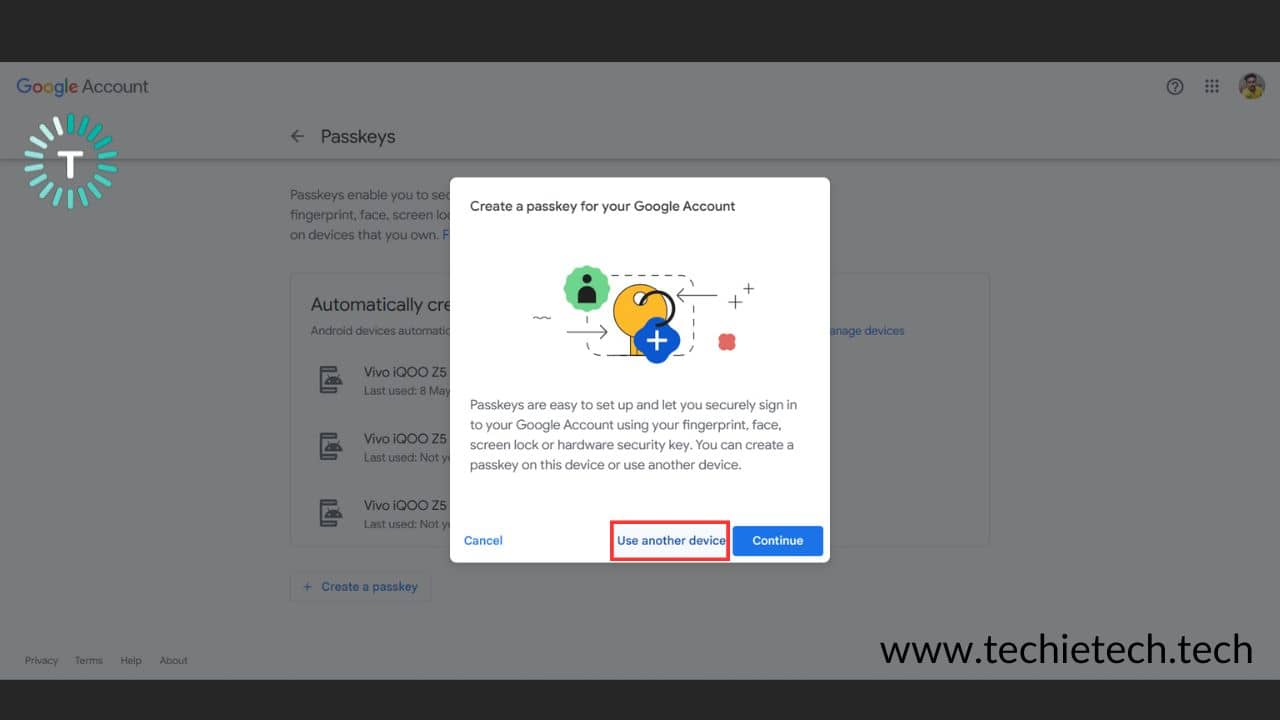
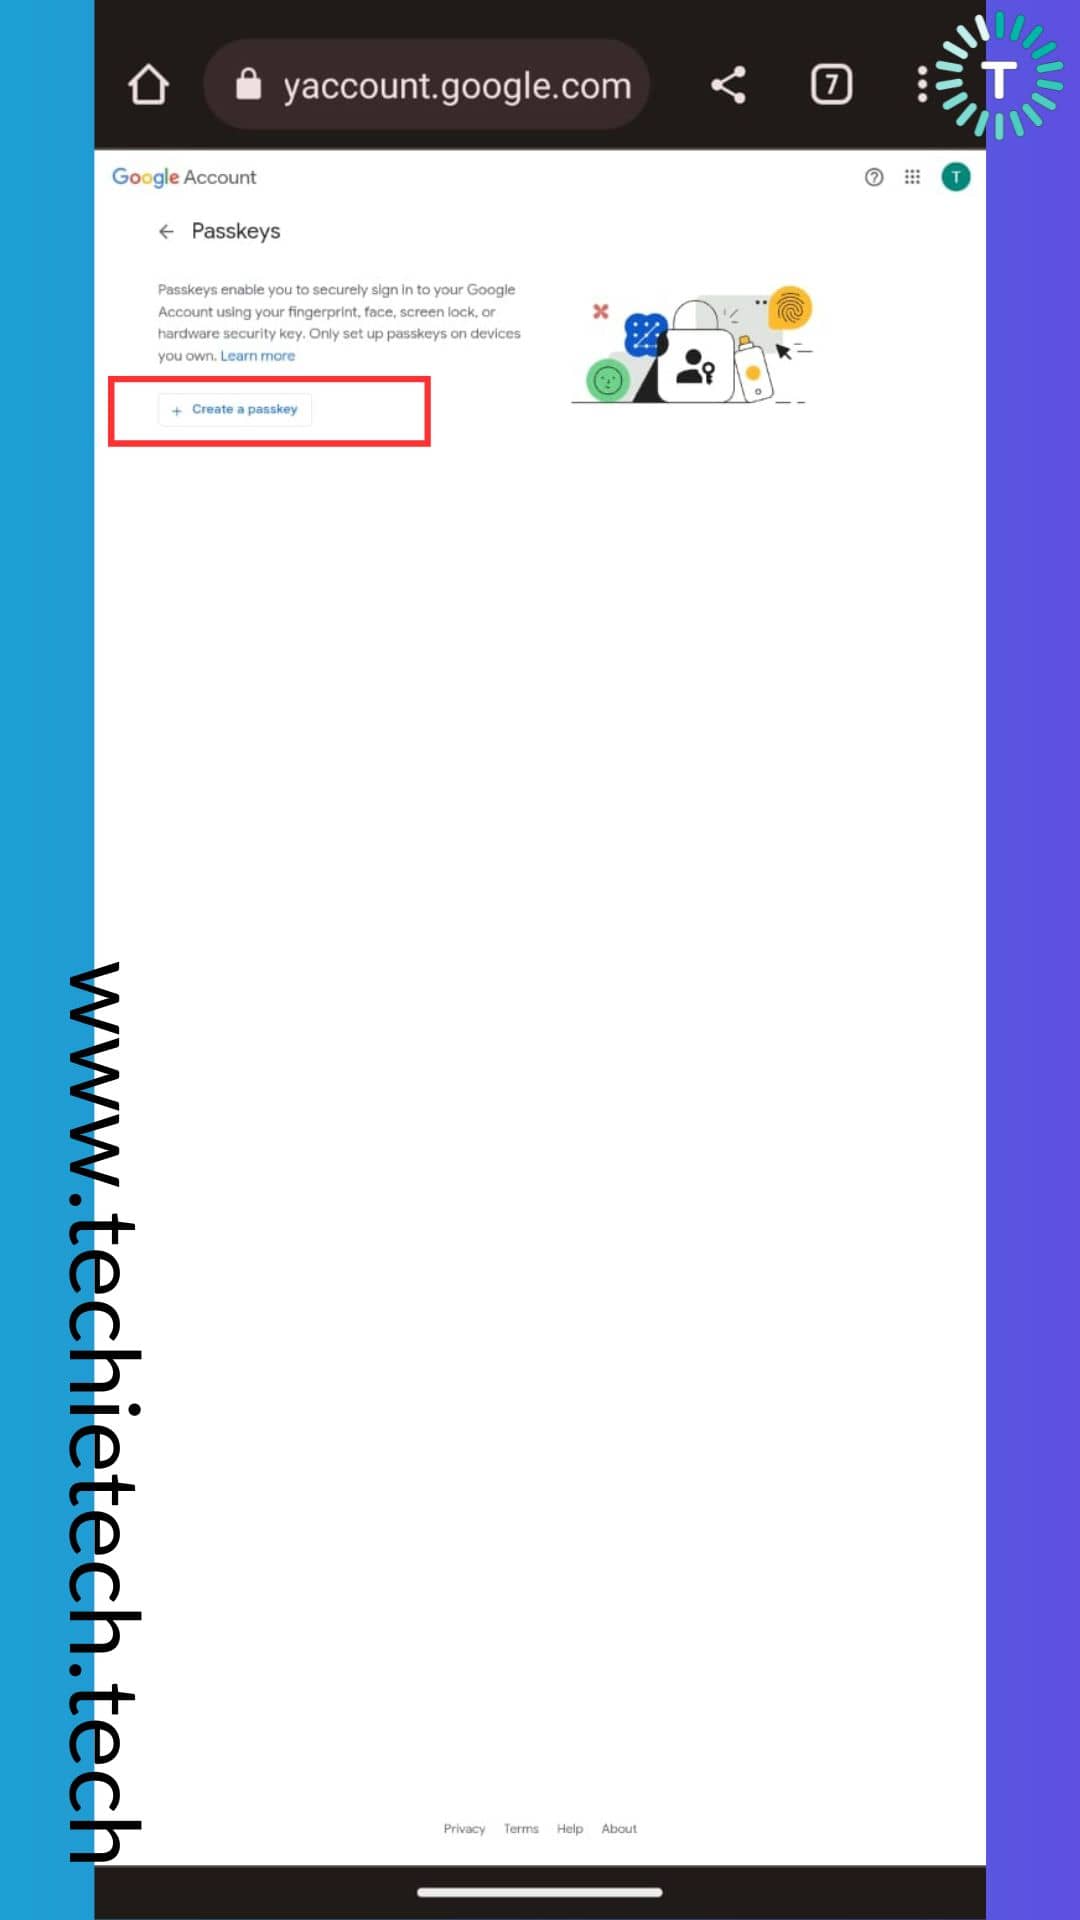
Step 1: First of all, visit g.co/Passkeys on your browser and sign in to your Google Account using your password, then, click on ‘Create Passkey,’
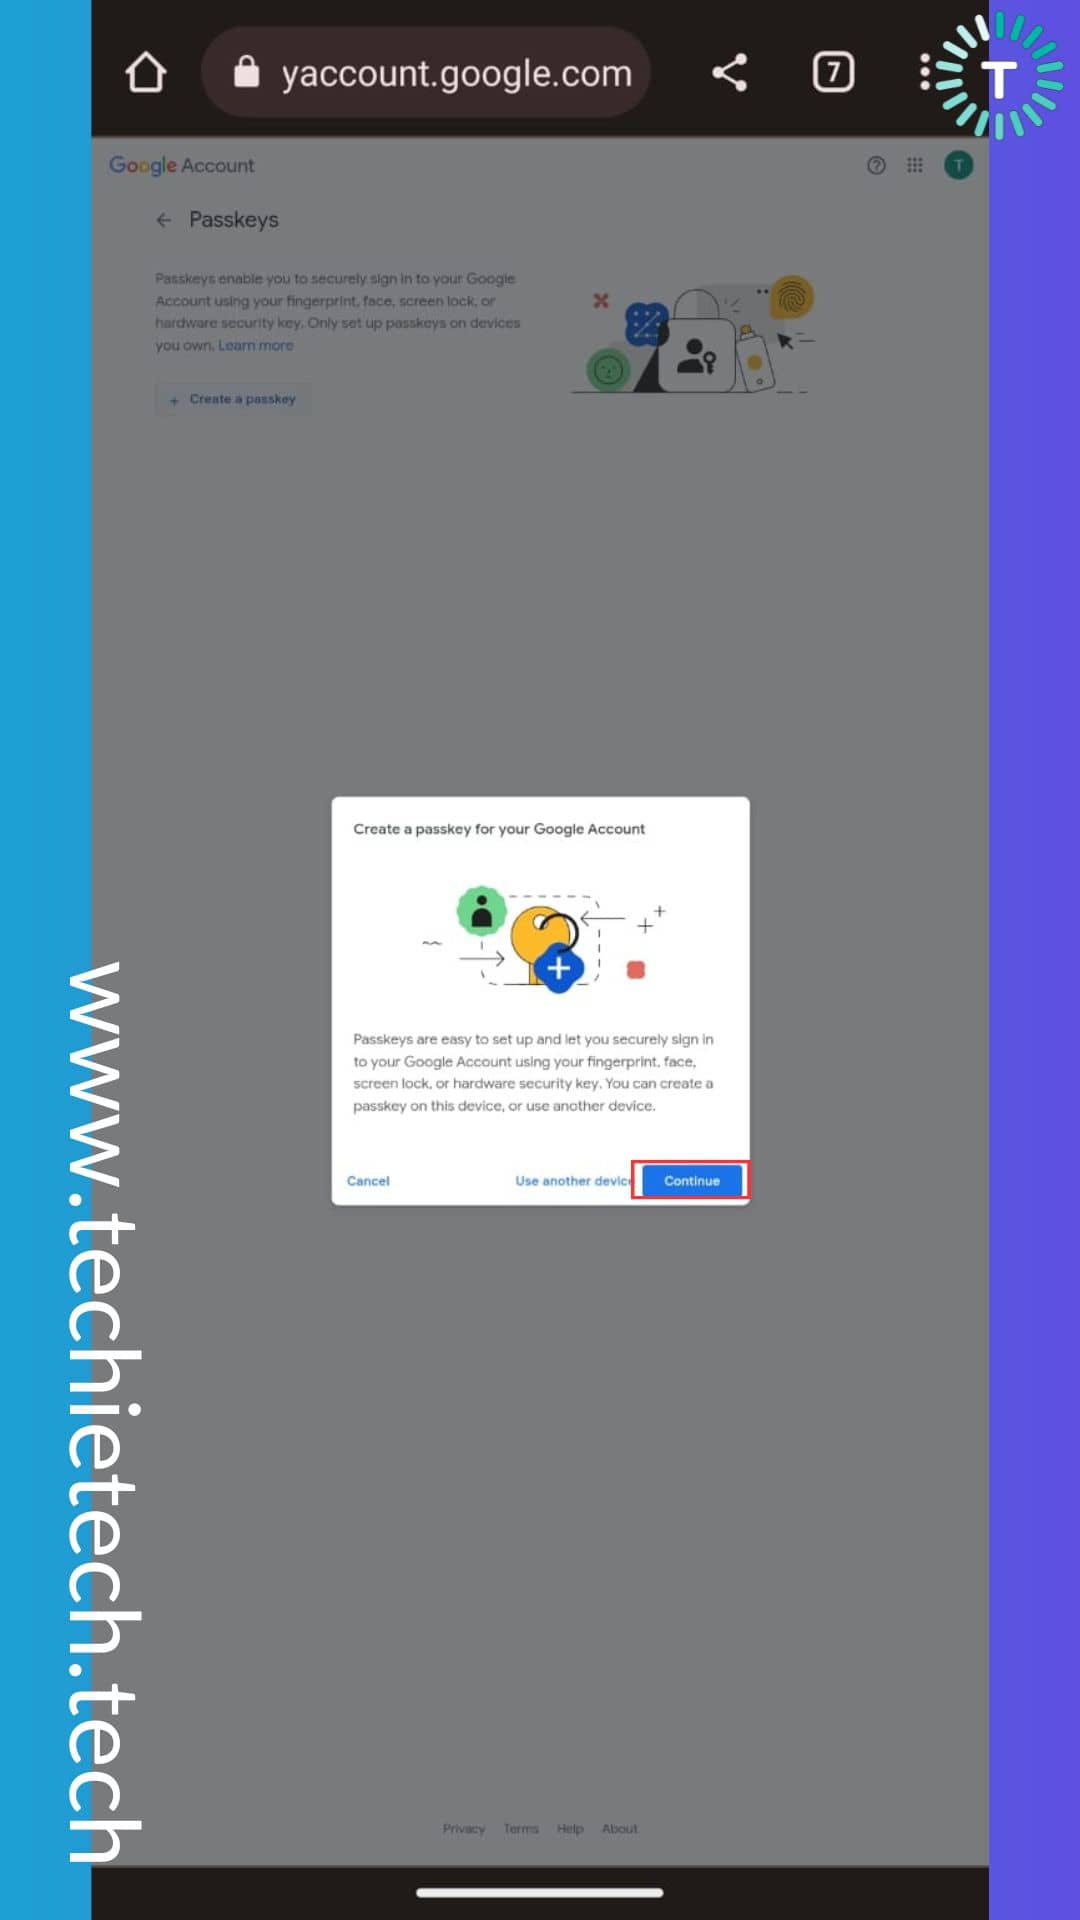
Step 2: Then, based on how you want to verify sign-in using Passkeys, you can choose between ‘Use another device’ or ‘Continue.’ If you want to use your Windows or macOS device to sign in to your Gmail, simply click on ‘Continue.’
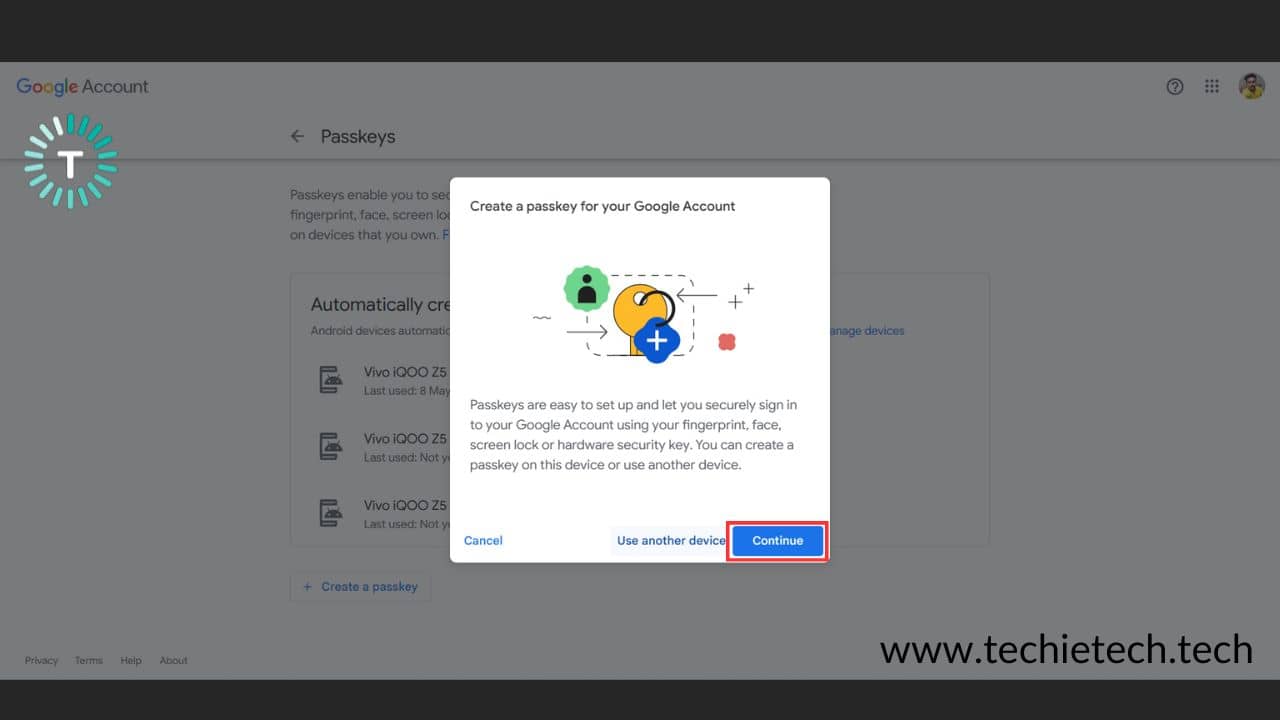
Step 3: From the pop shown on the screen, click on Windows Hello or the external security key,
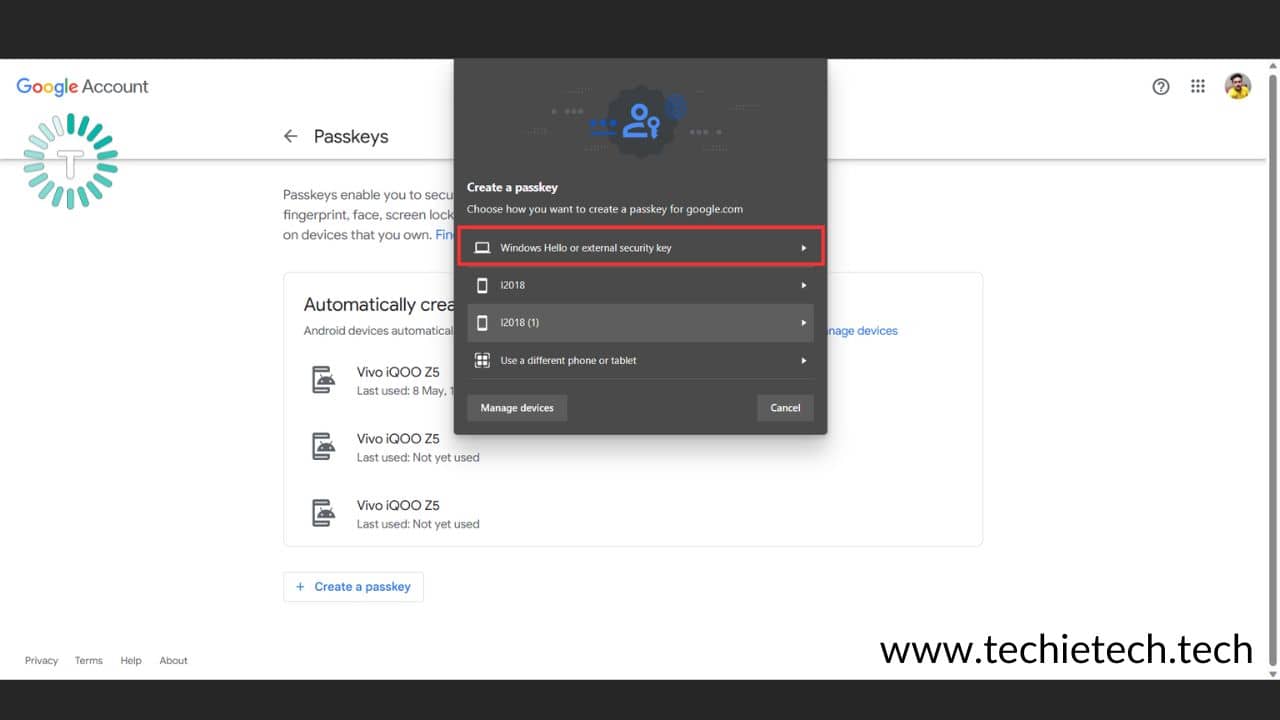
Step 4: Then you’ll be asked to enter the Password, PIN, or biometric based on whichever lock screen method is enabled on your Windows PC,
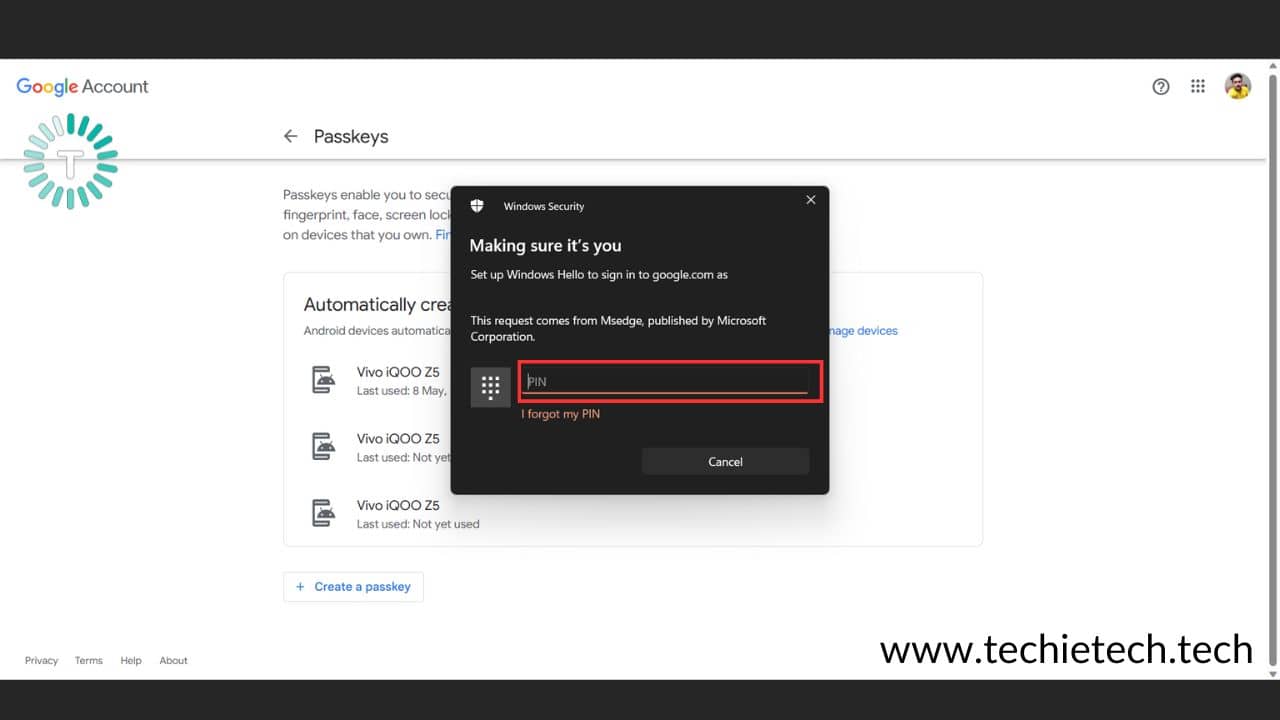
Step 5: After you hit the enter key, a new passkey will be created and added to your Google Account.
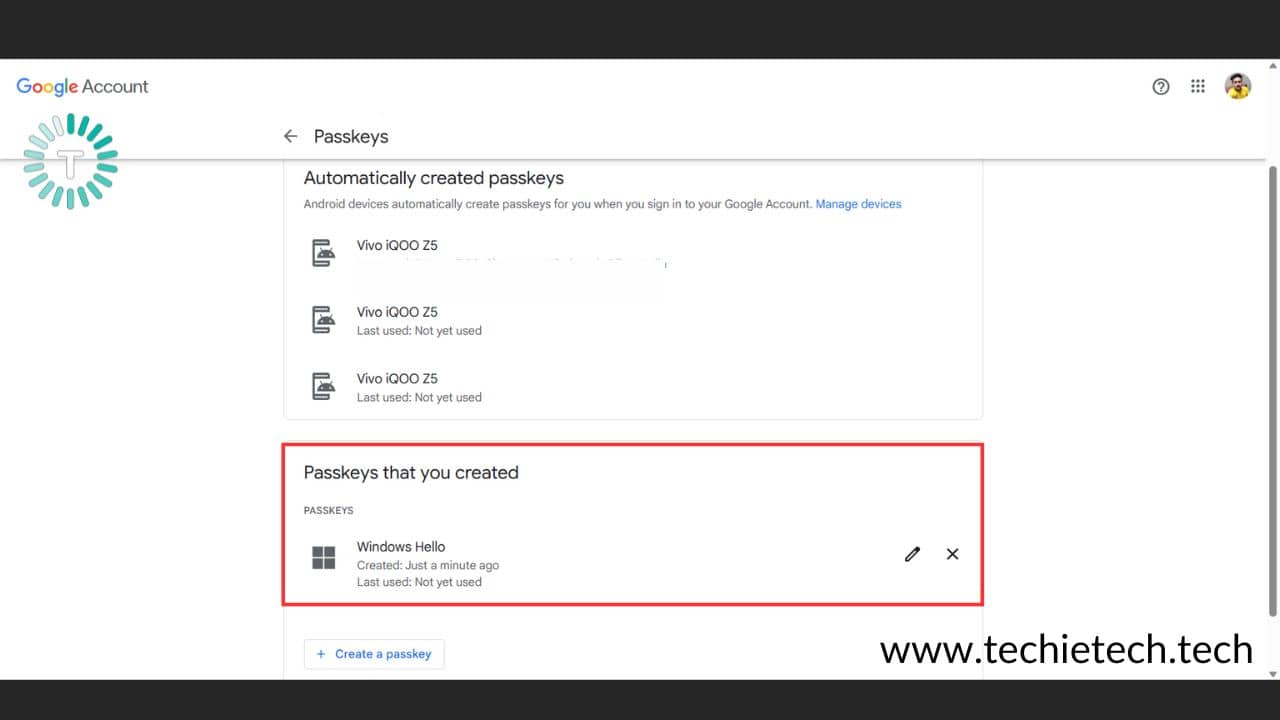
Now, whenever, you’ll sign in to your Gmail account, tap on ‘Try another way’ when asked for the password, and opt for ‘Sign in using Passkey’ and you’ll log into your account automatically after you’ve entered the Windows lock screen PIN/Password/Biometric.
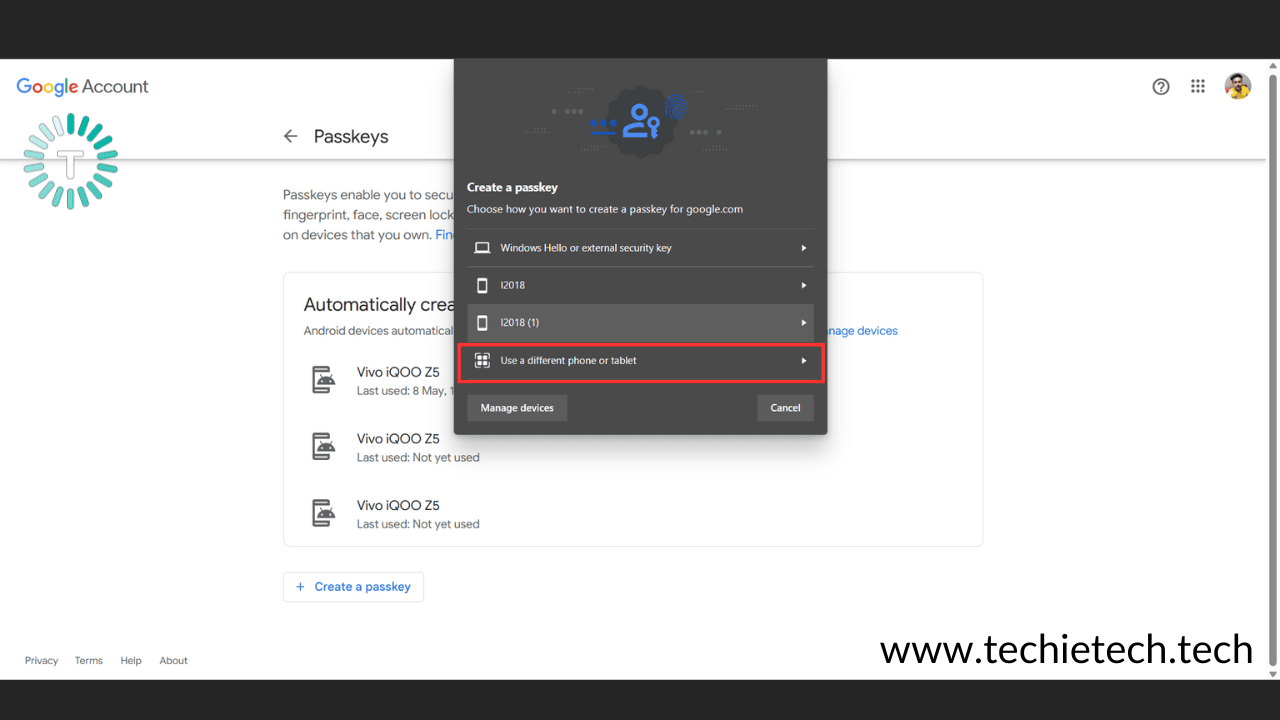
If you are willing to create a passkey using a different device, say your Android phone to set up Passkey to access Gmail Web, make sure to follow Step #3, then continue with the following steps:
Step 5: If you want to use your Android device to set up a passkey for Gmail web, click on ‘Use another device,’
Step 6: Now an on-screen prompt will appear with multiple options, you can choose the Scan QR code option, and a QR code will appear on your Windows PC screen,
Step 7: Then, using Google Lens (it’s the camera icon from your camera app, scan the QR code and you’ll be redirected to a page on your phone saying ‘Connect with QR code?”
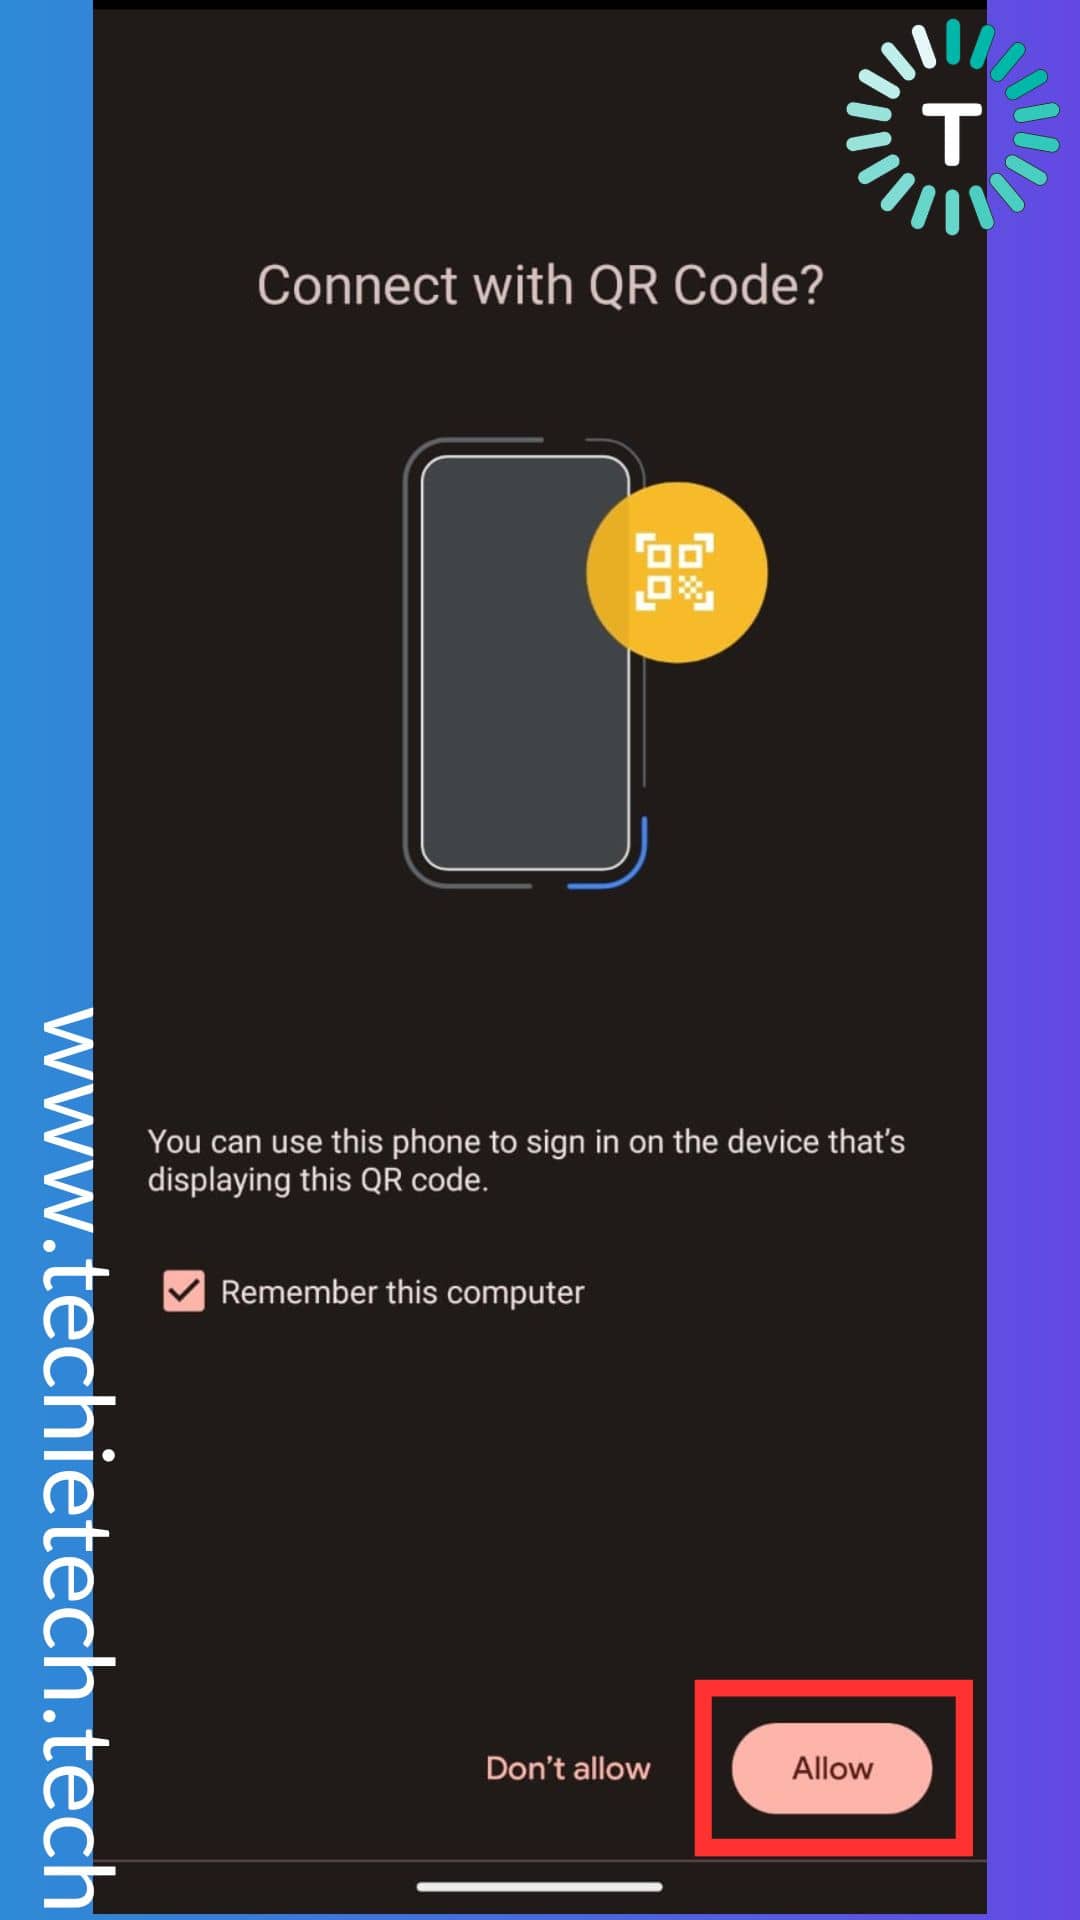
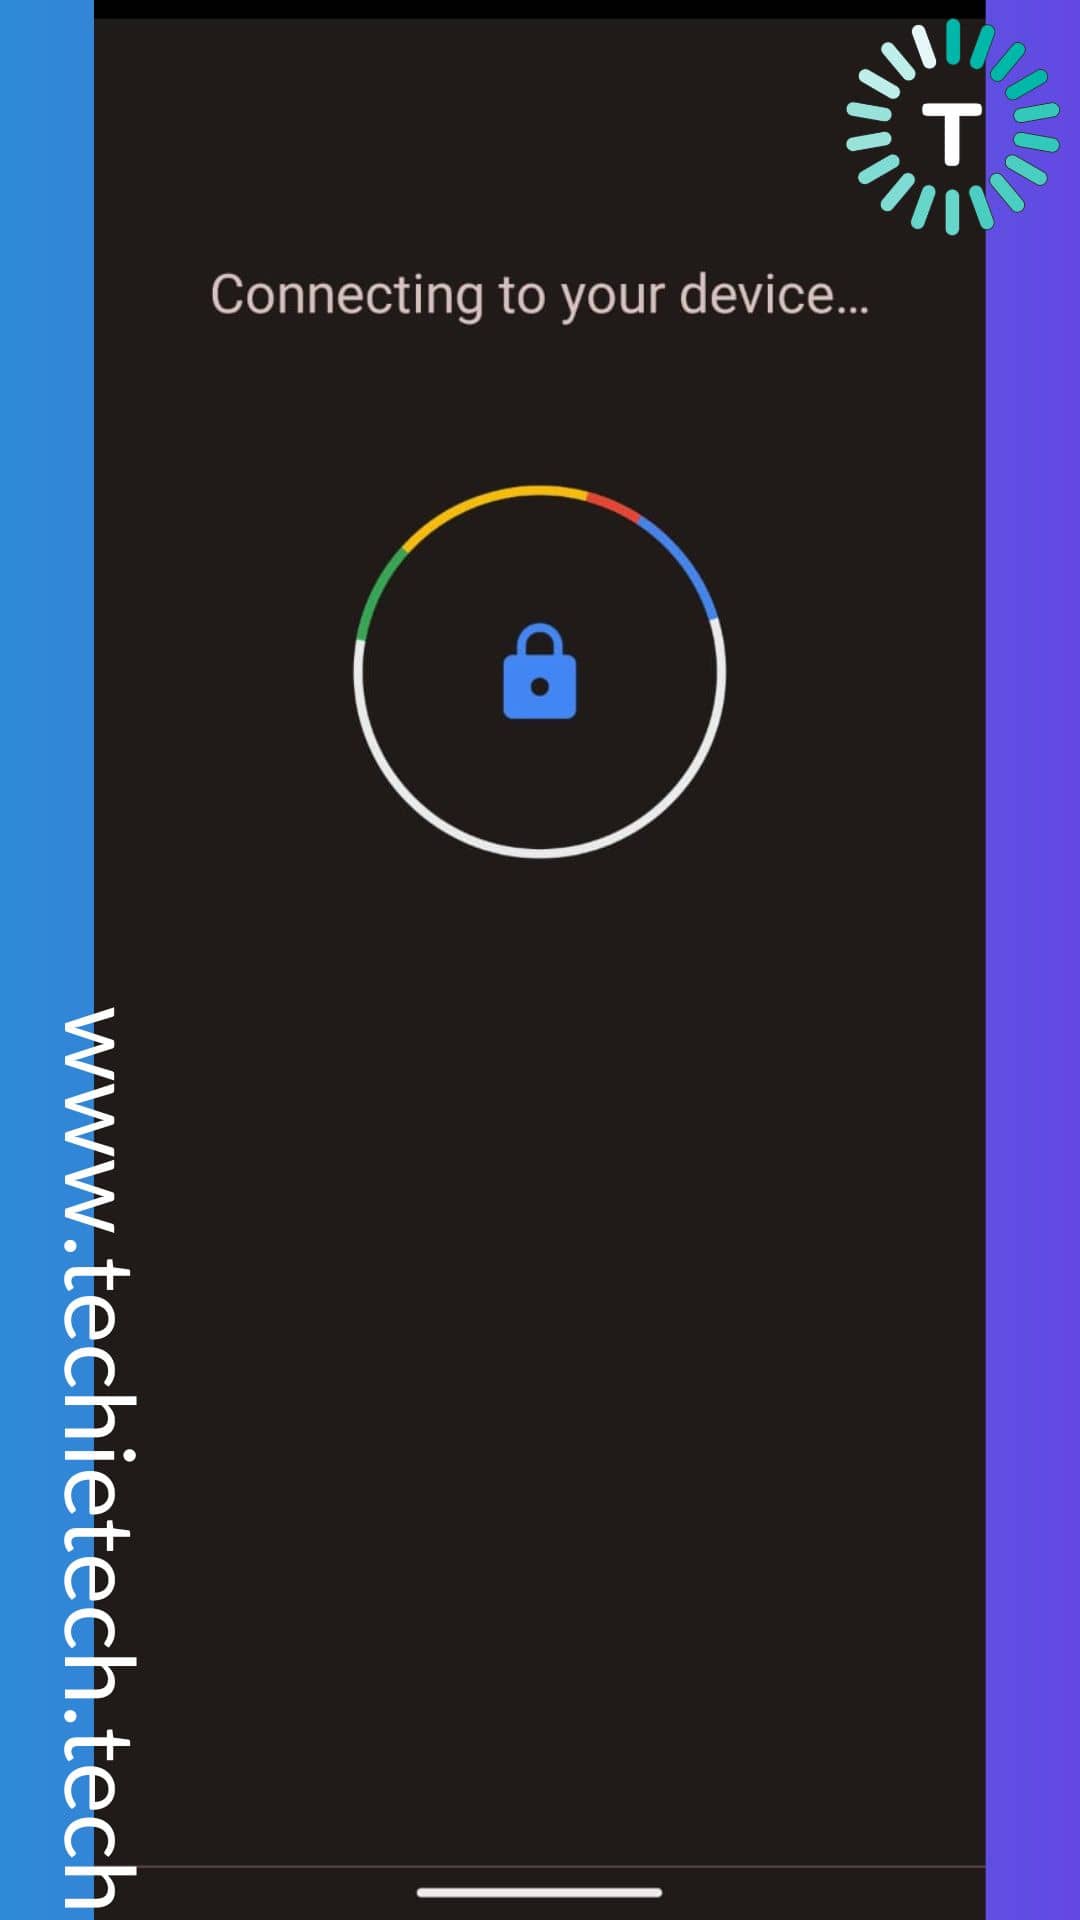
Step 8: Then you will see connecting to your device page on your phone, after a few seconds, you’ll be asked to Verify your identity using biometrics on your smartphone,
Step 9: Lastly, you’ll see the ‘Passkey created for your Google account’ message on your Windows screen.
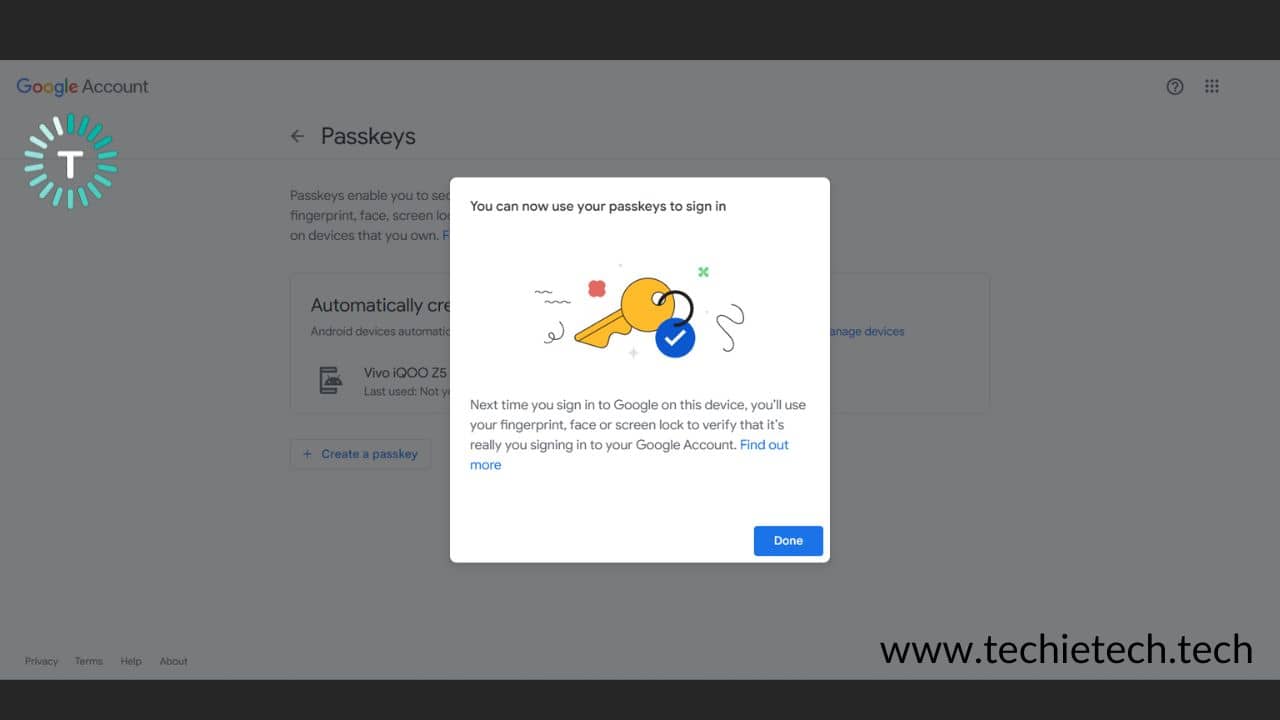
Now, whenever you’ll try to sign in to your Gmail account, you will get a prompt to Verify your identity on your Android phone. Once, you verify the prompt, you’ll be logged in to your Gmail web account automatically.
Also read: Passkeys are the new Passwords: Here’s all you need to know
How to setup Passkeys for your Gmail account on Android
If you are uninitiated, please note that the Android devices that have the updated Gmail app and double-factor authentication enabled will automatically become a passkey for that particular Gmail account.
In case your device is not shown in the passkey list, you can add it manually by following these steps:
Step 1: On your Android device, open Chrome and type in g.co/Passkeys on the URL bar
Step 2: Now you will be asked to log in to your Gmail account using the password, once entered correctly, you’ll land on the Passkeys page.
Step 3: Then tap on ‘Create a passkey’ and a prompt will appear on your screen asking you to create a passkey using the same device or another one,
Step 4: If you want to create a passkey for your Google Account using the same device, just tap on ‘Continue’
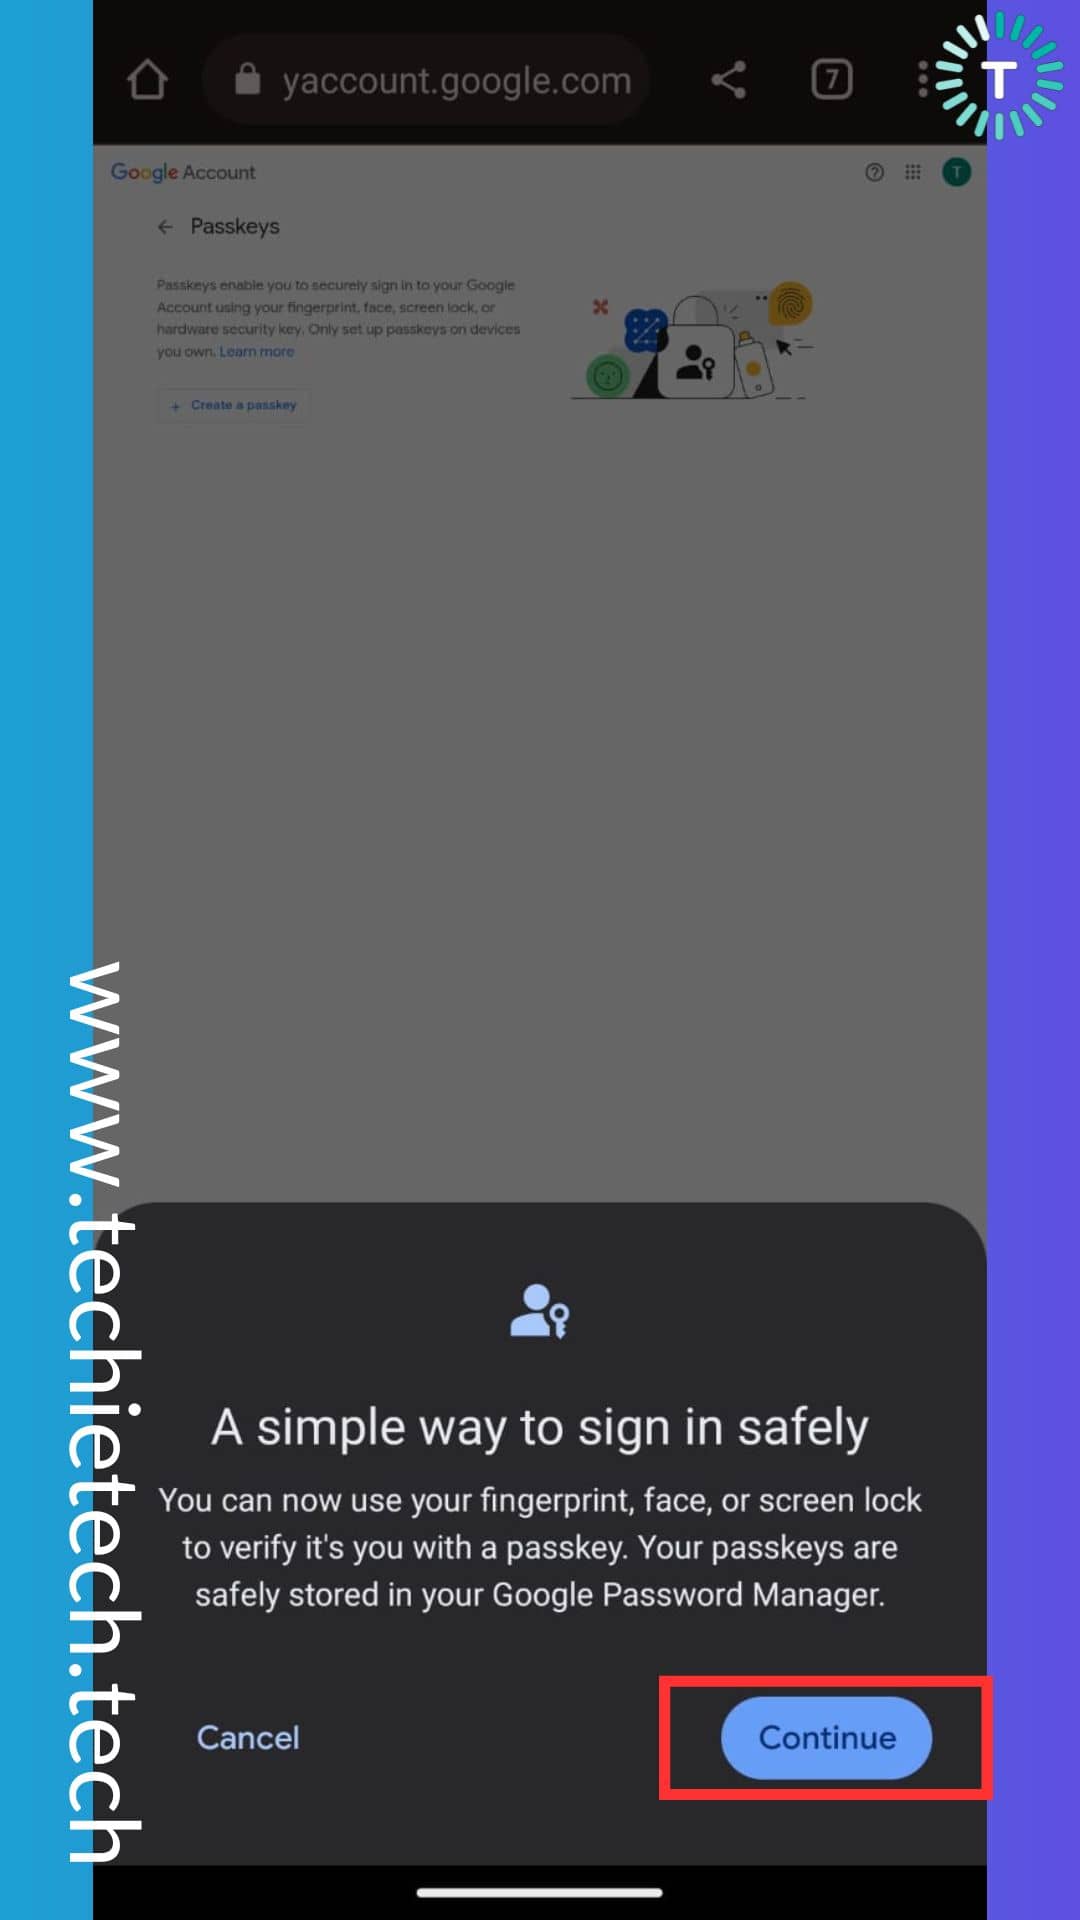
Step 5: Now you’ll see a prompt with the heading ‘A simple way to sign in safely,’ just tap on the ‘Continue’ option,
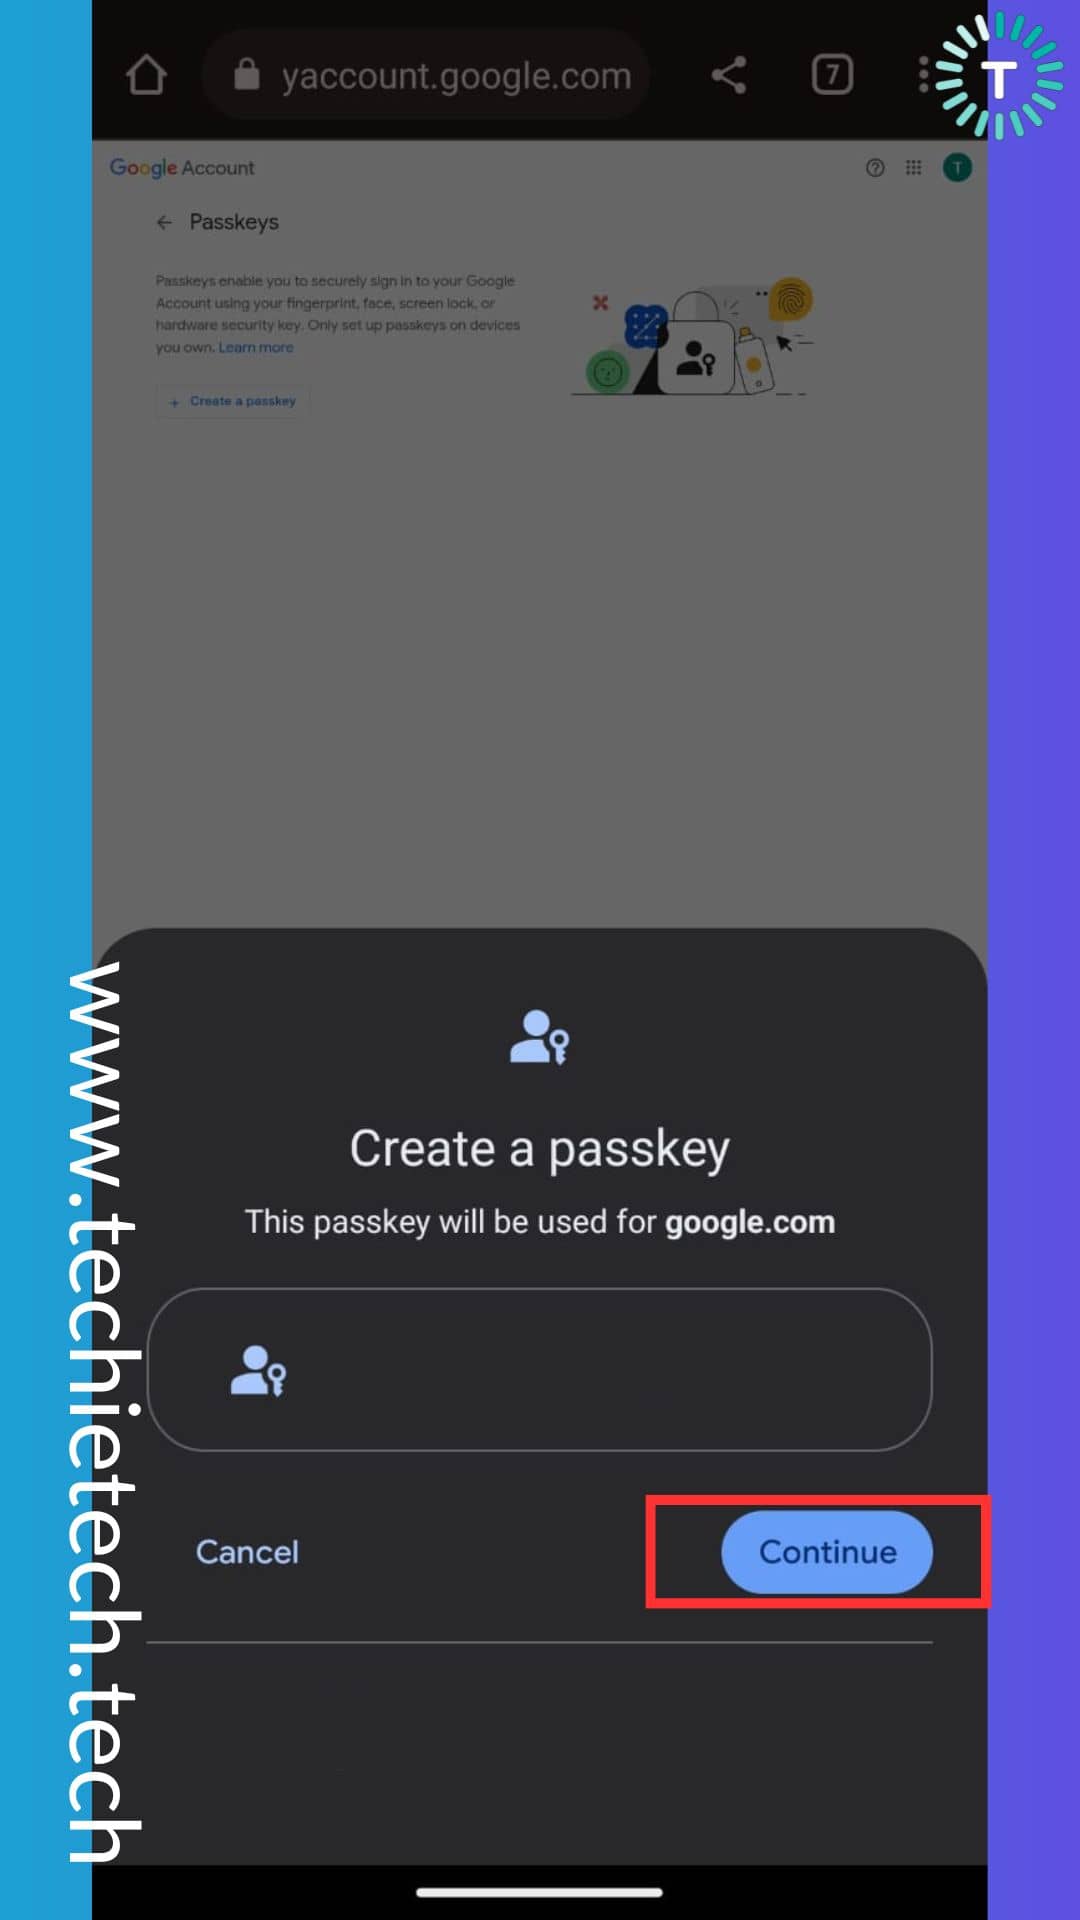
Step 6: On the following screen a prompt will appear saying ‘Create a passkey’ with your Gmail address beneath, you will have to tap on ‘Continue’ here as well.
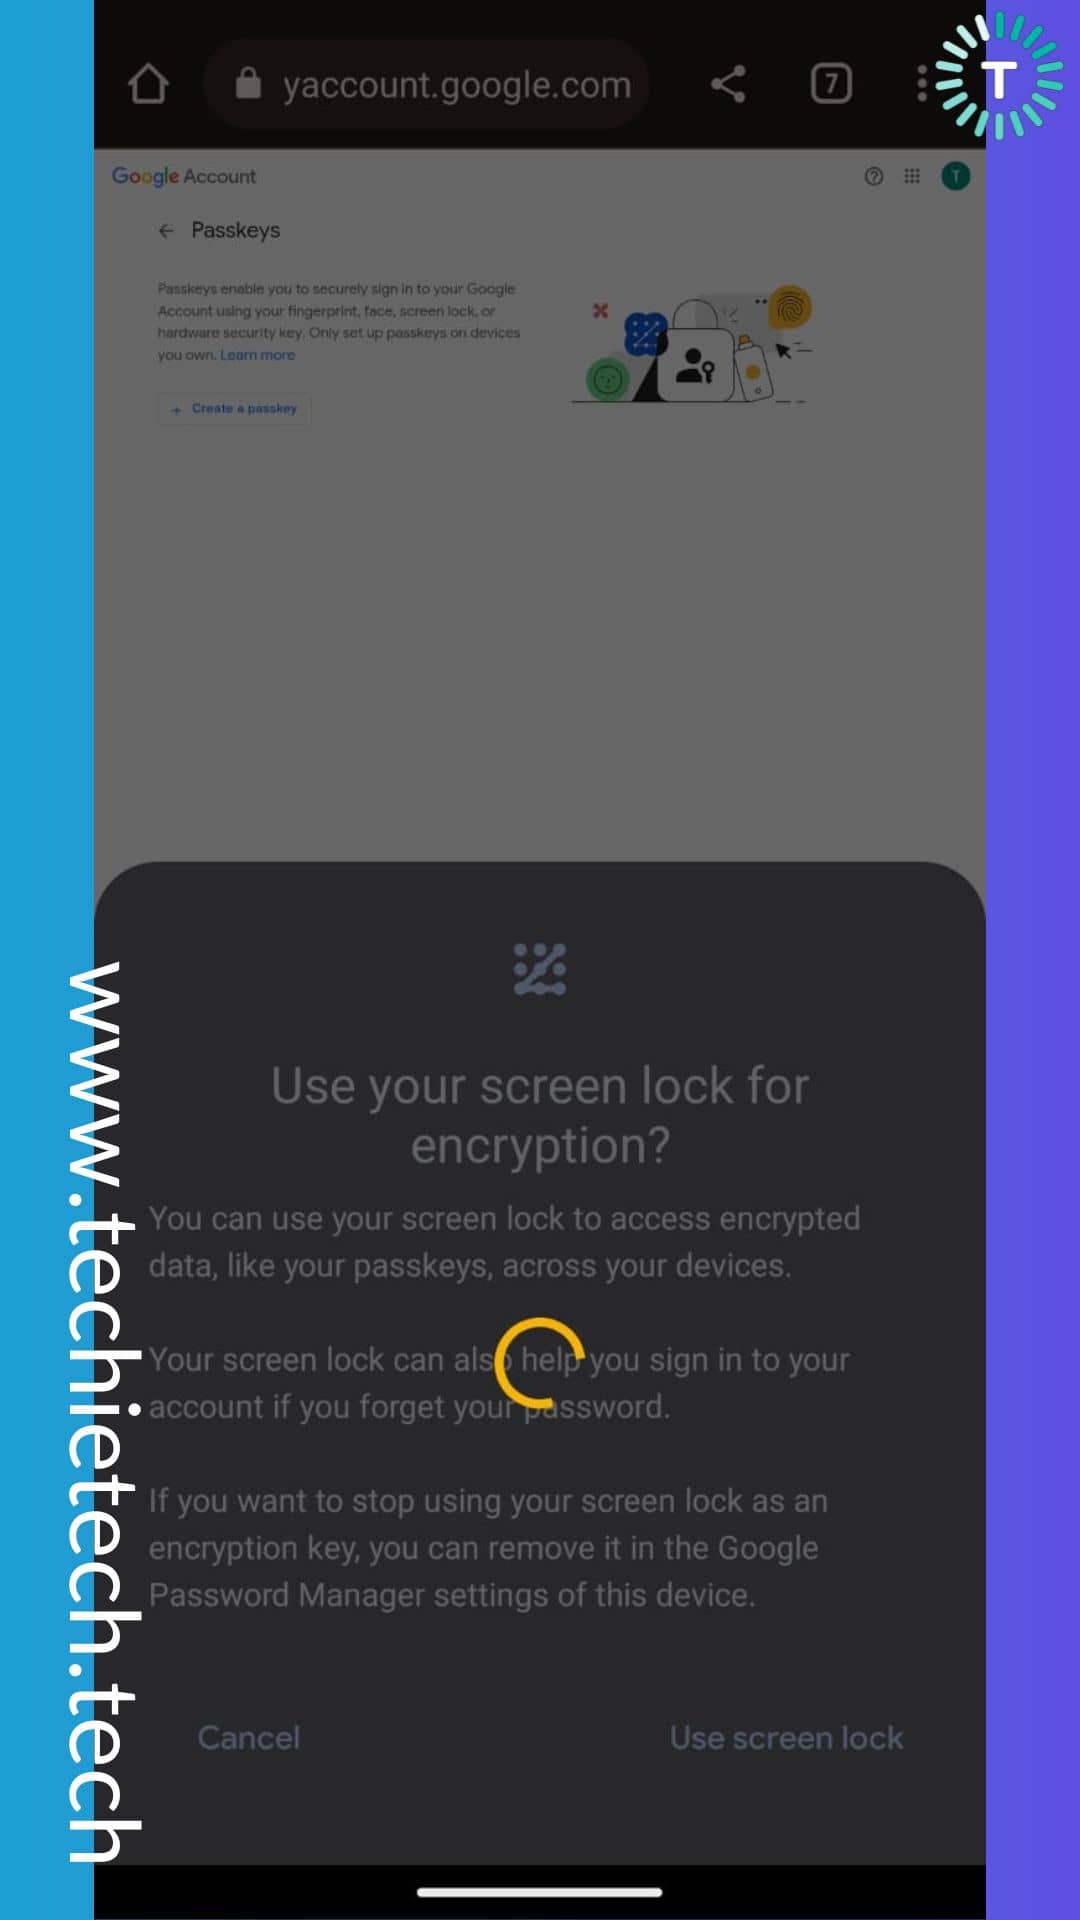
Step 7: Next, you will see a prompt saying ‘Use your screen lock for encryption?’ Just tap on ‘Use screen lock,’

Step 8: Now the device will process the commands and you’ll be asked to verify your identity using ‘fingerprints or face’
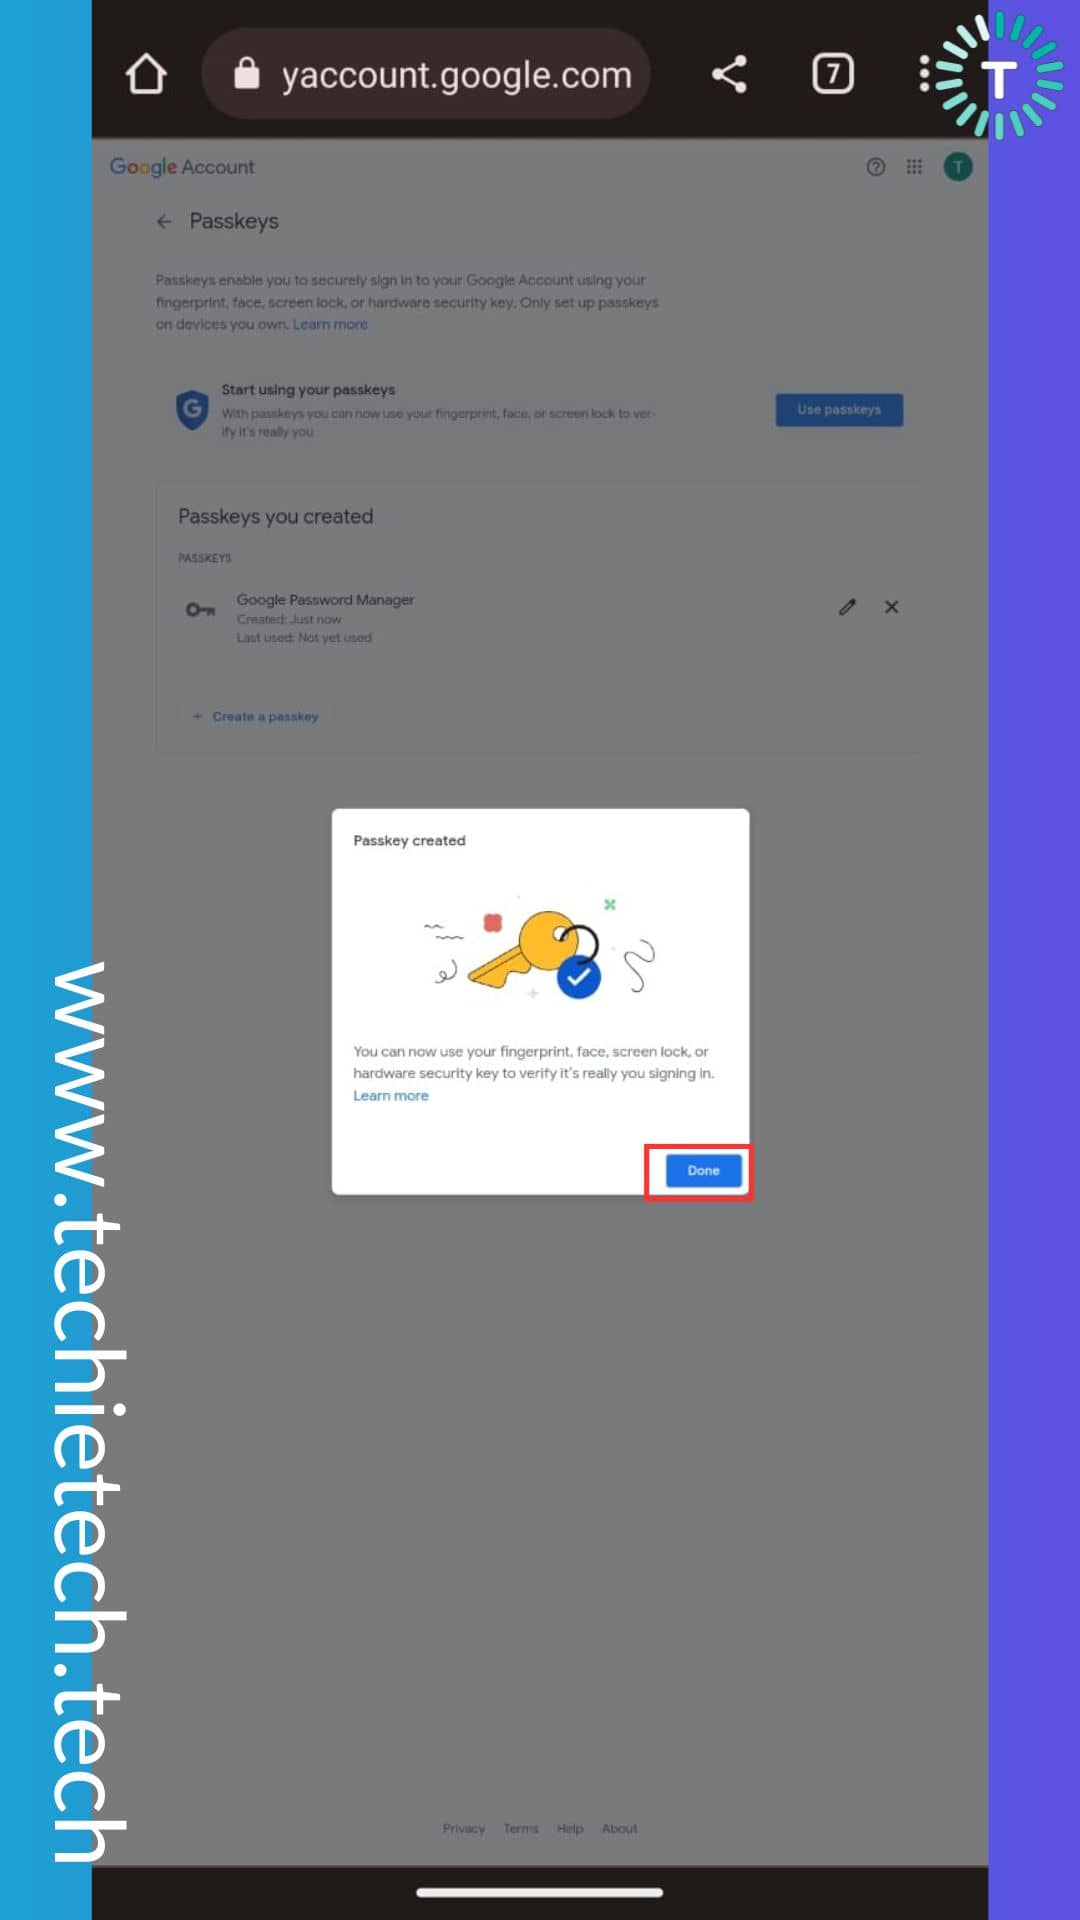
Once everything is done, you will be redirected to the same page from where you started earlier and a message will appear saying ‘Passkey created.’
Next time you have to sign in to your Gmail account, you will not have to enter your password, rather, you will be asked to verify your identity using screen lock. You can verify yourself using your
fingerprint or face to automatically sign in to your Gmail account.
Also read: How to Setup and Use Passkeys on Android & Google Chrome
How to create a Passkey for your Gmail account on iPhone
If you are an iPhone user and wondering if I can get rid of passwords like the Android users using Passkeys, the answer is ‘yes.’ Now that Passkeys are available for every Google Account user, you can create Passkeys for your Gmail account on your iPhone or iPad and enjoy the convenience of a password-less sign-in experience. But, do you know how to set up Passkeys for Gmail accounts on iPhone? No? We have got you covered, make sure to follow the step-by-step instructions given below:
Disclaimer: Before you proceed, make sure to update the Gmail and Safari app iPhone, and ensure that your iPhone is running on iOS 16 or later.
Step 1: Open the Safari app and visit your Google account by typing https://myaccount.google.com/ in the URL bar and signing in to your account using the password,
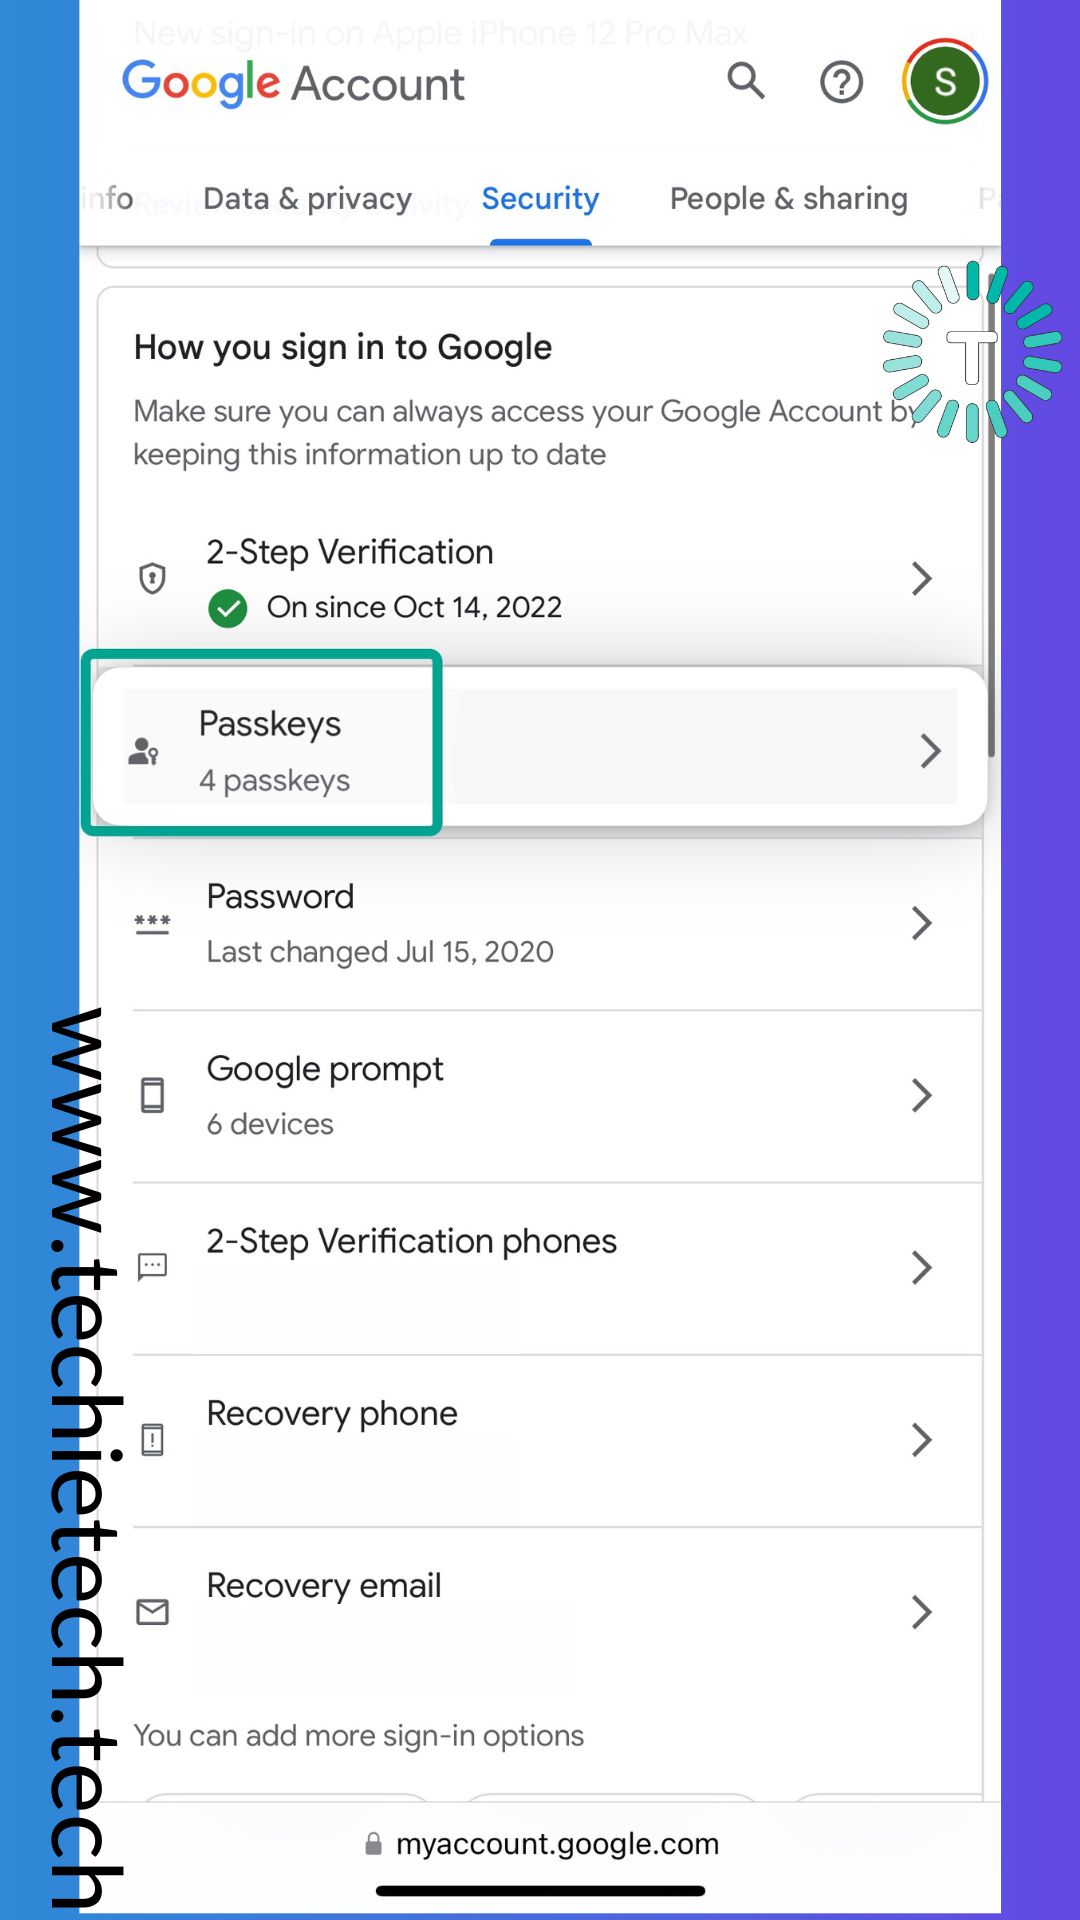
Step 2: After you are logged in, head to the Security tab,
Step 3: Now find the Passkeys option and tap on it,
Step 4: On the following screen, tap on the ‘Create a passkey’ option,
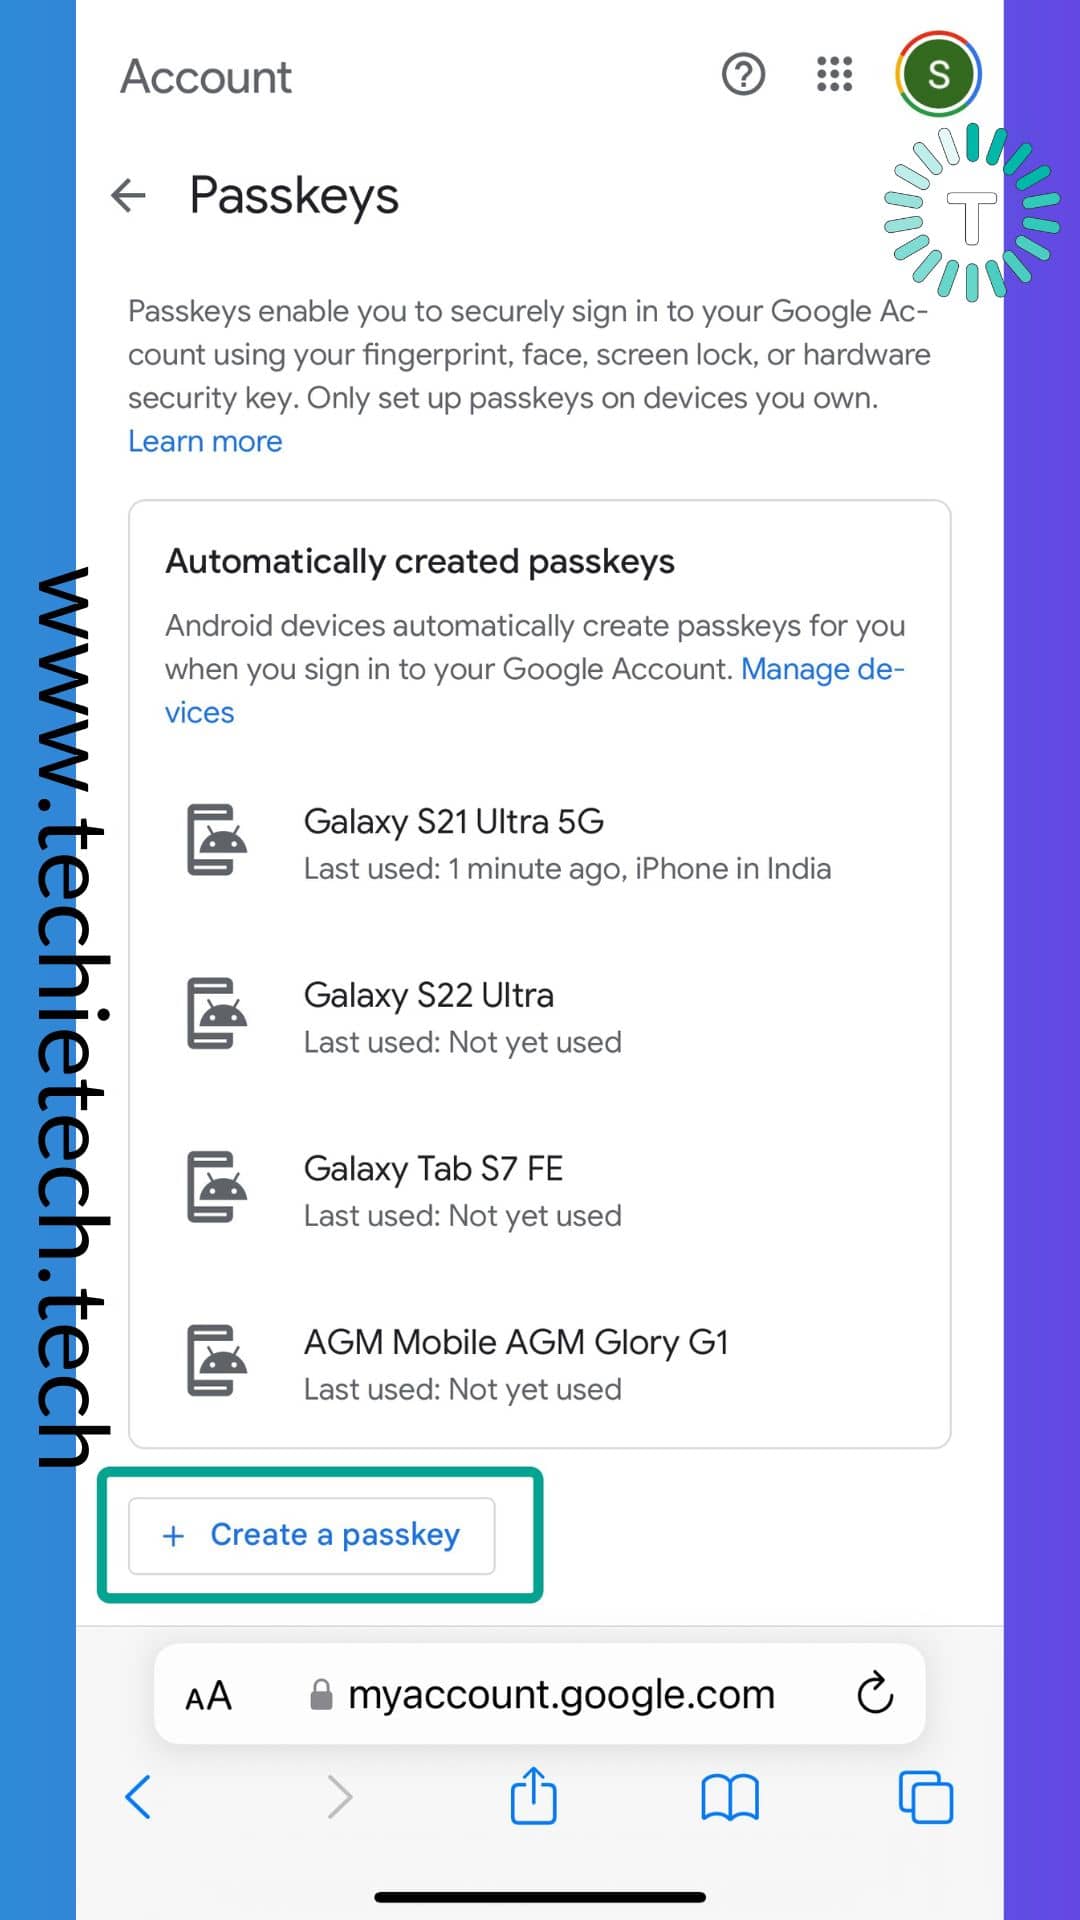
Step 5: Then a screen prompt will appear, you have to tap on ‘Continue,’
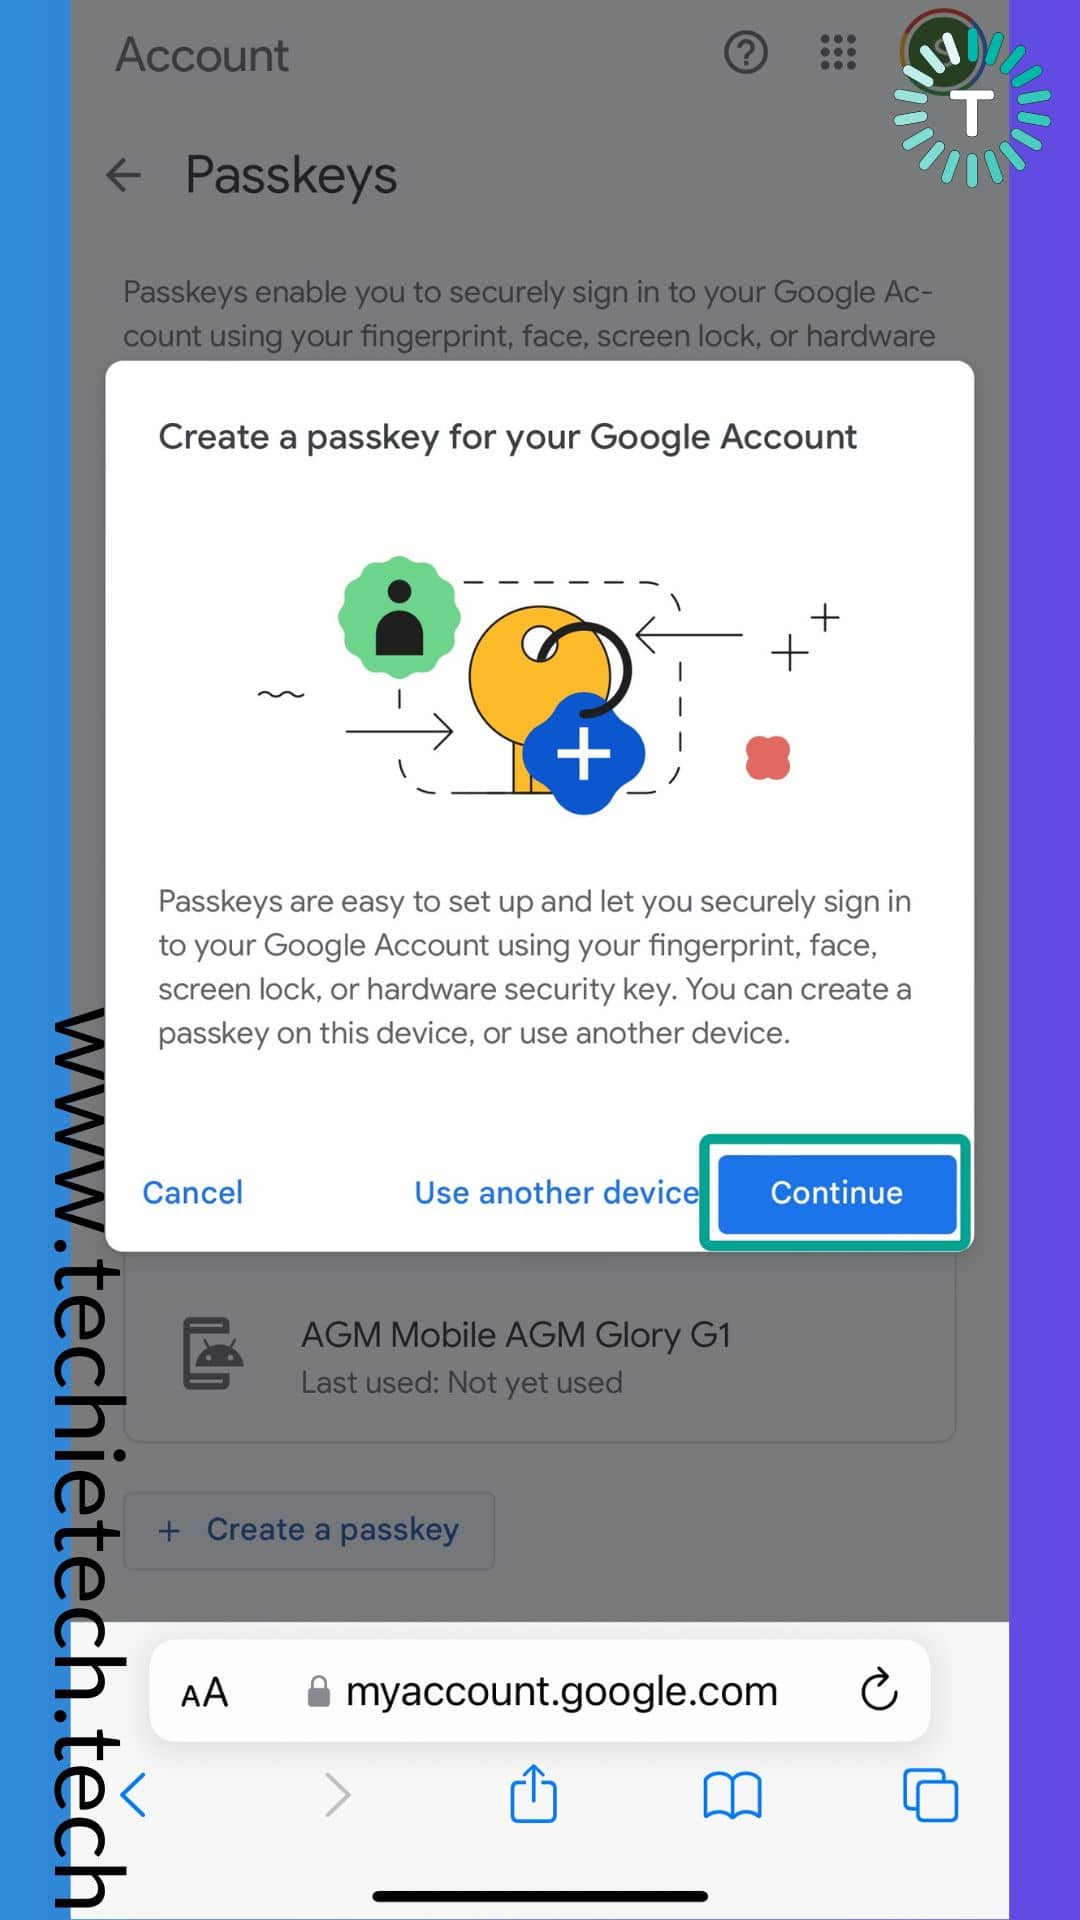
Step 6: On the following screen you’ll be asked to Verify your identity using biometrics (either Face ID or Passcode)
Step 7: Once you’ve successfully verified, a passkey will be created using your iPhone for your Gmail account.
Unlike Android, you must save the created passkey in order to Sign in to your account. However, keeping a passkey on your iPhone and iCloud Keychain is relatively easy, so don’t worry about it, you can follow the steps given below.
Also read: How to set up Passkeys on iPhone & Mac
How to save and rename created passkey for your Gmail on iPhone
Disclaimer: Depending on the browser, website, or app, the steps might differ slightly.
Step 1: On your iPhone, do one of the following:
- For a new account: On the account sign-up screen, enter an account name.
- For an existing account: Sign in with your password, then go to the account management screen.
Step 2: When you see the option to save a passkey for the account, tap Continue,
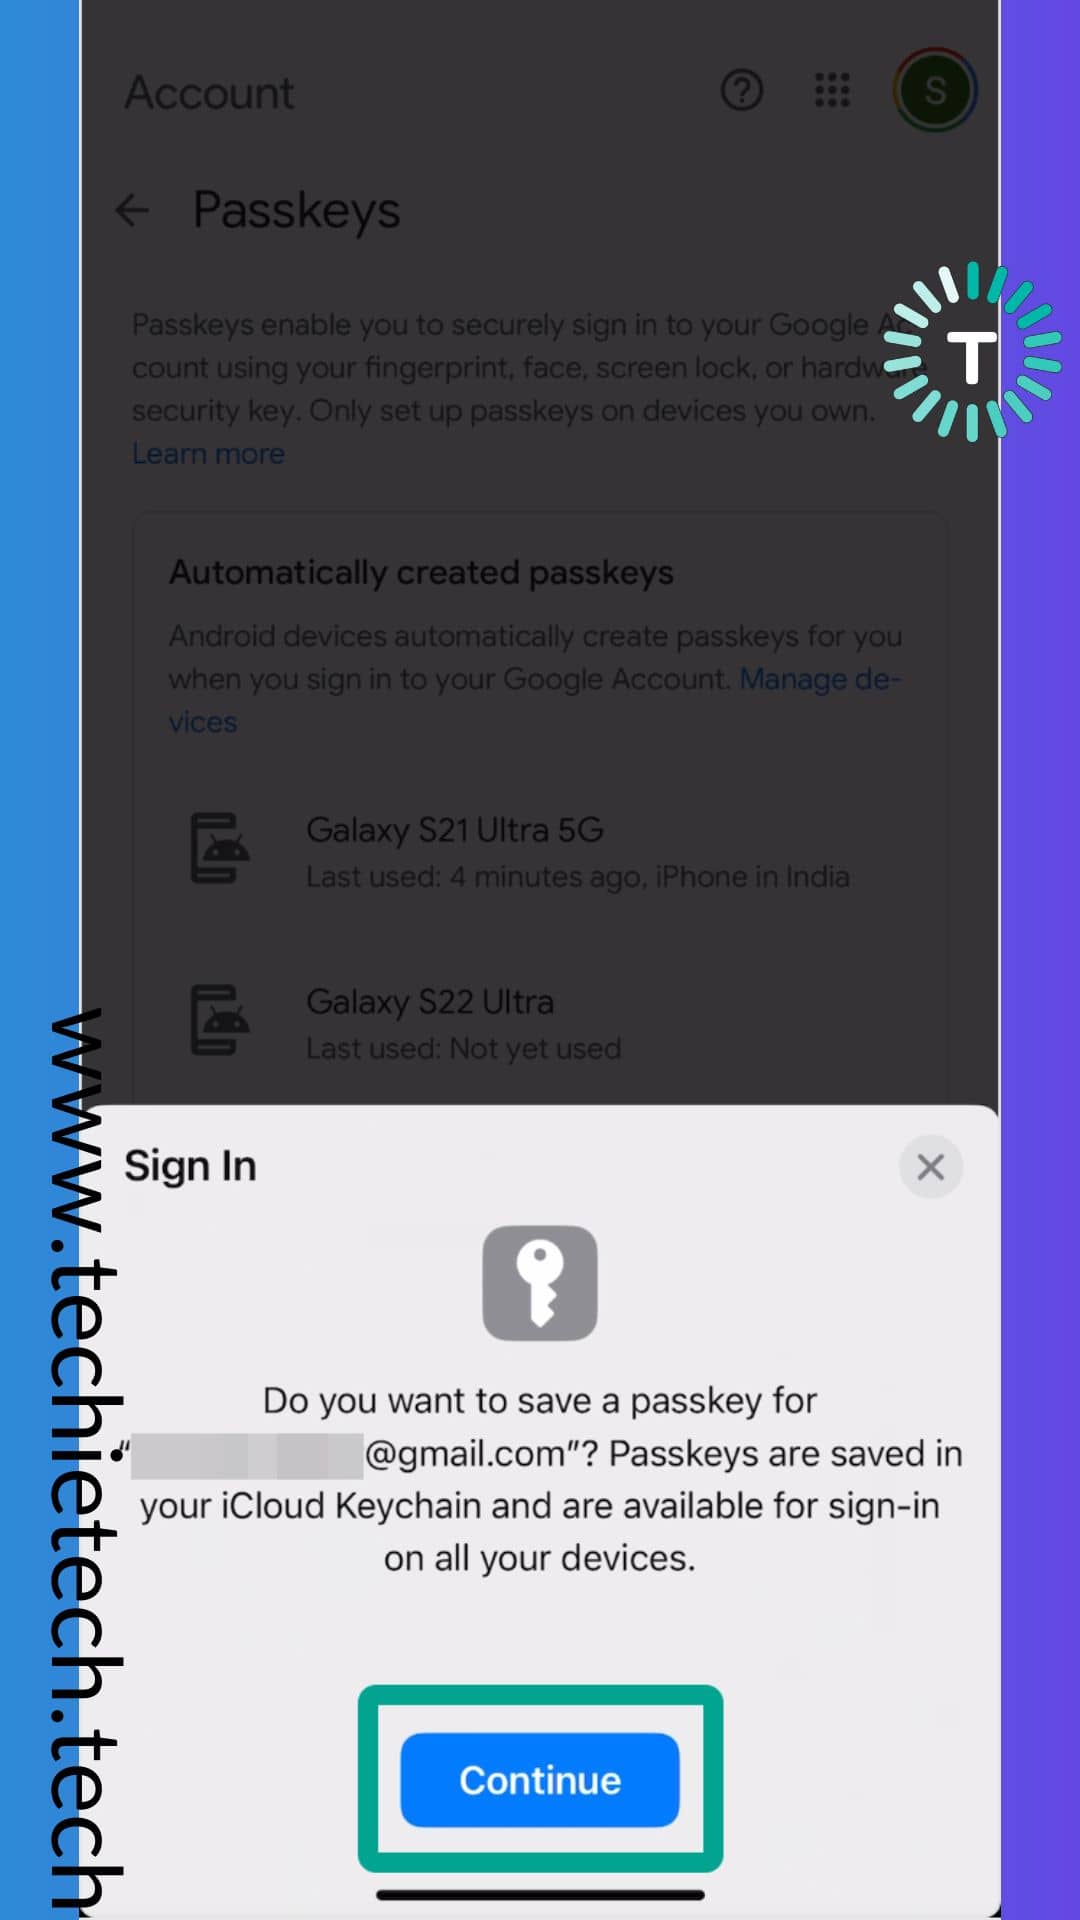
Step 3: Next, the device will confirm your identity using FaceID or Passcode,
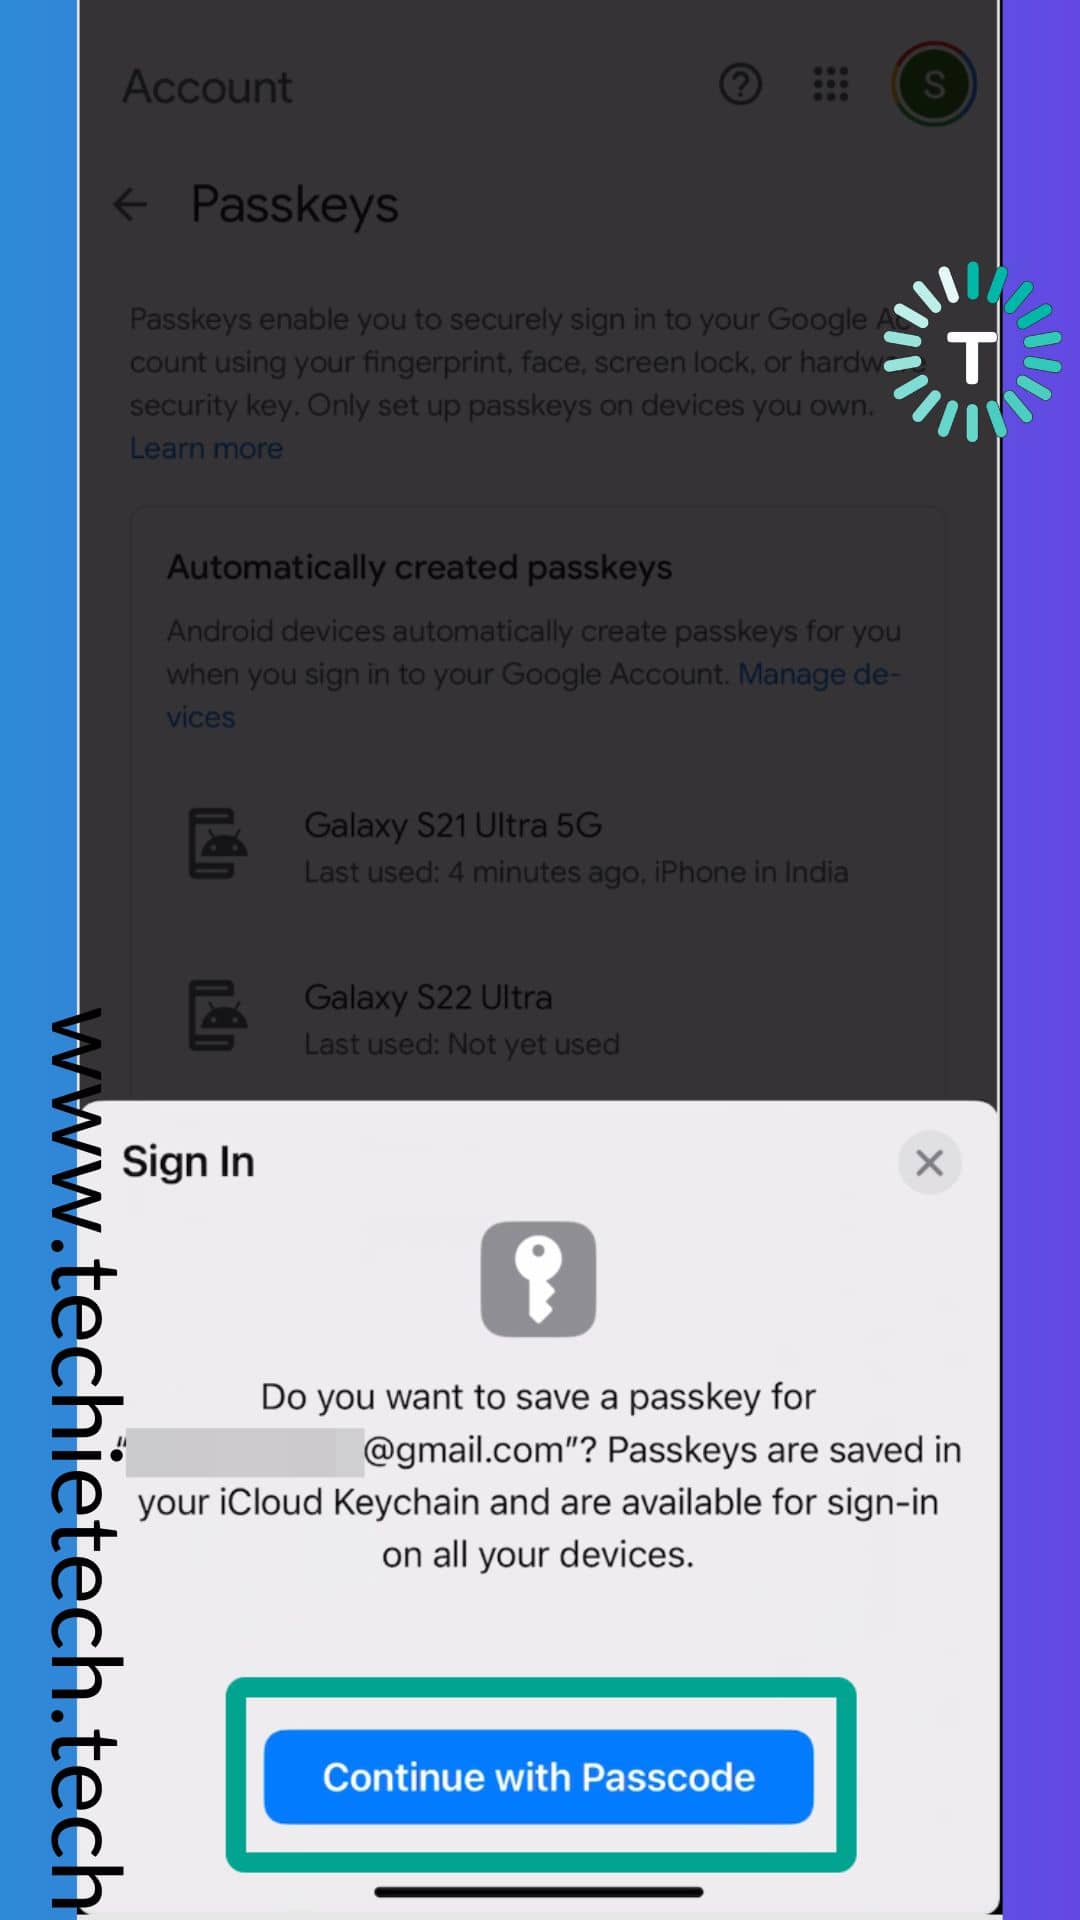
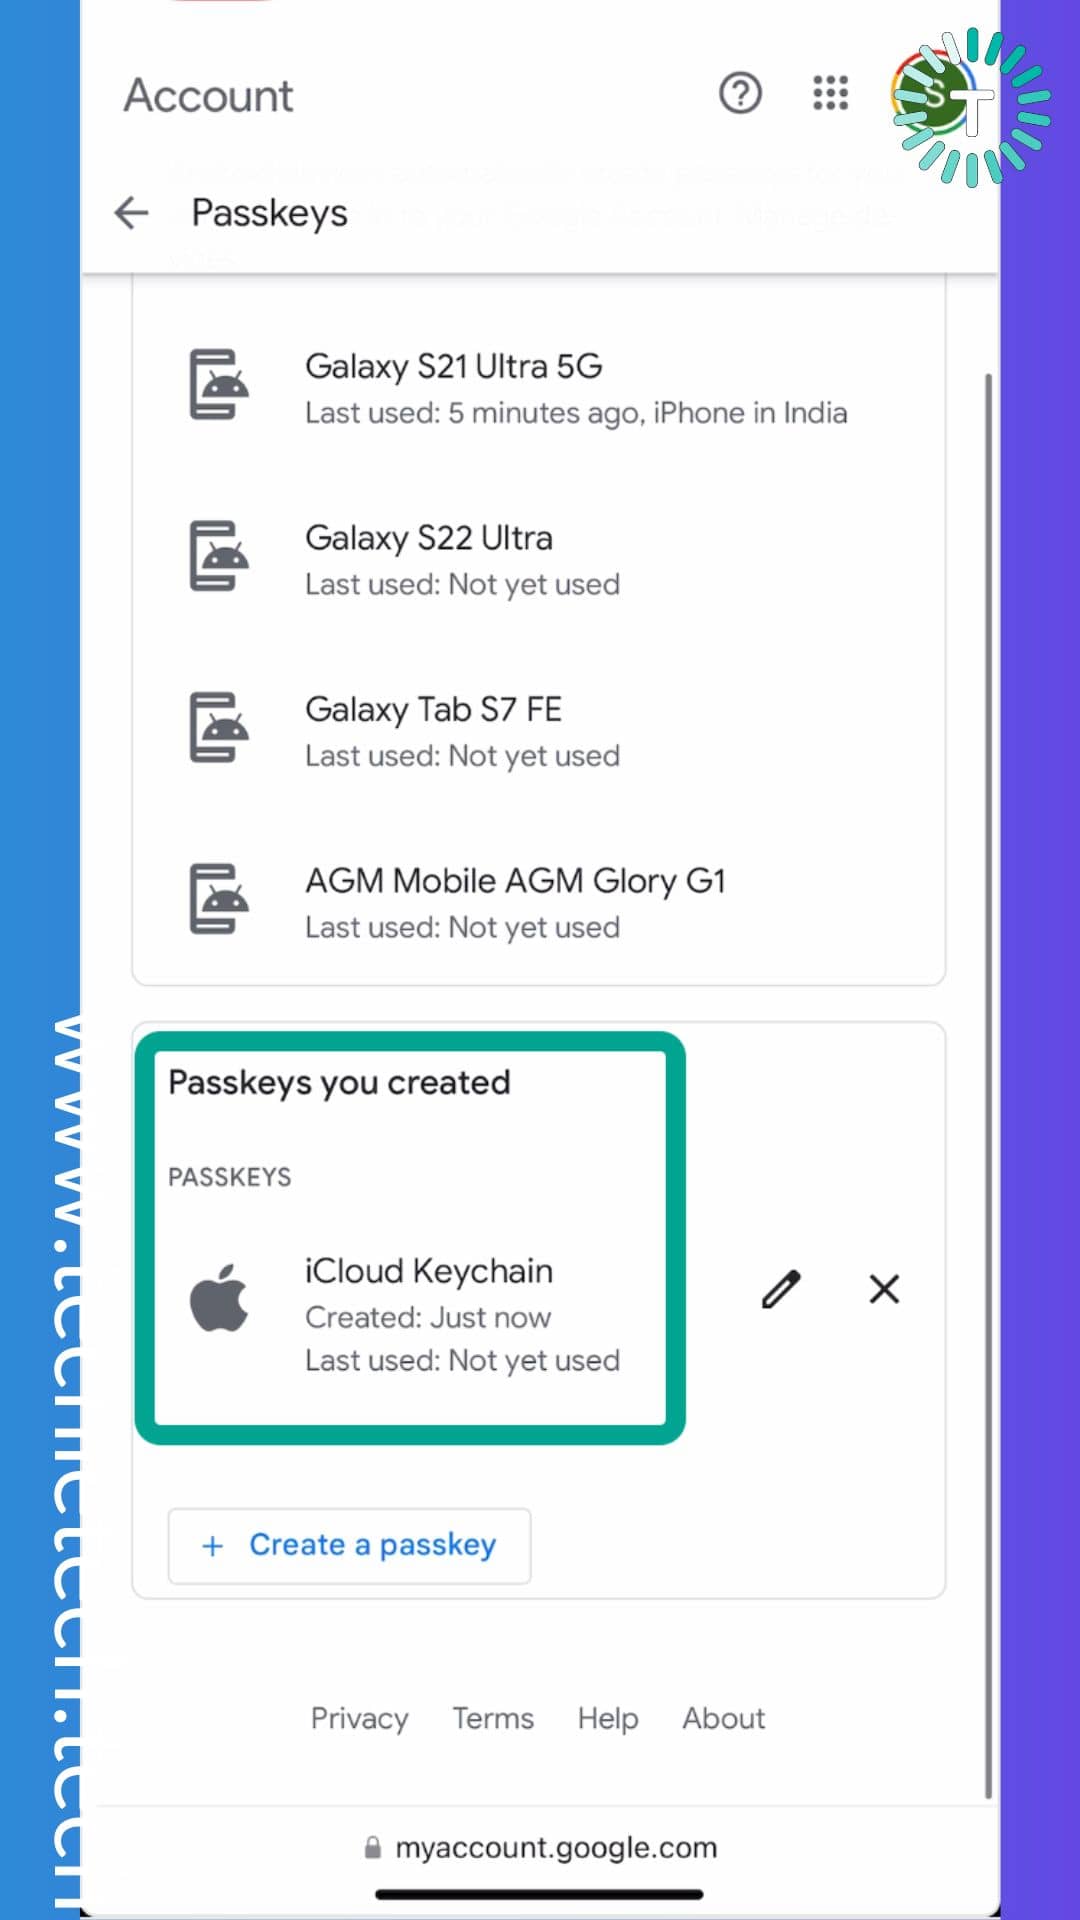
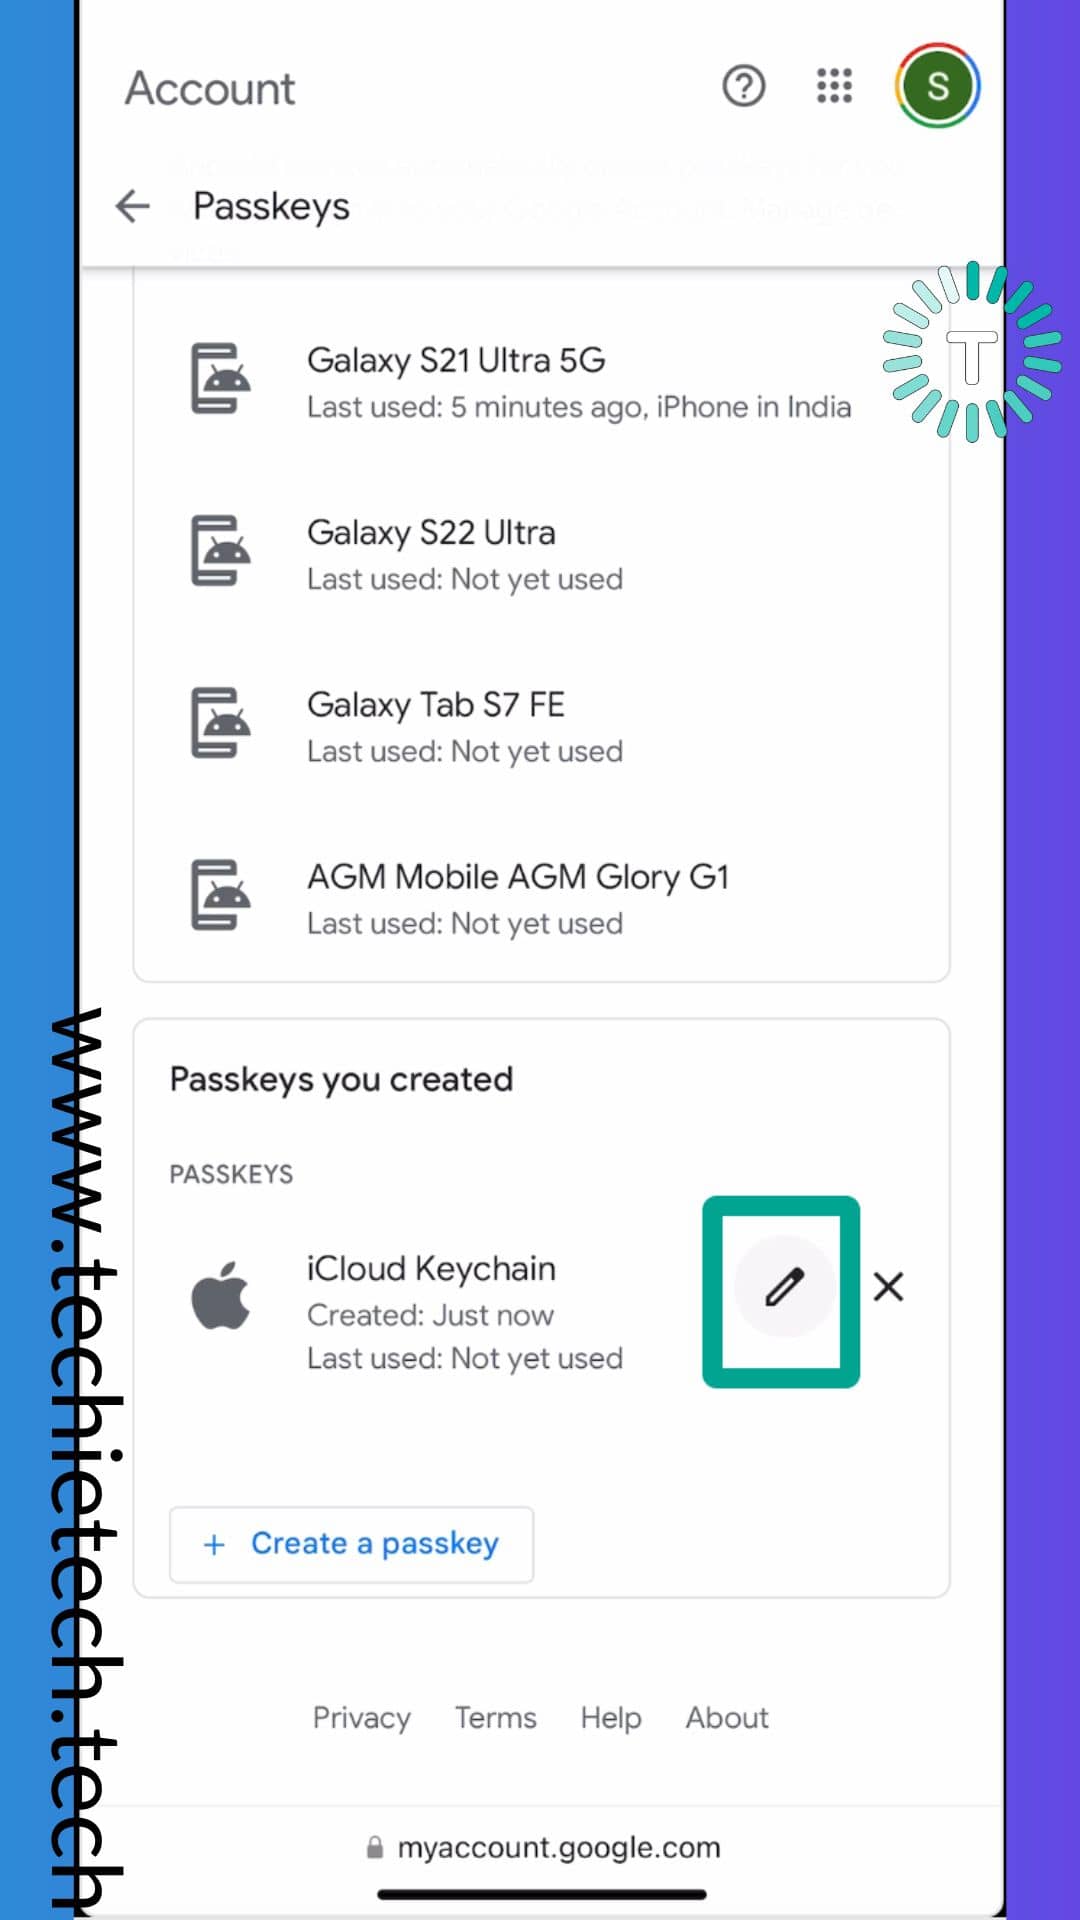
Step 4: Once you are done, the created passkey for your Gmail account on your iPhone, will be listed as a saved Passkey in the Security tab of your Google Account,
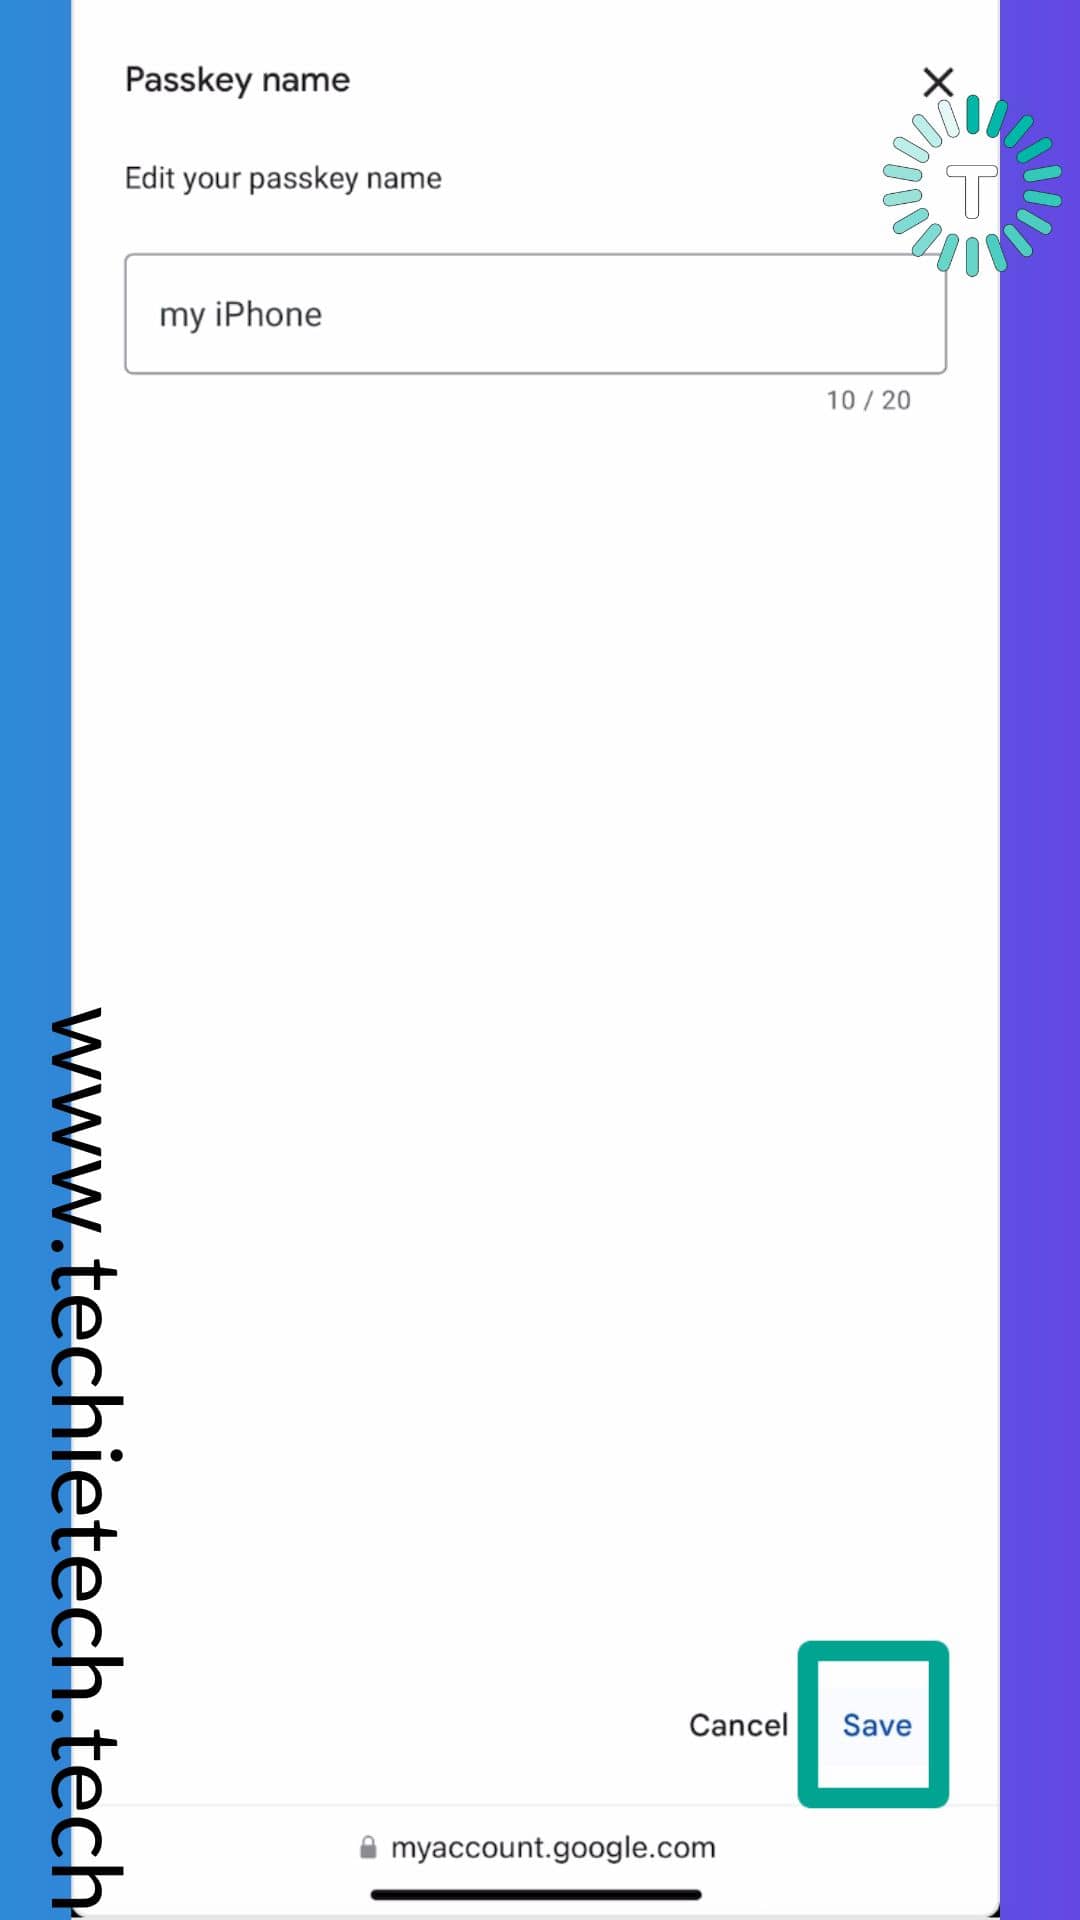
Step 5: If you want to personalize the passkey by renaming it, tap on the ‘Pencil’ icon beside the passkey you created
Step 6: Now, add a name for your passkey

Step 7: Lastly, tap on Save to rename the passkey
After you’ve created a passkey for your Gmail account on your iPhone, you can easily sign in to your Gmail account without entering a password. All you have to do is
enter the email and tap ‘Try another way’ on the next screen. Then, tap on Continue to confirm your identity using Face ID or Passcode and you’ll be automatically signed in to your Gmail account.
Also read: How to enable voice isolation on iPhone
That’s all for now in this guide on how to set up Passkeys on Gmail on the Web, Android, and iPhone. Also, don’t forget to check out some mind-boggling facts about iPhone that we bet you don’t know.
Banner Image Source: Google