The Galaxy S10 and S10+ smartphones are amongst the powerful Android phones that have everything from a stunning display to impressive cameras. But, do you know that some clever tricks can help you unlock the true potential of your Galaxy S10 as well as S10 Plus smartphones? So, whether you’ve just got a new Galaxy smartphone or looking for ways to go beyond the basics and customize your Galaxy S10+, we’ll be sharing our favorite tips and tricks that will make you a Pro on your Galaxy S10 series.
Let’s get started with our 25 amazing tips and tricks for the Galaxy S10 series that will help you make the most out of your smartphone. The mentioned tricks will work with Galaxy S10, S10 Plus, and S10e smartphones.
Tips and Tricks for Galaxy S10/S10+
1. Faster Animations
Galaxy S10 and S10+ have a quick and super-easy trick that will make your phone feel faster. Animations play a significant role in the overall experience of a user interface. Samsung’s One UI is known for its relaxed animations and overall user interface. When you browse through your phone, open an app, or switch between different apps, the faster these tasks are done, the better experience you usually get. If you’re someone who wants to experience faster speed and performance on your S10 or even S10 Plus, you can play around the settings that control these animations.
How to enable faster animations on Galaxy S10 and S10 Plus?
1. First, you need to put your S10/S10+ smartphone in the Developer mode. Here’s how to do it:
- Head to Settings > About Phone
- Select Software Information
- Tap Build Number a few times until your phone says, “You’re a developer.”
2. Then tap Back and select Developer Options.
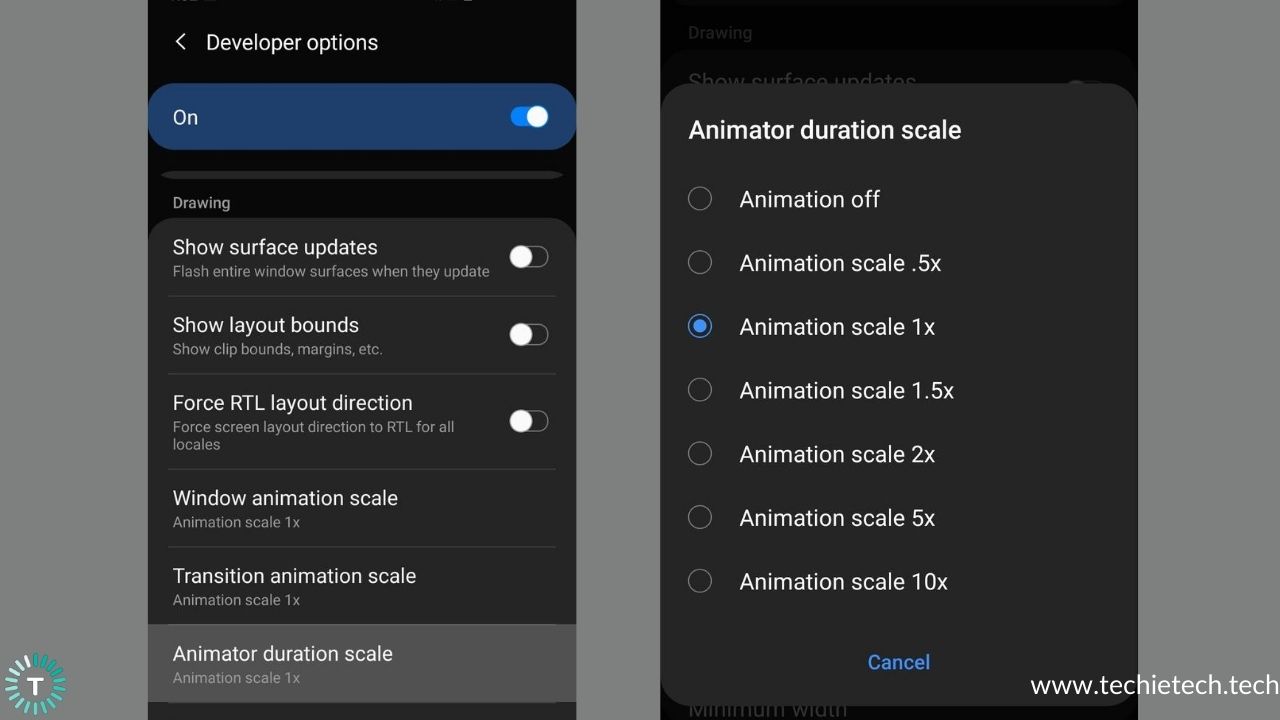
3. Scroll Down and find Window, Transition, and Animator scale options.
4. Set each scale option to “.5x”
Now, you would experience faster animations on your Galaxy S10/S10+.
2. Use two apps simultaneously
Imagine you want to compose an important email, and you need to refer to a doc file to make sure that you don’t miss out on anything. Switching back and forth between two apps while you’re in the middle of something important is a headache, right? Now, if you’re wondering how to multitask on Galaxy S10 or how you can use two apps at the same time on your smartphones, we’re here to tell you how it’s done.
You can use the split-screen multitasking feature on your S10 series that allows you to use two apps by pinning them side by side. You don’t need to switch between them back and forth.
How to use Split-screen Multitasking in Galaxy S10/S10+?
1. Make sure that you’ve one of the apps that you want to multitask with, in the Recent apps. If it’s not there, first open the app.
2. Now, browse through the Recent apps and find the app that you want to work with.
3. Tap the app icon. A drop-down menu will appear.
4. Select Open in split-screen view.
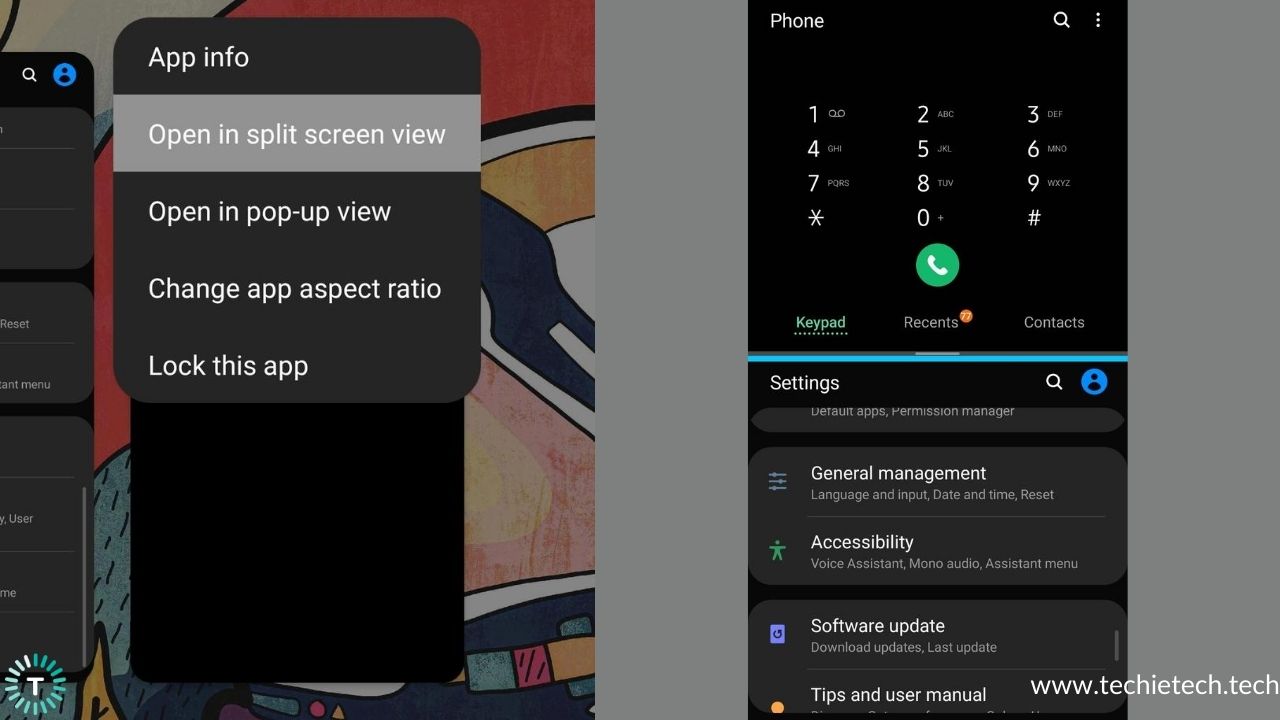
5. The app will appear on the top half of your screen. Now, select the second app from the Recents apps(if it’s already opened) or go to Home Screen and select the app.
6. If you want to change the second app, you can close it and choose a different app.
7. To end your multitasking, grab the slider and drag it to the top or bottom so that one app occupies the entire screen.
8. You can also rotate the screen so that you get the two apps side by side in the landscape mode. Also, if you want to give more screen space to one app, just drag the slider and adjust the size accordingly.
3. One-handed mode
You can use One-handed mode on your S10+ to access the entire display, especially the top of your screen. This mode will adjust the screen size and layout for easy and comfortable controlling of the device with one hand.
How to use one-handed mode on Galaxy S10+ or S10?
1. Go to Settings > Advanced features
2. Tap One-handed mode
3. Tap One-handed mode switch to turn it ON
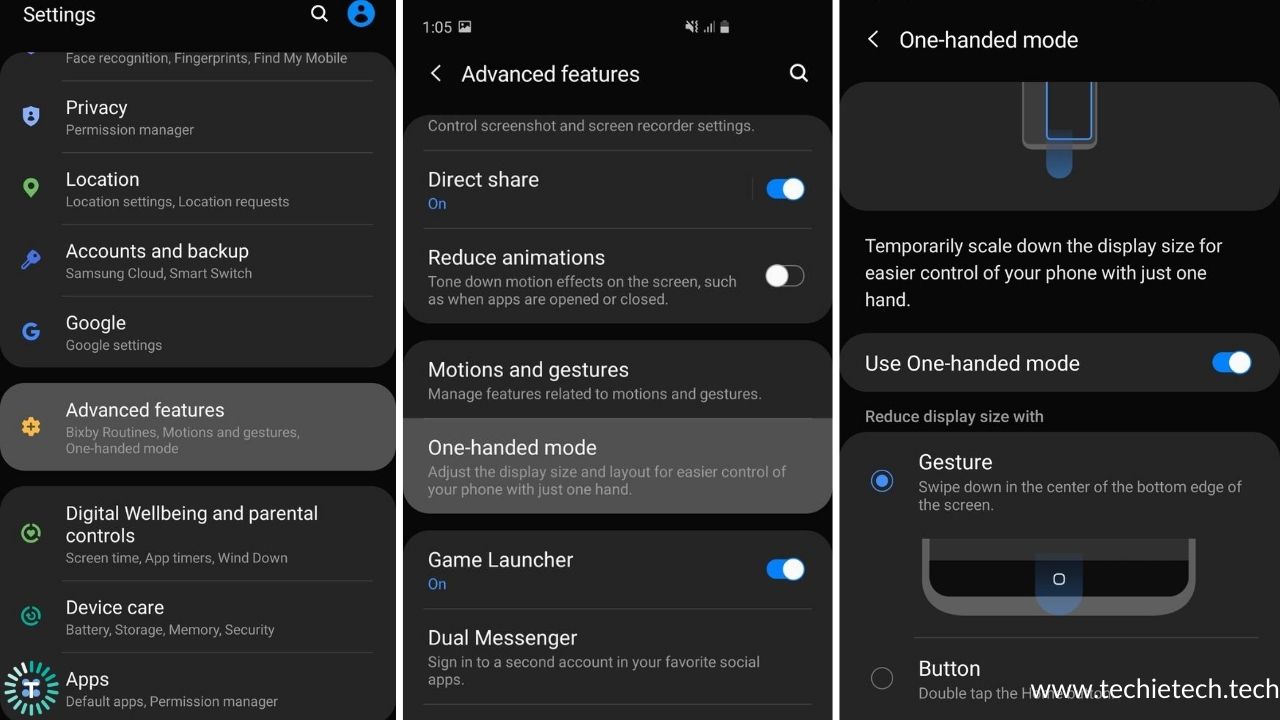
4. Now, select either Gesture or Button option
If you select the Gesture option, a diagonal swipe up with enable the One-handed model. For the Button option, you’ll have to tap Home Button 3 times to use one-handed mode on your Galaxy S10/ S10+.
4.Smart Pop-Up View
A pop-up view is a great option that enables certain apps to notify you whenever there’s any notification. Once you’ve selected the app and a notification pops up, that application will be viewed as a chat head.
How to use a Pop-up view on Galaxy S10/S10+?

- Head to Settings > Advanced Features
- Select Smart Pop-up View
- Select the apps that you want to use in the Pop-up view. (This will be available for only those apps that support Multi-window)
- Now, if you get any notification for the selected apps, you can view a chat head on the home screen.
- If you want to see the notifications or respond to them, tap the chat head.
- You can also adjust the transparency, minimize, maximize, move, or close the pop-up window.
5. How to use more than one account on messaging apps
Do you use two separate accounts on Whatsapp, FaceBook, or any other messaging app and tired of those irritating log-ins and log-outs? Galaxy smartphones have got a fantastic feature to clear off this mess and improve the user experience. Using the Dual Messenger feature, you can use two separate accounts for the same app on your Galaxy S10/S10+ smartphone.
How to set up Dual Messenger or Parallel Apps on Galaxy S10/ S10+?
1. Head to Settings > Advanced Features
2. Scroll down and select Dual Messenger
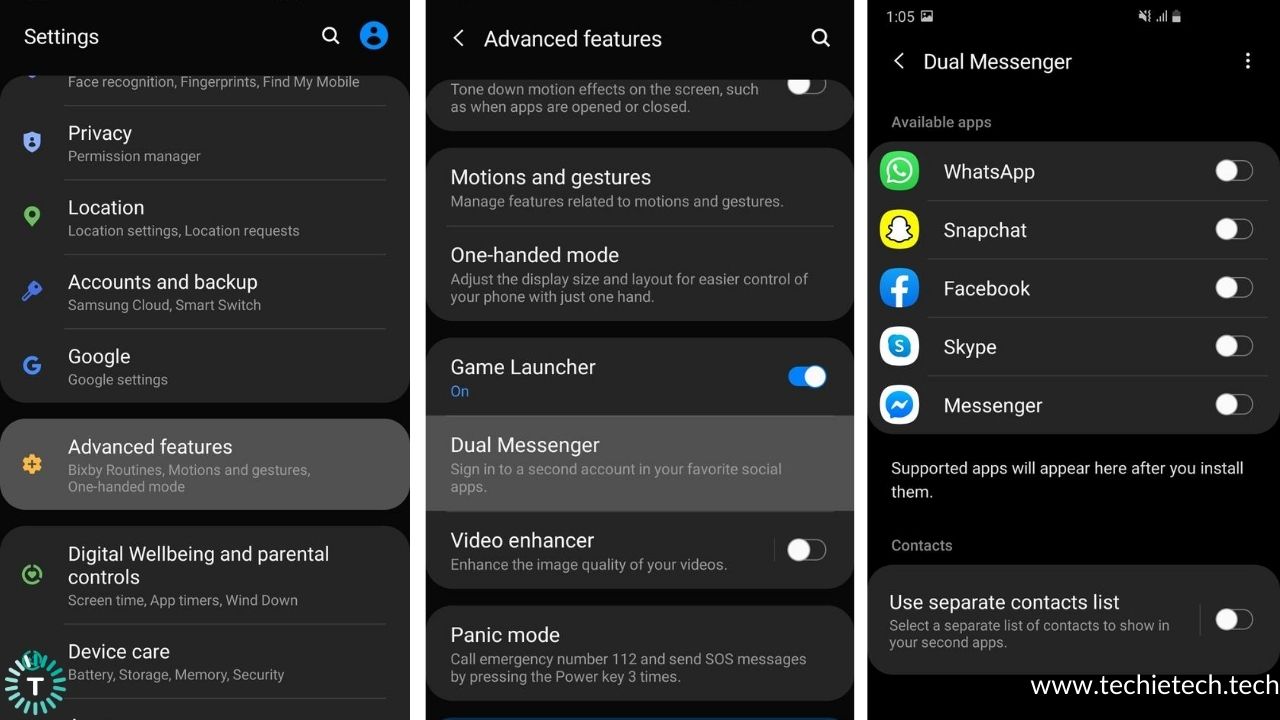
3. You’ll see a list of apps that are compatible with the Dual Messenger. Toggle the switch for the app that you want to use.
4. Tap Install.
5. Read the Disclaimer and tap Confirm.
6. The second app will appear on the Home Screen for easy navigation.
If you want to use the same contacts for the first and second accounts, go to Navigation Settings > Advanced Features > Dual Messenger and turn OFF the Use Separate Contact List option. In case you want to use separate contacts for the two accounts, turn the option ON.
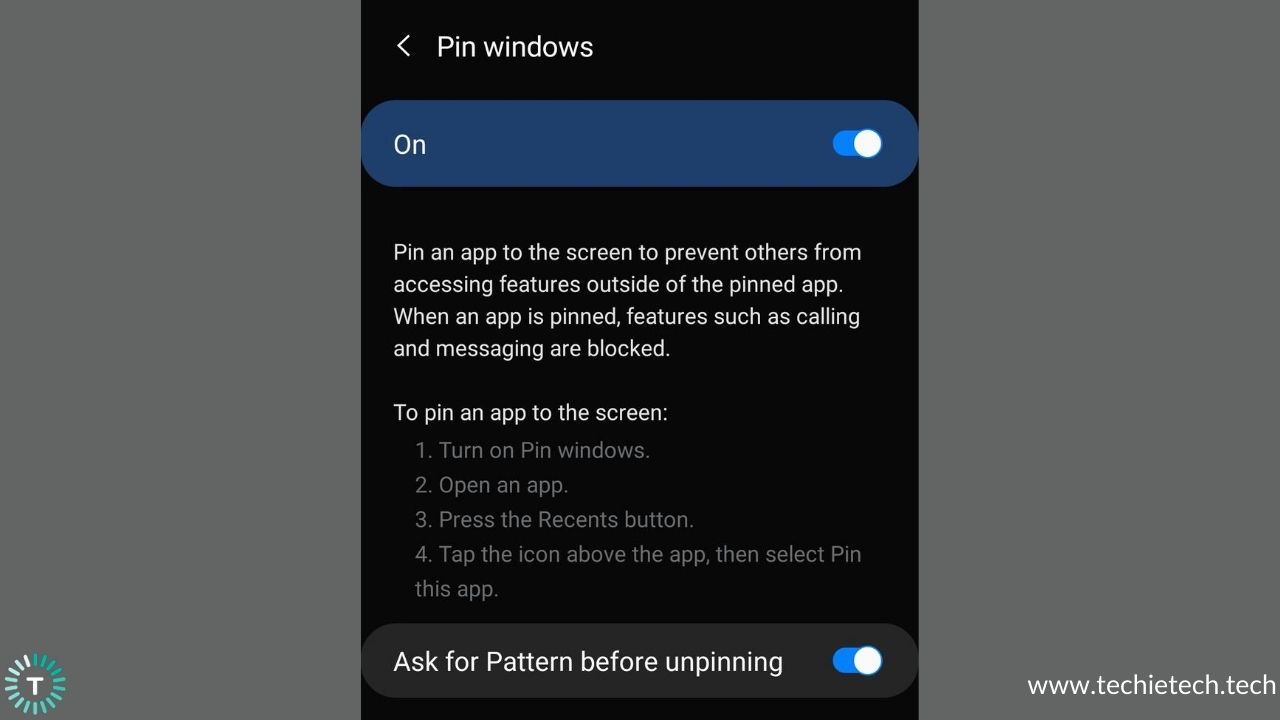
6. Pin an app
There are many times when we accidentally close an app while we are in the middle of something important, right? The Galaxy S10/S10+ has a handy feature that allows you to pin an app to the screen so that you don’t close it accidentally. It’s really helpful in situations when you want to give your phone to your kid to play games or someone else to make a phone call, and you don’t want them to use anything outside that particular app.
To pin an app, you’ll first need to activate the Pin Windows feature on your smartphone.
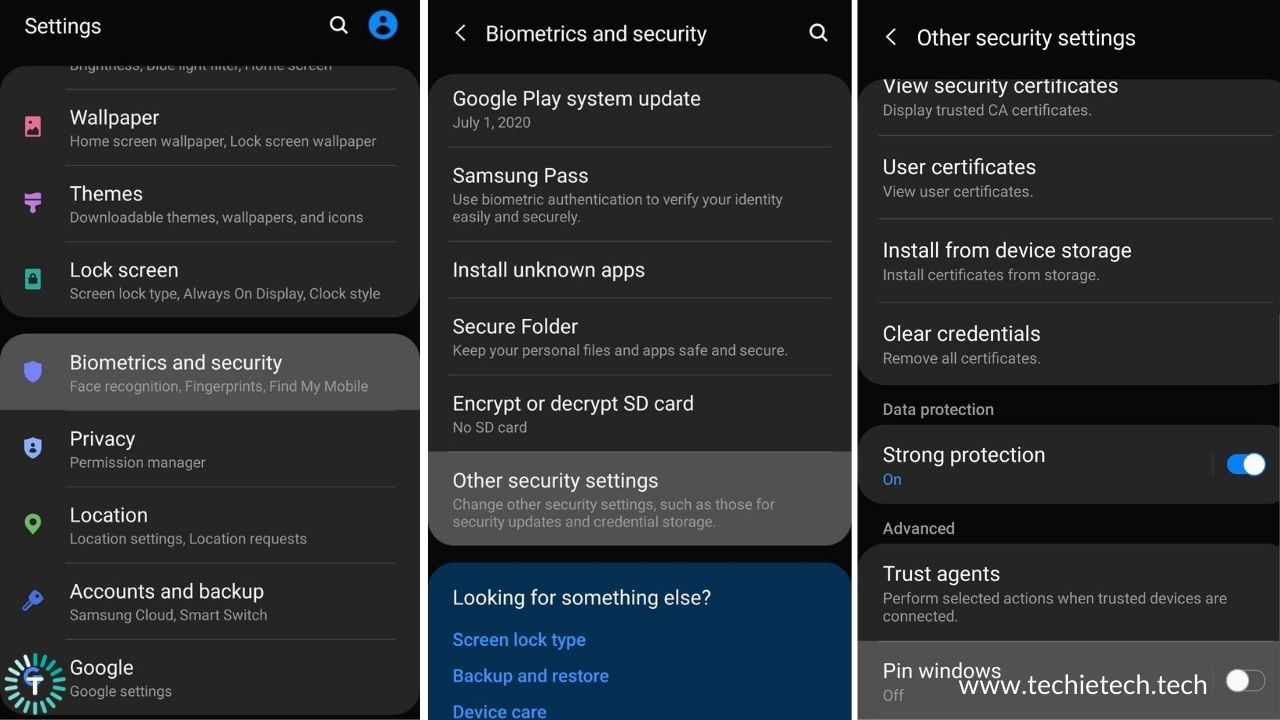
How to turn ON the Pin Windows feature on Galaxy S10/S10+?
- Settings > Biometrics and Security
- Scroll down and tap Other Security settings
Now, scroll down and turn ON the Pin Windows feature.
3. Now, scroll down and turn ON the Pin Windows feature.
How to Pin an app on Galaxy S10/S10+?
- Make sure that you’ve got the app in the Recent apps. If it’s not there, first open the app.
- Now, browse through the Recent apps and find the app that you wish to pin.
- Tap the app icon. A drop-down menu will appear.
- Select Pin this app.
When an app is pinned, you’ll only be able to navigate around that particular app, and won’t be able to use anything else. To unpin the app, simultaneously hold both the left and right icons on the bottom.
7. Send SOS Messages
The SOS message feature makes it easy for you to notify a contact in case of an emergency. Turn ON the Send SOS message feature, and then you need to press the lock button three times. Your phone will automatically send a message saying SOS followed by a link, which, when opened, will show up your location.
Do you know that you can even send a photo of your location or/and a voice message with the SOS message to provide more evidence on where you are and what’s happening with you?
How to send SOS messages on Galaxy S10/S10+?
1. Go to Settings > Advanced features
2. Tap Panic Mode
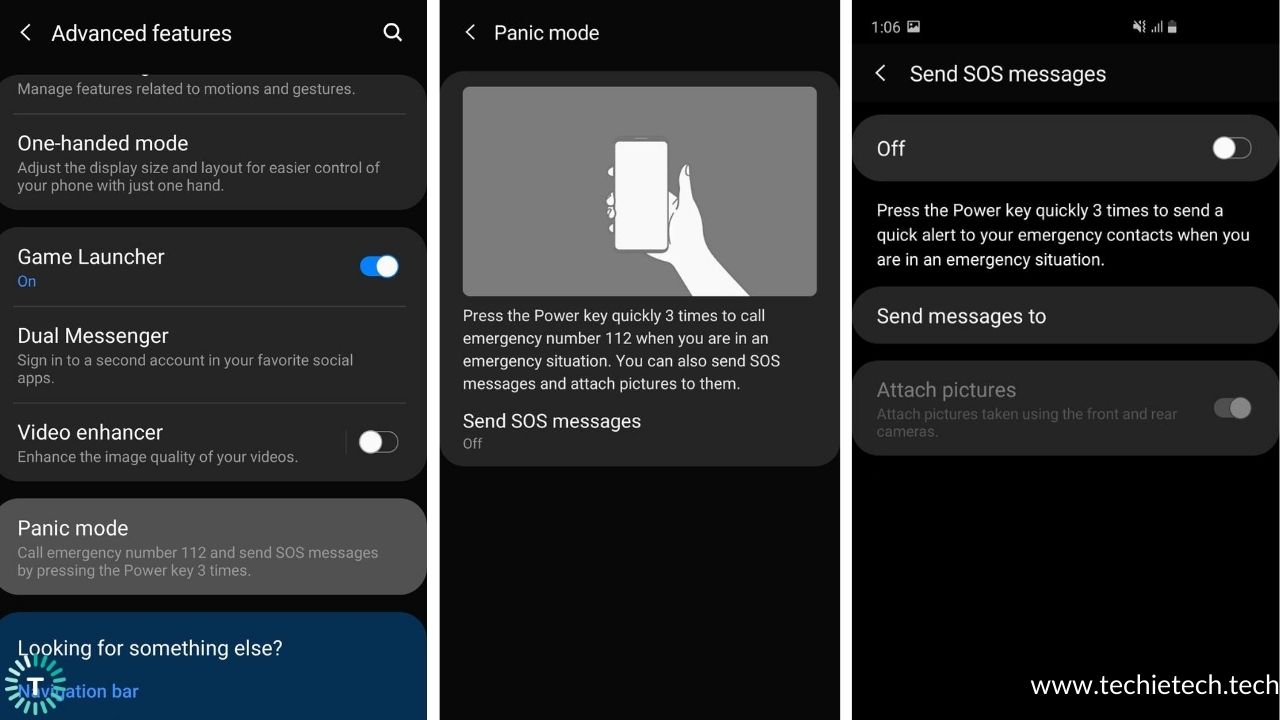
3. Select Send SOS Messages
4. Turn the switch On and tap OK
5. Agree to the terms and conditions and add a contact to send an SOS message to. You can add up to 4 emergency contacts on a device.
6. You can add a recipient from your contacts or add a new number.
7. Tap the back icon and return to the Send SOS Messages screen.
8. If you want to Attach pictures from your front and rear cameras, turn ON the Attach pictures option.
9. To send a 5-second voice message, turn ON Attach audio recording.
8. Switch to brighter screen colors
You can also brighten up the screen colors on your Galaxy S10/S10+ smartphone. By default, the display is set to the natural mode, and it looks great, but you can anytime change the screen colors to match what you’re watching or doing. If you prefer a fully saturated, spiced up, brighter display, you can switch to the Vivid mode.
How to adjust color settings on Galaxy S10 and S10 Plus?
- Go to Settings > Display
- Tap Screen mode
- Tap Vivid
- Now, adjust the slider for White Balance to make the display cooler or warmer.
- You can also manually adjust the screen color by tapping the Advanced Settings option.
It’s worth mentioning that the Vivid option may not be available if you’ve enabled the Blue Light filter on your Galaxy smartphones.
9. Easy Notifications
S10 and S10+ are large phones and they’re not the most accessible phones when it comes to one hand usage especially when you need to access the notification bar. You can open the notifications panel without going all the way to the top of your more prominent display on S10+ on the home screen. Galaxy S10/S10+ smartphones allow you to assign the swipe down to open the notification panel. Though it works only on the home screen, it’s a handy feature to view the notifications on S10+ and even S10.
- Go to Settings > Display
- Tap Home Screen
- Turn ON Quick-open notification panel
Now, you can swipe down on the home screen to access the notification panel and check your phone’s notifications, and a swipe up will still take you to the app drawer.
10. Disable/ Customize Bixby button
One of the biggest frustrations of the Bixby button is its placement- right under the volume keys and nearly opposite to the power button. On bigger phones like Galaxy S10 Plus, accidental presses are very common.
It’s easier to disable Bixby on Galaxy S20, Note 20, and Note 10 series as compared to Galaxy S8, Note 8, S9, Note 9, and S10 series.
First, let’s make it very clear that we cannot altogether disable the Bixby button in Samsung’s One UI, but we can disable Bixby to open on the single presses. We can relegate Bixby to a double press, and it’s at least less painful than invoking Bixby on those accidental single presses.
How to disable the Bixby button on Galaxy S10/S10+?
Step 1: Firstly, to disable the Bixby button, you would have to log into your Samsung account.
- Press the Bixby button or swipe right on the home screen.
- Tap the next button.
- Enter the credentials for your Samsung account or Create an account.
- If you get a message saying “Use biometrics,” tap Not Now.
- Tap the Next button.
- Review the terms and conditions, tap Next.
- If you want, you can teach Bixby your voice and then tap Next.
- Tap Next.
- Now, you’ve successfully logged into your Samsung account.
Step 2: Remove Bixby Home from the Home Screen
- On the Home Screen, hold down an empty space until you see the menu.
- Swipe to the right and reach the left home panel.
- Disable Bixby Home
Step 3: Disable Bixby button
- Go to Settings > Advanced features
- Tap Bixby key
- Now, select Double press to open Bixby.
While you cannot disable the Bixby button entirely, we can customize the Bixby button to open any other app like the Google Assistant or Camera.
How to Remap the Bixby button on Galaxy S10/S10+?
1. Go to Settings > Advanced Features
2. Tap Bixby Key
3. Tap Double press to open Bixby
4. Enable Use single press
5. Tap inside Use single press
6. Select the Open App option
7. Tap the Settings icon and select the app you want
Now, you can double-press the Bixby button to open the app and single-press it to open anything that you want.
Are you facing battery drain issues? Here are the 13 ways to effectively fix S10/S10+ battery drain problems.
11. Use your phone to scan a document
Gone are the days when you would need a photocopier with a scanning function to scan a document. Now, you can scan your letters, bank statements, business cards, receipts, and other documents right on your smartphones on the go. Samsung S10, S10+, Note 10, and many other Galaxy smartphones have a built-in scanner that lets you scan your documents with just a tap.
How to scan a document using Galaxy S10+ or S10?
1. Tap the Camera app.
2. Navigate to the Settings icon > Enable Scene Optimizer.
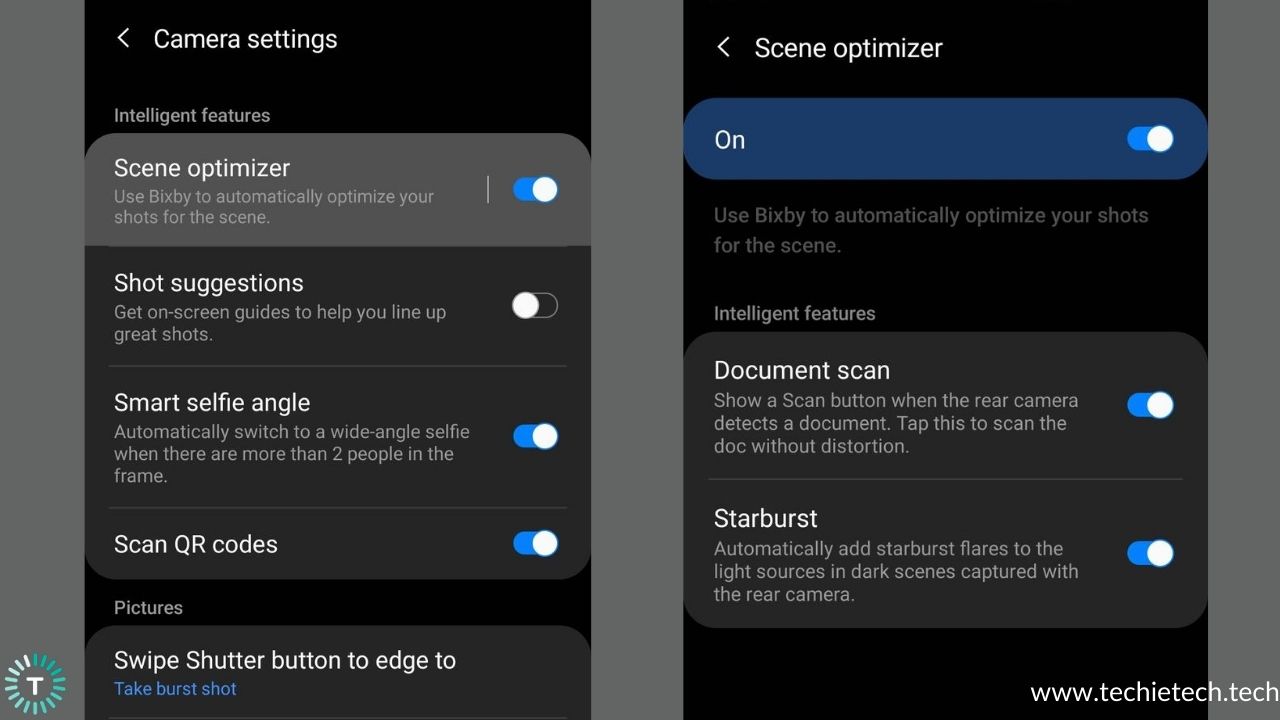
3. Also, turn On the Document Scan option.
4. Start scanning your documents right away.
12. Customize Quick Settings
Quick settings is a convenient way to play around several features on the phone, without going for a series of steps. The best part is you can get rid of the default lineup and customize the quick settings on Galaxy S10+ as well as S10. For example, if you’re always switching Wi-Fi connections or using your phone’s flashlight, you can change the button order to show up your most frequently used or favorite shortcuts first. This can turn out to be a real timesaver.
How to customize quick settings on Galaxy S10 Plus or S10?
1. Pull down the notification shade to access the quick settings.
2. Tap three vertical dots on the top right corner.
3. Tap Button Order and select what setting you want to include and position them precisely.
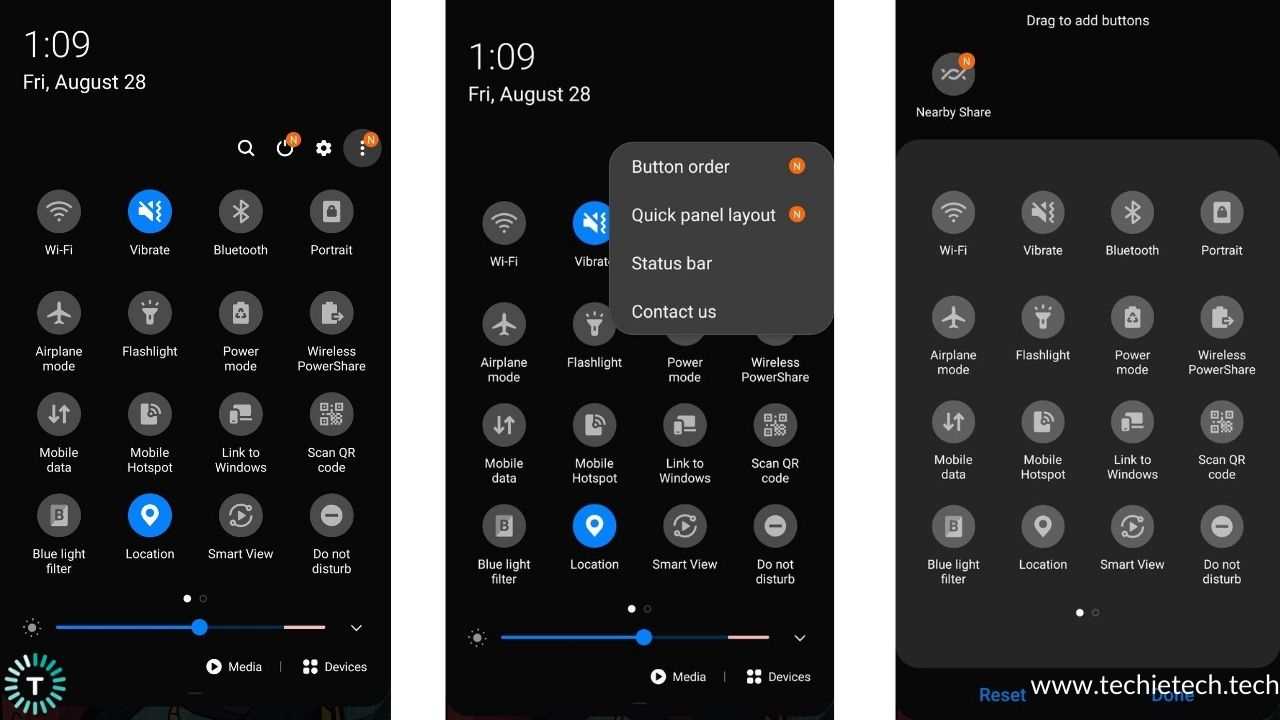
4. You can also make changes to the button grid and Status bar.
13. Hide Sensitive Files
Have you got some photos, apps, or documents that you don’t want anyone else to see? Samsung Galaxy smartphones have a supremely-useful feature called Secure Folder that adds another layer of privacy to your data. This folder protects all your personal and sensitive information from malicious attacks using defense-grade Samsung’s Knox security platform. You can add everything from photos and apps to business documents to the Secure Folder and then lock that folder with biometric, PIN, or pattern.
The Secure Folder comes pre-installed on Galaxy S10, S10+, S20 and S20+, S20 Ultra, Note 10+, and other Galaxy smartphones. For other devices, you can download the Secure Folder app from the Google Play store.
How to hide photos, apps, or other files on Galaxy S10/S10+?
Step 1: Set up Secure Folder
1. Go to Settings > Biometrics and security > Secure Folder.
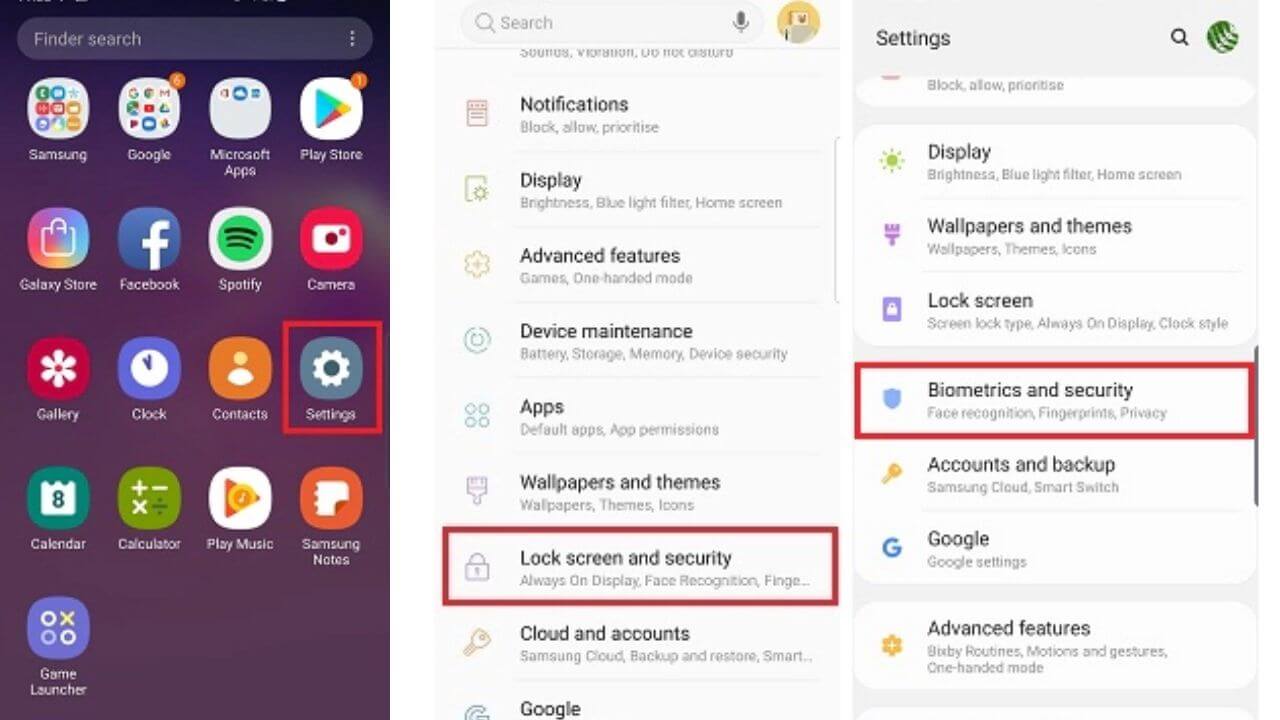
2. Sign in or create a Samsung account.
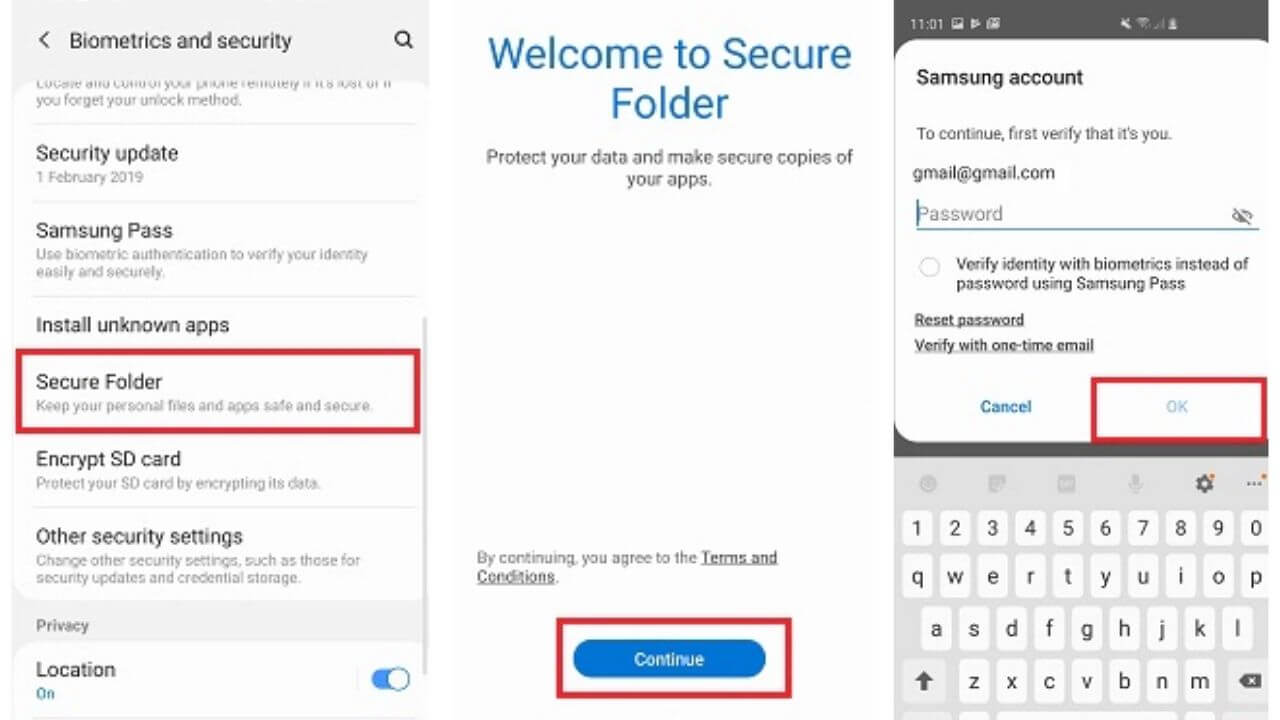
3. Select a lock type and tap Next.
4. Enter and confirm the lock method.
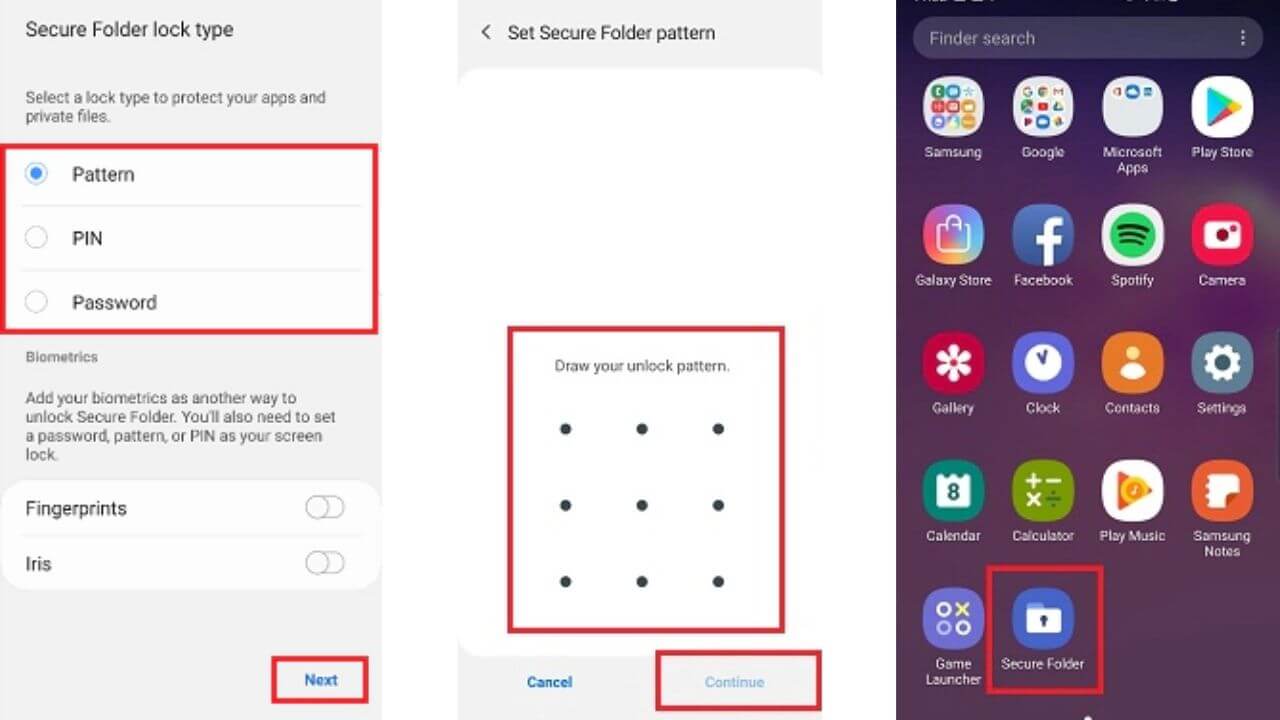
5. You’ll now have a shortcut to the Secure Folder on your Home and Apps screen
Step 2: Hide photos, apps, or other files using Secure Folder on Samsung Galaxy S10/S10+
1. Launch the Secure Folder
2. Tap the Add Files option, and you’ll see options like images, video, audio, documents, and my files. In case you want to hide apps, select the Add Apps adjacent to the Add Files option.
3. Transfer your photos/apps/files to the Secure Folder.
When you want to access the hidden photos, apps, or other files, head to the Secure Folder, enter your password, and you’ll be able to see all the hidden files.
You can even hide the Secure Folder.
The Secure Folder can appear on the home screen of your smartphone. If you want to hide the Secure Folder icon and its related menus, you must turn off
Show Secure Folder.
1. Go to Settings > Biometrics and security > Secure Folder
2. You’ll see an option to Show Secure Folder
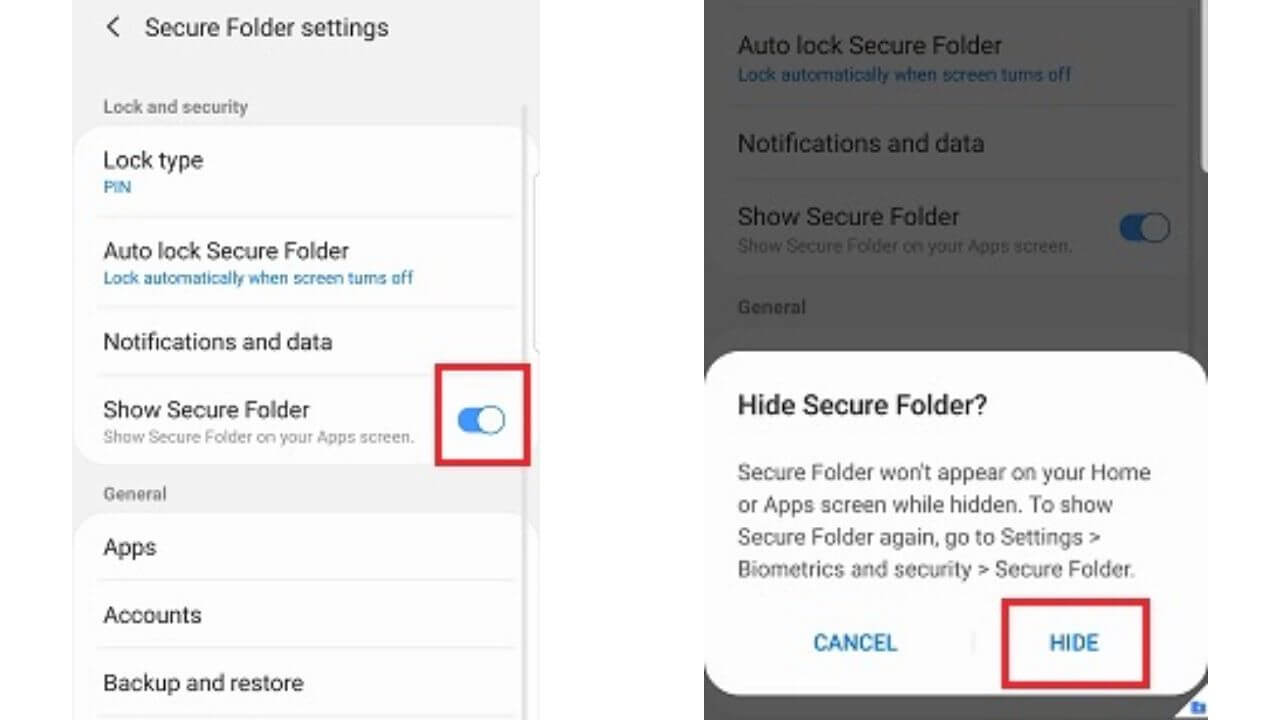
3. Toggle this feature OFF, and you’ll get a pop-up asking if you’re sure to hide it.
4. Select Hide
When the Secure Folder is hidden, you can access the apps within the folder by heading to Settings > Biometrics and security > Secure Folder and entering the PIN or password.
Please note that even if your Secure Folder is hidden, notifications may still be shown by some apps. In case you don’t want any of them, you must disable notifications for those apps individually by heading to system settings.
This is one of the ways to hide apps on your S10 phone, make sure to read our detailed guide on how to hide apps on any Samsung Galaxy smartphone
14. Use Screen Edge or turn it off
Galaxy S10 and S10+ features an edge panel that contains shortcuts for your most frequently used apps. You can quickly access those apps without navigating to the home screen or apps screen. You can customize the edge panel by adding or deleting the apps. Go to
Settings > Display > Edge Screen > Edge Panel. Now, you can select the apps, contacts, or other information that you want to show up on the screen edge.
Another way to use your S10’s screen edges is to light them up whenever you get any notifications or phone calls. To do this, go to Settings > Display > Edge Screen > Edge Lighting. You can also change the style of the edge lighting and select the apps for which you want to light up the screen edges. It’s a great feature for all the users who usually keep their phones on silent mode. It gives a nice visual cue so that you don’t miss any notifications.
How to turn off Edge Screen on Galaxy S10/S10+?
If you don’t want to use the edge panel, you can simply turn it off by heading to Settings > Display > Edge screen and toggle OFF Edge panels.
15. Turn On Google Auto-fill
Have you recently switched or formatted your Galaxy S10/S10+ and tired of always typing out the username and password to log in to your apps or different websites? You can easily cut through the chase and save your time with the Google auto-fill feature on S10/S10+.
If you use Google Chrome to save your login details, you can set your S10/S10+ to automatically fill the login forms using the information from that Google account.
It’s worth mentioning that you must have set up your phone with that Google account/ Gmail.
How to turn On Google auto-fill feature on Galaxy S10 and S10+?
- Go to Settings > General Management
- Tap Language and Input
- Tap Autofill service
- Select Google
16. Extend Battery Life
We all know that Galaxy S10+, as well as S10, have got impressive battery life. You’ll be super-happy to know that there’s a way to extend the battery life on your S10/S10+. You can use the Power saving mode to save yourself from a situation where you want to make an urgent call, and your phone’s battery is low, plus there’s no option to charge your phone.
How to extend the battery life of the Galaxy S10/S10+?
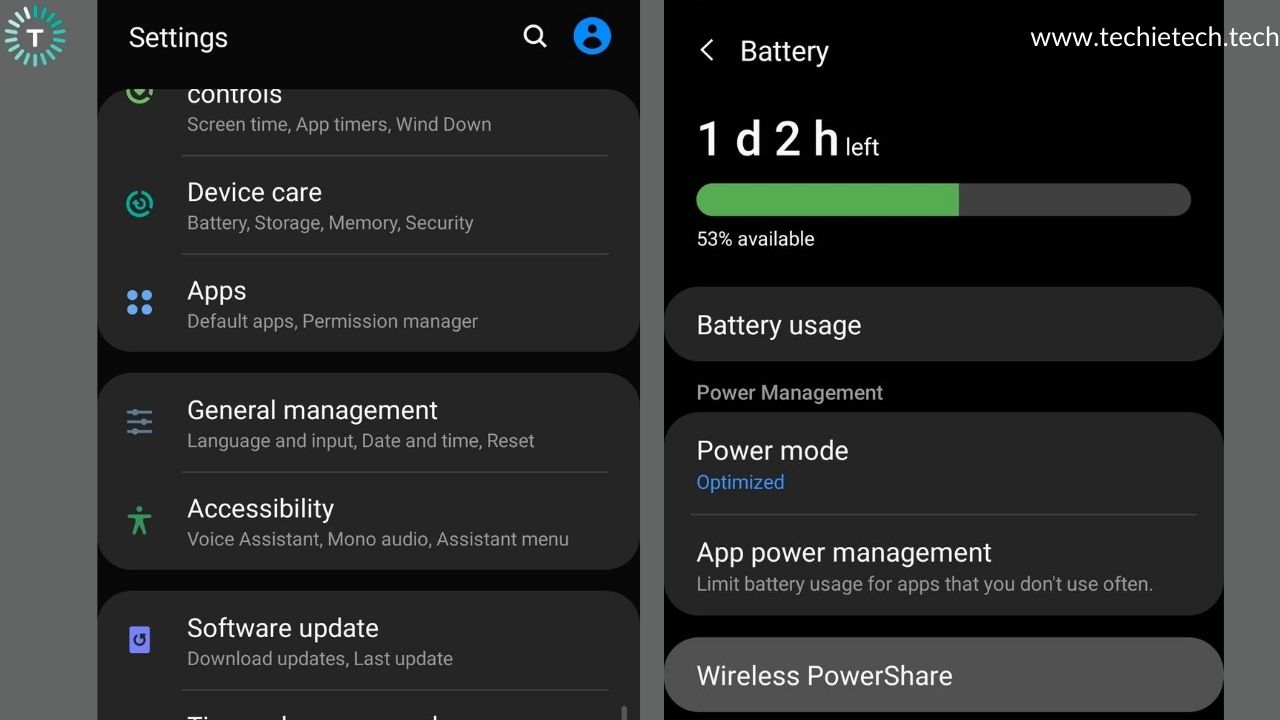
- Head to Settings
- Tap Device Care > Battery
- Select Power Mode
You can choose from the following modes:
- The Optimized power-saving mode will help your smartphone to find the ideal balance between performance and available battery life.
- The Medium power-saving mode will slightly limit the speed of your processor, turn off Always-on Display, and restrict the background data to extend the battery life and allow you to use your phone a bit longer.
- The Maximum power-saving mode is a savior in those horrible situations when your phone’s battery is almost dying and you don’t have access to a charger. This mode will restrict many functions, but you’ll still be able to make calls, send texts, and use certain apps. Though you might not be able to use everything on your phone, you can easily survive morning to night without charging your phone.
- The Adaptive power-saving mode will automatically save battery life based on your usage patterns.
17. Hide Punch-hole Camera
Galaxy S10 series features Infinity-O display, which offers an immersive viewing experience with its true edge-to-edge screen. However, the punch-hole camera cutout may not please everyone, especially when you’re using an app with a white background. If you don’t like this, there are two options to hide the front camera on S10/S10+.
How to hide the front-camera on Galaxy S10/S10+?
Option 1: Hide the Punch-hole camera on S10/S10+ with a Black bar on the top
- Head to Settings > Display
- Tap Full-Screen Apps
- Turn ON the slider for the Hide front camera option.
This will add a thick top bezel on the screen. Though it doesn’t look very elegant, it’s a handy tool that allows you to watch full-screen videos.
Option 2: Hide the Punch-hole camera on S10/S10+ with a cool looking wallpaper
If you don’t want to sacrifice the Infinity display, you can use a cleverly designed wallpaper to hide the front-facing camera lens on your Galaxy S10 as well as S10+. You’ll find many creative wallpapers for S10 as well as S10+ that strategically place the front-camera within the designs. From famous robots to cute Minions, you can choose your favorite wallpaper to hide the front camera on your smartphone. You can search the Galaxy Store or search
Reddit, where community members keep on uploading super-cool wallpapers regularly.
18. Charge other devices with your S10
Your Galaxy S10, as well as S10+, supports reverse wireless charging, called Wireless PowerShare, by Samsung. Therefore, if you want to lend some battery life to your friend’s phone, or even power-up your other Qi-enabled devices, like a Samsung smartwatch or Galaxy Buds, you can do that with your Galaxy S10 series smartphone. All you have to do is place the two devices together back-to-back. Wireless PowerShare works with all the Qi-compatible devices. This feature might not work with some cases and accessories; therefore, make sure to remove them before charging.
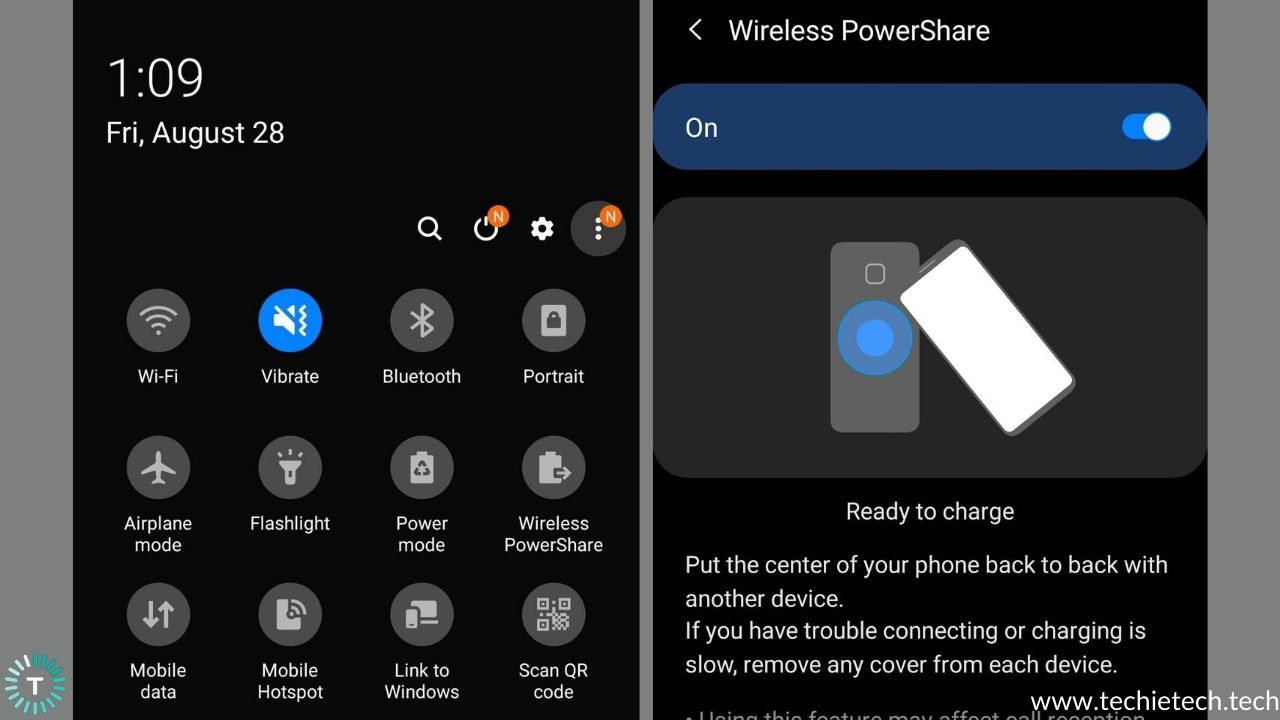
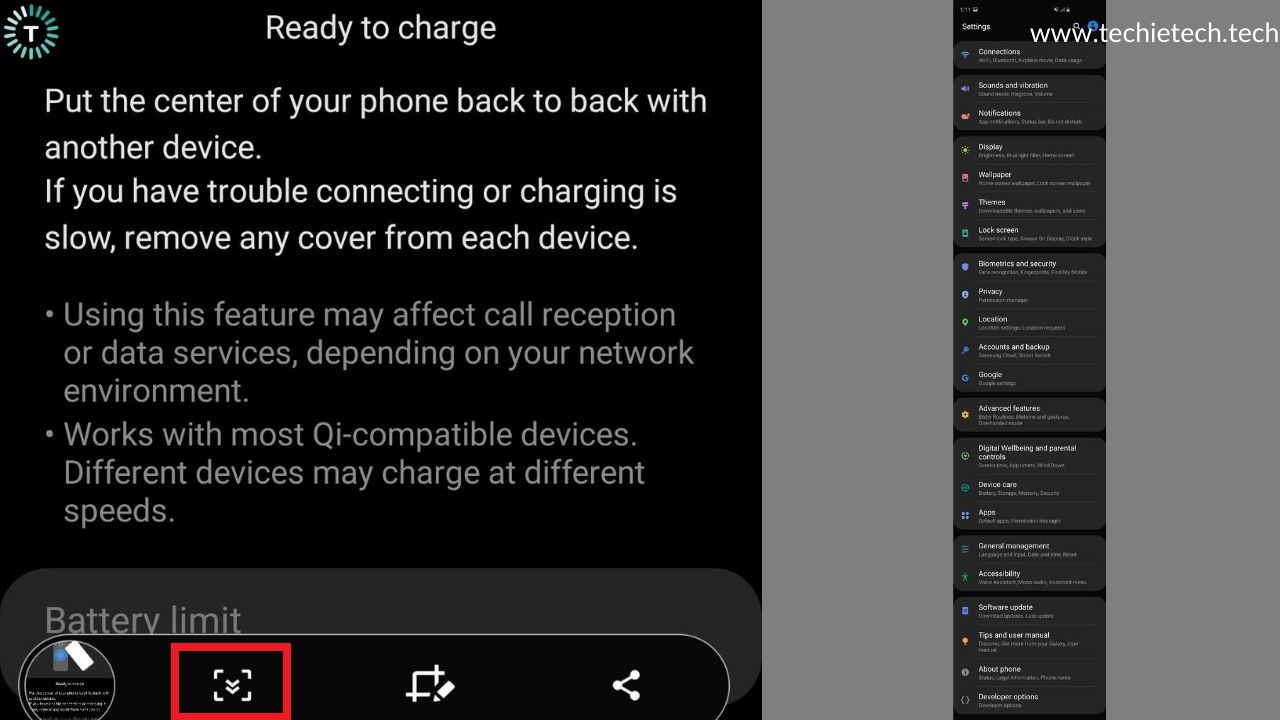
How to use Wireless PowerShare on Galaxy S10/S10+?
Firstly, make sure that your S10 or S10+ phone is charged to at least 30 percent. Now, just swipe down the notifications shade and tap the Wireless PowerShare icon in the Quick Settings. You’ll get a pop-up saying, “ready to charge.” Now, place your Galaxy S10/S10+ and a Qi-compatible device back to back. When you’re done, just separate the two devices. The PowerShare feature will turn OFF automatically after 30 seconds when no other device is detected.
If you want to power-up your Galaxy S10/S10+ while you’re charging another device via PowerShare, simply connect it to an official charger.
19. Take Screenshots with Palm Gestures
The standard way to take a screenshot on the Galaxy smartphones is to press the Power and Volume Down buttons at the same time. Now, this doesn’t mean that it’s the only way to grab a screenshot. As Samsung always tries to level up the game with gestures, there’s a palm swipe option to take a screenshot on the Galaxy S10 series.
How to take screenshots with palm gestures on Galaxy S10/S10+?
- Head to Settings > Advanced Features
- Tap Motions and Gestures
- Turn ON Palm swipe to Capture.
20. Take Scrolling Screenshots
What if you want to capture a screenshot of a full web page or an email that’s longer than the screen of your S10/S10+? Taking multiple screenshots will surely be a hard nut to crack. But, you don’t need to do that because you can take a long, scrolling screenshot on your Galaxy S10 smartphones.
How to take scrolling screenshots on S10/s10+?
To do this, first, take a normal screenshot. When you see the menu at the bottom of the screen, tap the leftmost icon (two down arrows). This will scroll the rest of the page and create a full, scrollable screenshot for you.
In case you don’t see the editing menu at the bottom of the screen, head to Settings > Advanced features > Motions and Gestures, and turn ON Smart capture.
21. Hide Notifications for some apps
Although notifications are a great way to stay up to date on your smartphone and receive alerts from various apps, the constant buzzing of notifications may be annoying in some situations. If you want to hide the notifications for some apps on your S10/S10+, you need not put it to Do not Disturb mode. Let’s see a better way to do this.
How to hide notifications for some apps on Galaxy S10/S10+?
- Go to Settings > Notifications.
- In the Recently sent section, tap “See All.”
- By default, you’ll see a list of apps along with notification switches for the most recent apps. If you want to see all the apps, tap “Most Recent” and select “All.”
- Turn the slider OFF for each app, for which you want to hide the notifications.
22. Change default apps
You can easily change the default apps on your Android smartphones. If you’ve got multiple apps on your phone that will do the same thing, Android lets you decide which app you want to set as default. For example, if you want to browse the internet, the default browser app for your Galaxy smartphone is Samsung Internet, but you want to use Google Chrome instead, you can easily do that. The same goes for other default apps like Calling, Messaging, and others.
How to change default apps in Galaxy S10?
- Go to Settings > Apps
- Tap the Menu option (three vertical dots on the top-right corner)
- Select Default apps
- Here, you can change the default Browser app, Calling, Messaging, and other apps for your smartphone.
23. Enable RAW capture
We all know that both S10 and S10+ phones are packed with powerful tri-camera setup on their rear panels. But did you know that you can capture RAW photos as well on your Galaxy S10 series? This is a super-cool feature for photographers and advanced users who know how to process and edit RAW images.
These photos have better maximum possible details that you can capture from a smartphone camera. Also, the RAW images are up to 5-7 times higher in size than the regular photos. It’s worth mentioning that you can shoot RAW/DNG photos on Galaxy S10 or S10+ by using only the main shooter of your rear camera.
If you want to capture RAW photos for some specific shots or landscapes, you just need to tweak a few settings in the camera app.
How to capture RAW images on S10/S10+?
- Launch the Camera app
- Go to camera settings
- Tap Save Options and turn the toggle ON for RAW Copies (PRO)
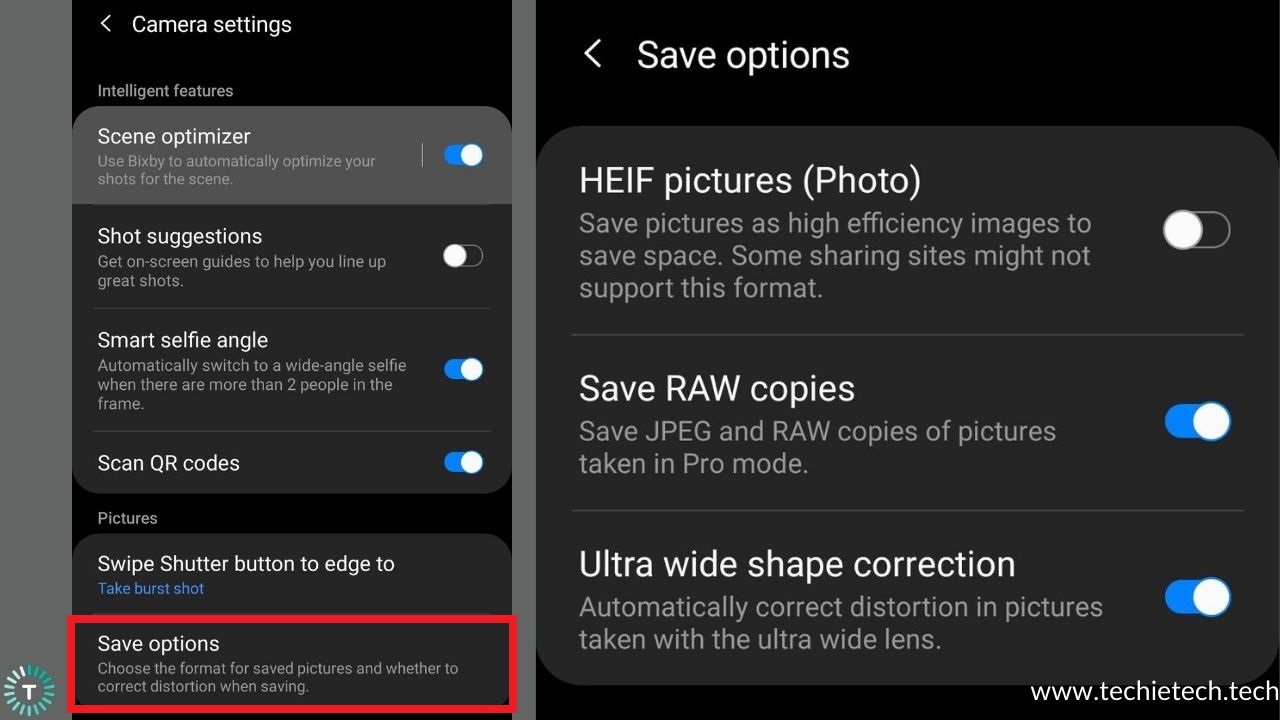
After you’ve enabled this option, take photos in the Pro mode to save a RAW copy of the captured image.
24. Turn ON Video Enhancer
If you love watching videos on your smartphone, you’re gonna love this feature.
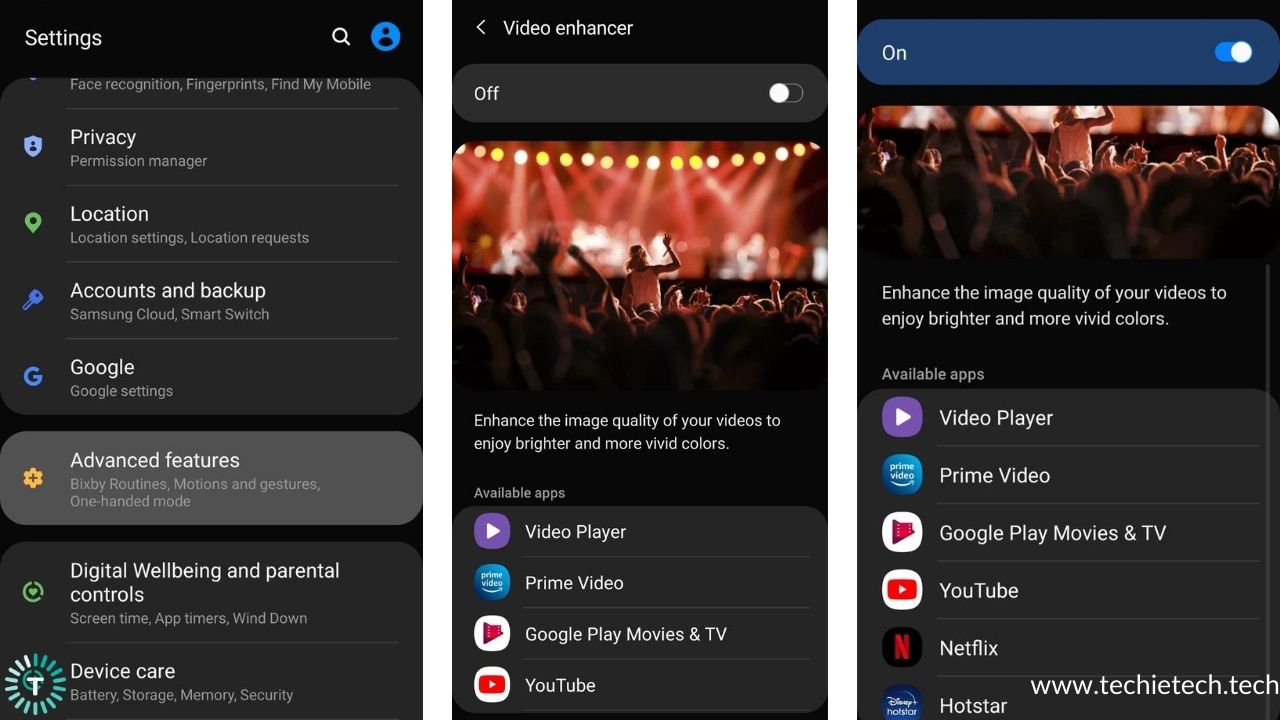
Galaxy S10 and S10+ comes with video enhancer settings that aim to boost the image quality of videos so that you can enjoy brighter and more vivid colors.
It boosts the screen color and lightens some of the darker areas of a scene to give you better viewing experience. This feature works for a wide range of apps, including NetFlix, YouTube, Play Movies, and Prime Video.
How to turn ON the Video enhancer on Galaxy S10/S10+?
- Go to Settings > Advanced features
- Toggle ON for Video enhancer
Are you facing Wi-Fi issues on your Galaxy S10 phones? Check out our 15 ways to get rid of Wi-Fi problems on any Galaxy smartphone.
25. Shoot in HDR10+
If you love shooting videos on your Galaxy S10, make sure to take advantage of HDR10+ support. It is limiting when it comes to frame rates and camera lenses but gives a wider dynamic range and enhances the colors and contrast of the media. As the display of your Galaxy S10+, as well as S10, is HDR10+ compatible, you’ll see the difference right away. This is because HDR10+ works with dynamic metadata, which carries scene-by-scene instructions to adjust color, brightness, and contrast to display the content as accurately as possible.
How to enable HDR10+ video recording in S10/ S10+?
- Go to the Video mode.
- Open Camera settings > Advanced recording functions
- Toggle ON HDR10+
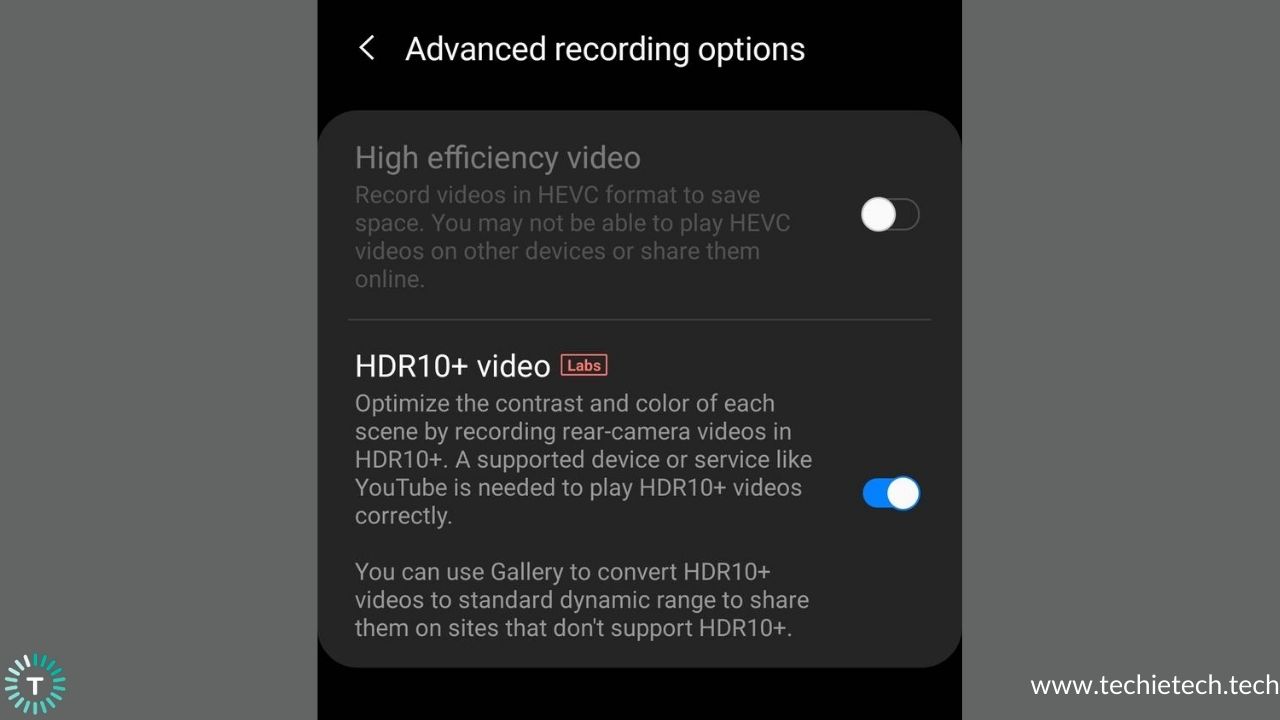
Make sure to watch these videos on an HDR10+ compatible display; otherwise, they’ll look like regular low-quality videos.
We hope you enjoyed these Galaxy S10 and S10+ tips and tricks. We’re sure that they will help you customize your experience. Do share your favorite trick with us in the comments section below.